background image

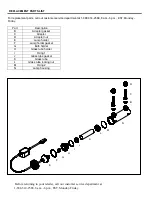
Before returning to your retailer, call our customer service department at  
1-888-314-2588, 8 a.m.-6 p.m., EST, Monday-Friday.   
 

PREPARATION 

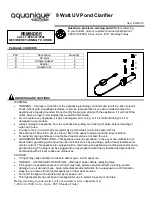
Before beginning assembly of product, make sure all parts are present. Compare parts with package 
contents list and diagram above. If any part is missing or damaged, do not attempt to assemble, install or 
operate the product. Contact customer service for replacement parts. 


Estimated Assembly Time: 30 minutes  


No Tools Required for Assembly 
 

IMPORTANT NOTES 


This product will not operate unless it is fully assembled with the lamp base screwed completely into 
the housing.   


UV rays are harmful to your eyes and skin.  The indicator portal will remove the harmful effects of the 
UV light but still allow you to see the bulb operating. 


Do not attempt to operate this product unless the lamp is completely assembled within the light 
housing. 


This product conforms to the Code of Federal Regulations (CFR) requirements including, Title 21, 
Chapter 1, Subchapter J, Radiological Health. 


ASSEMBLY INSTRUCTIONS 


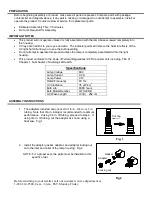
1.  The adapters included can connect to 1/2-in., 3/4-in. or 1-in. 

tubing.  Note that 3/4-in. tubing is recommended for optimum 
performance.  If using 1/2 in. ID tubing, proceed to step 2.  If 
using 3/4 in. ID tubing, cut the adapter as shown using a 
hacksaw.  Fig. 1 


Fig. 1 


2.  Install the adapter gasket, adapter, and adapter locking nut  

onto the inlet and outlet of the lamp housing.  Fig.2 


  NOTE: For a proper seal, the parts must be installed in this 
              specific order. 


Fig.2 

Specifications 

Lamp Voltage 

60V 

Lamp Current 

0.2A 

Lamp Power 

9 W 

Rated Frequency 

60 Hz 

UV Irradiance 

35 µW/cm

2


Bulb Life 

8000 hours 

Bulb Model Number 

QFUV9RB 

UV Wave Length 

UV(C) · 254 nm 


Gasket 

Adapter 

Locking nut 


Cut ring 

Содержание QPUV9

Страница 1: ...G INSTRUCTIONS This appliance must be grounded In the event of a malfunction or break down grounding will reduce the risk of electric shock by providing a path of least resistance for electric current...

Страница 2: ...operating Do not attempt to operate this product unless the lamp is completely assembled within the light housing This product conforms to the Code of Federal Regulations CFR requirements including T...

Страница 3: ...feature for your pond Fig 4 NOTE The outlet is marked OUT on the lamp housing Fig 4 5 Plug the QPUV9 into a properly grounded electrical outlet Fig 5 Fig 5 6 Wait several seconds for the light to tur...

Страница 4: ...te the locking ring counterclockwise to remove the lamp holder Fig 8 Fig 8 3 Carefully remove the old bulb by firmly pulling on the base Carefully install the new bulb Fig 9 Fig 9 4 Reinstall the lamp...

Страница 5: ...e QPUV9 Failure to do so will result in water leakage which can cause damage to the light unit 1 Disconnect the UV light from the outlet Be sure to allow sufficient time for the light to cool before d...

Страница 6: ...placement parts call our customer service department at 1 888 314 2588 8 a m 6 p m EST Monday Friday Part Description B Adapter gasket C Adapter D Adapter nut E Lamp holder F Lamp holder gasket G Bulb...

Страница 7: ...iated with the shipping handling installation or removal of products or parts subject to this warranty For products damaged in transit a claim should be filed with the carrier Disclaimer Any oral stat...

Отзывы: