background image

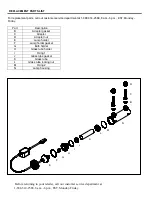
Before returning to your retailer, call our customer service department at  
1-888-314-2588, 8 a.m.-6 p.m., EST, Monday-Friday.   
 

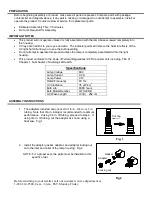
3.  Connect tubing from the outlet of your pump to the inlet of the 

QPUV9.  Fig. 3 


NOTE: The inlet is marked “IN” on the lamp housing. 


Fig. 3 


4.  Connect tubing to the outlet of the QPUV9.  The other end 

can be connected to a spitter, waterfall, or any other water 
feature for your pond.  Fig. 4 


NOTE: The outlet is marked “OUT” on the lamp housing. 


Fig. 4 


5.  Plug the QPUV9 into a properly grounded electrical outlet.  

Fig. 5 


Fig. 5 

6.  Wait several seconds for the light to turn on then check the 

indicator light to verify if the light is functioning correctly.   

Fig. 6 


NOTE: This clarifier has a safety feature that only allows the   

UV light to turn on if the lamp holder is fully seated 
into the lamp housing.  


Fig. 6


Pump  
(not included) 

Tubing 
(not included) 

QPUV9 

QPUV9 

Connect this 
end to a 
water 
feature. 

Submersible 

pump in water 

GFCI 

Indicator light 

Содержание QPUV9

Страница 1: ...G INSTRUCTIONS This appliance must be grounded In the event of a malfunction or break down grounding will reduce the risk of electric shock by providing a path of least resistance for electric current...

Страница 2: ...operating Do not attempt to operate this product unless the lamp is completely assembled within the light housing This product conforms to the Code of Federal Regulations CFR requirements including T...

Страница 3: ...feature for your pond Fig 4 NOTE The outlet is marked OUT on the lamp housing Fig 4 5 Plug the QPUV9 into a properly grounded electrical outlet Fig 5 Fig 5 6 Wait several seconds for the light to tur...

Страница 4: ...te the locking ring counterclockwise to remove the lamp holder Fig 8 Fig 8 3 Carefully remove the old bulb by firmly pulling on the base Carefully install the new bulb Fig 9 Fig 9 4 Reinstall the lamp...

Страница 5: ...e QPUV9 Failure to do so will result in water leakage which can cause damage to the light unit 1 Disconnect the UV light from the outlet Be sure to allow sufficient time for the light to cool before d...

Страница 6: ...placement parts call our customer service department at 1 888 314 2588 8 a m 6 p m EST Monday Friday Part Description B Adapter gasket C Adapter D Adapter nut E Lamp holder F Lamp holder gasket G Bulb...

Страница 7: ...iated with the shipping handling installation or removal of products or parts subject to this warranty For products damaged in transit a claim should be filed with the carrier Disclaimer Any oral stat...

Отзывы: