background image


55 

AQUAMAX CONTINUOUS FLOW GAS WATER HEATER 

WARRANTY 

 AUSTRALIA ONLY 


CONTINUOUS FLOW GAS WATER HEATER CF20 SERIES 

1.


THE AQUAMAX WARRANTY – GENERAL 

1.1


This warranty is given by Aquamax Australia Pty Limited ABN 37 138 189 689 of 463-467 Warrigal Road Moorabbin Victoria, the 
supplier of Aquamax continuous flow gas water heaters, manufactured by Paloma Co., Ltd., a world leader in water heater technology 

and manufacture. 

1.2


Aquamax offer a trained and qualified national service network who  will repair or replace components at the address of the water 
heater subject to the terms of the Aquamax warranty. Aquamax Service, in addition can provide preventative maintenance and advice 
on the operation of your water heater. The Aquamax Service contact number is available 7 days a week on 1800 676 000 from 9am to 
5pm, excluding public holidays (hours subject to change without notification). 

1.3


For  details  about  this  warranty,  you  can  contact  us  on  1800 676 000  or  by  email  at 

[email protected]

  (not  for  service 

bookings). 

1.4


The terms of this warranty are set out in section 2 and apply to water heaters manufactured after 1

st

 January 2012. 

1.5


If a subsequent version of this warranty is published, the terms of that warranty will apply to water heaters manufactured after the date 
specified in the subsequent version. 


2.


TERMS OF THE AQUAMAX WARRANTY AND EXCLUSIONS TO IT 

2.1


The decision of whether to repair or replace a faulty component is at Aquamax’s sole discretion. 

2.2


If you require a call out and we find that the fault is not covered by the Aquamax warranty, you are responsible for our standard call 
out charge. If you wish to have the relevant component repaired or replaced by Aquamax, that service will be at your cost. 

2.3


Where a failed component or cylinder is replaced under this warranty, the balance of the original warranty period will remain effective. 

The replacement does not carry a new Aquamax warranty. 

2.4


Where the water heater is installed outside the boundaries of a metropolitan area as defined by Aquamax or further than 25 km from 
either  a  regional  Aquamax  branch  office  or  an  Accredited  Aquamax  Service  Agent's  office,  the  cost  of  transport,  insurance  and 
travelling between the nearest branch office or Aquamax Accredited Service Agent’s office and the installed site shall be the owner’s 

responsibility. 

2.5


Where the water heater is installed in a position that does not allow safe or ready access, the cost of that access, including the cost of 
additional materials handling and/or safety equipment, shall be the owner’s responsibility. In other words, the cost of dismantling or 
removing cupboards, doors or walls and the cost of any special equipment to bring the water heater to floor or ground level or to a 

serviceable position is not covered by this warranty. 

2.6


This  warranty  only  applies  to  the  original  and  genuine  Aquamax  water  heater  in  its  original  installed  location  and  any  genuine 
Aquamax replacement parts. 

2.7


The Aquamax warranty does not cover faults that are a result of: 
a)


Accidental damage to the water heater or any component (for example: (i) Acts of God such as floods, storms, fires, lightning 
strikes and the like; and (ii) third party acts or omissions). 

b)


Misuse or abnormal use of the water heater. 

c)


Installation  not  in  accordance  with  the  Owner’s  Guide  and  Installation  Instructions  or  with  relevant  statutory  and  local 
requirements in the State or Territory in which the water heater is installed. 

d)


Connection at any time to a water supply that does not comply with the water supply guidelines as outlined in the Owner’s Guide 
and Installation Instructions. 

e)


Repairs,  attempts  to  repair  or  modifications  to  the  water  heater  by  a  person  other  than  Aquamax  Service  or  a  Aquamax 
Accredited Service Agent. 

f)


Faulty plumbing or faulty gas or power supply. 

g)


Failure to maintain the water heater in accordance with the Owner's Guide and Installation Instructions. 

h)


Transport damage. 

i)


Fair wear and tear from adverse conditions (for example, corrosion). 

j)


Cosmetic defects. 

k)


Ice formation in the waterways of a water heater: where the electricity supply has been switched off or has failed and the water 
heater has not been drained in accordance with the instructions; or due to an ambient temperature below -20°C (including wind 
chill factor). 

2.8


Subject to any statutory provisions to the contrary, this warranty excludes any and all claims for damage to furniture, carpet, walls, 

foundations or any other consequential loss either directly or indirectly due to leakage from the water heater, or due to leakage from 
fittings and/ or pipe work of metal, plastic or other materials caused by water temperature, workmanship or other modes of failure. 

2.9


If  the  water  heater  is  not  sized  to  supply  the  hot  water  demand  in  accordance  with  the  guidelines  in  the  Aquamax  water  heater 
literature, any resultant fault will not be covered by the Aquamax warranty. 


AQUAMAX AUSTRALIA PTY LIMITED

, A.B.N. 37 138 189 689

www.aquamax.com.au


For Service Telephone 1800 676 000 AUSTRALIA or refer local Yellow Pages 

Содержание CF20 series

Страница 1: ...is water heater must be installed and serviced by a qualified person Please leave this guide with the householder Owner s Guide and Installation Instructions Continuous Flow Gas Water Heater CF20 seri...

Страница 2: ...d or Rheem Australia Pty Ltd Trademark of Aquamax Australia Pty Limited or Rheem Australia Pty Ltd Note Every care has been taken to ensure accuracy in preparation of this publication No liability can...

Страница 3: ...the installer but may be of interest About Your Water Heater 4 Temperature Control 11 Water Supplies 22 Save A Service Call 23 Installation Water Heater 26 Connections Plumbing 37 Connections Electric...

Страница 4: ...up to 75 C with an Aquamax pumped direct solar system during periods of low solar energy gain will boost the water temperature automatically to its preset outlet temperature setting WATER HEATER OPERA...

Страница 5: ...heater has been installed to an existing water heater installation then all controllers must be disconnected and removed If this water heater is installed as part of a solar water heater system the sy...

Страница 6: ...mbustible materials near the water heater Flammable liquids such as petrol newspapers and similar articles must be kept well away from the water heater and the flue terminal Do not use aerosols stain...

Страница 7: ...ts Spray insecticide around the water heater if necessary to rid the area of insects Do not spray the surface or into the air inlet or flue terminal of the water heater Insects encroaching into or nes...

Страница 8: ...r Heater on page 9 TO TURN ON THE WATER HEATER Screw in the drain plugs at the cold water inlet and hot water outlet of the water heater if the water heater has been drained Open all of the hot taps i...

Страница 9: ...freezing then it is necessary to drain the water heater refer to Draining the Water Heater on page 9 Pipe work to and from the water heater must be adequately insulated to prevent freezing The water h...

Страница 10: ...e connections on both the solar storage tank and the in series gas booster VICTORIAN CUSTOMERS Notice to Victorian Customers from the Victorian Plumbing Industry Commission This water heater must be i...

Страница 11: ...ner of the controller Warning Temperature controllers must not be fitted to this water heater CF20 60 model if it is installed as an in series gas booster with a solar water heater because water at a...

Страница 12: ...ll controllers whether they are on or off when hot water is flowing regardless of which controller has priority display panel The current temperature setting is displayed on all controllers whether ho...

Страница 13: ...n to deactivate the controller on off light is off Press and hold the up button Press the on off button whilst the up button is pressed The sound for the controller is deactivated Repeat this procedur...

Страница 14: ...he water heater defaults to the preset outlet temperature setting This may be up to CF20 60 series 70 C CF20 50 series 48 C Refer to How Hot Should The Water Be on page 5 On a building fitted with a t...

Страница 15: ...roll the temperature setting up to a maximum 43 C if there is hot water flowing or 45 C if there is no hot water flowing From the 45 C setting the up button must be pressed once for each increase in t...

Страница 16: ...ority if a Bathroom controller is on Notes on the Kitchen controller The controller cannot be turned on whilst a hot tap is open The Kitchen controller must be on and have priority in order to adjust...

Страница 17: ...tment on page 15 The selected temperature setting will be displayed on all controllers 4 Open the hot tap The in use light will glow on all controllers 5 Close the hot tap The in use light will go out...

Страница 18: ...installed in the hot pipe to the bathroom or up to 60 C if a temperature limiting device is not installed CF20 50 series 48 C Notes on the Bathroom controllers The controller cannot be turned on whil...

Страница 19: ...Press the on off button The on off operating light and the priority light will both glow The previous Bathroom controller temperature setting will be displayed on the temperature display panel 3 Sele...

Страница 20: ...ill change the water volume setting by 10 litres Pressing the up button or down button continuously will scroll the water volume setting Fifteen seconds after the water volume has been selected the wa...

Страница 21: ...ller on page 13 The factory preset water volume is 180 litres If a hot tap is not opened for one hour after the new water volume has been set then the setting will be automatically cancelled The water...

Страница 22: ...ation should be sought from the supplier or it should be tested to ensure the water supply meets the requirements given in these guidelines for the Aquamax warranty to apply SATURATION INDEX The satur...

Страница 23: ...of the house Try lighting another gas appliance Has the gas line been purged of air after installation Refer to your plumber WATER IS TOO HOT OR NOT HOT ENOUGH Does the controller you are using have...

Страница 24: ...s permanent or clean the collector glass Ensure the glass on your solar collectors is free of dust salt spray or any other matter which may reduce the effectiveness of the solar collectors If the coll...

Страница 25: ...rror code appears Close the hot tap turn off the controller s and switch off the electrical supply to the water heater Check the gas isolation valve at the gas inlet to the water heater is fully open...

Страница 26: ...elating to the function and operation of the solar water heater refer to the Owner s Guide and Installation Instructions supplied with the solar water heater Note The CF20 50 model water heaters are m...

Страница 27: ...least 300 mm between the top of the flue terminal and the eaves At least 300 mm between the flue terminal and the edge of any opening into the building such as an openable door or window measured hor...

Страница 28: ...the water heater must be insulated with suitable thickness insulation if freezing conditions are likely to occur The insulation must be fitted to the underside of the water heater and be weatherproof...

Страница 29: ...et and the cold water inlet of no less than 15 Refer to the specifications of the temperature limiting device Where a temperature limiting device is installed adjacent to the water heater the cold wat...

Страница 30: ...ure limiting device prior to an open circuit direct system Due to the higher water temperatures generated under certain conditions in the solar collectors of an open circuit direct solar water heater...

Страница 31: ...ed water from a temperature limiting device cannot be circulated Where a circulated hot water flow and return system is required in a building a temperature limiting device can only be installed on a...

Страница 32: ...water heater and the pipe work between the solar storage tank if one is installed and the in series gas booster must be insulated in accordance with the requirements of AS NZS 3500 4 The insulation mu...

Страница 33: ...lers Only CF20 50 series CF20 60 series No Controllers CF20 50 series Notes Temperature Limiting Devices refer to Hot Water Delivery on page 29 Factory preset outlet temperature setting is CF20 60 ser...

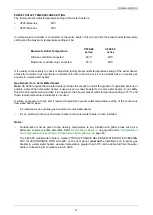
Страница 34: ...ural 70 C Recovery 25 C rise litres min 20 CF20 LP 50 propane 48 C Mass Empty kg 18 CF20 LP 60 propane 70 C Gas Details Hourly Gas Consumption MJ Min Gas Pressure kPa Test Point Gas Pressure kPa Max G...

Страница 35: ...INSTALLATION WATER HEATER 35 DIMENSIONS CONTROLLERS Kitchen Controller Bathroom Controller...

Страница 36: ...INSTALLATION WATER HEATER 36 TYPICAL INSTALLATION OUTDOOR LOCATION TYPICAL INSTALLATION ELECTRONIC INSTANTANEOUS GAS WATER HEATER...

Страница 37: ...29 and to Mains Water Supply on page 28 A disconnection union must always be provided at the cold water inlet and hot water outlet on the water heater to allow for disconnection of the water heater In...

Страница 38: ...d up to the connections on both the solar storage tank and the in series gas booster A full flow isolation valve must be installed on the water line to the in series gas booster GAS INLET The gas conn...

Страница 39: ...ing water heater installation then all controllers must be disconnected and removed The water heater is supplied with a 1 8 metre lead and plug and requires a weatherproof 240 V 50 Hz general purpose...

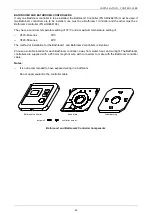
Страница 40: ...m1 controller is installed An additional Kitchen controller cable or Bathroom controller cable can be used if an extension of the cable length is required It will be necessary to cut an opposite end o...

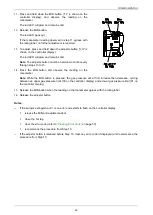
Страница 41: ...er 3 Remove the base plate from the controller 4 Draw the cable through the central hole in the base plate 5 Fix the base plate to the wall using suitable screws and wall anchors Ensure the projection...

Страница 42: ...g in the thin section in the underside of the controller to accommodate the cable as shown in the diagram prior to Step 6 Kitchen Controller Installation Exposed Cable controller cable screws terminal...

Страница 43: ...e setting of CF20 60 series 50 C CF20 50 series 48 C The method of installation for the Bathroom1 and Bathroom2 controllers is identical Choose a suitable location for each Bathroom controller away fr...

Страница 44: ...al hole in the base plate 7 Fix the base plate to the wall using suitable screws and wall anchors Ensure the projections in the base plate are pointing upwards 8 Plug the controller wire into the Bath...

Страница 45: ...e connections are non polarised Up to three cable lugs one from each type of controller can be connected to each remote controller terminal Warning Do not confuse the remote controller terminals with...

Страница 46: ...s not adjustable To complete the installation it is necessary to check the gas supply pressure at the inlet to the water heater refer to Gas Inlet Pressure on page 46 the minimum test point pressure a...

Страница 47: ...off button 7 Open a hot tap fully and ensure the burners are fully ignited It may be necessary to open a second tap 8 Turn on all other gas burning appliances in the house which are on the same gas s...

Страница 48: ...um test point gas pressure Refer to the rating label on the water heater for the minimum test point gas pressure 1 Close any hot taps and ensure the burners are not operating 2 Turn off the controller...

Страница 49: ...and observe the reading on the manometer Note While the MIN button is pressed the gas pressure will at first increase then decrease cycling between an upper gas pressure limit 39 on the controller di...

Страница 50: ...ressing the on off button Switch off the electrical supply at the power outlet to the water heater Disconnect the controller cable from the remote terminal screws Reconnect the cables from the control...

Страница 51: ...d as an in series booster for a solar water heater it can satisfy this AS 3498 requirement provided it is energised the booster preset outlet temperature setting is 70 C and that a remote temperature...

Страница 52: ...he jacket 3 Gently disengage the front panel and pull forward to remove from the water heater 4 Switch on the electrical supply at the power outlet to the water heater 5 Switch DIP SWITCHES 3 and 4 to...

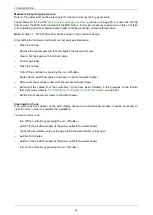
Страница 53: ...et to the water heater Close the cold water isolation valve at the inlet to the water heater Drain the water heater if there is a risk of freezing conditions occurring Refer to Draining The Water Heat...

Страница 54: ...y the shower outlet Unscrew the two drain plugs one each at the cold water inlet and hot water outlet on the underside of the water heater Water will drain from the water heater When water stops flowi...

Страница 55: ...r ready access the cost of that access including the cost of additional materials handling and or safety equipment shall be the owner s responsibility In other words the cost of dismantling or removin...

Страница 56: ...or rating labels b Is not installed in Australia 5 HOW TO MAKE A CLAIM UNDER THIS WARRANTY 5 1 If you wish to make a claim under this warranty you need to a Contact Aquamax on 1800 676 000 and provid...

Отзывы: