background image

Installation Manual 

:: 

Aqua 9+ Natural Ionic Calcium Water System


9


Copyright ©  Aqua 9+ Beverage


FEED WATER INSTALLATION


1. 

The feed water assembly consist of a 1/2” Metal adapter. Locate this part in the instal-


lation kit. (Note: Teflon tape should be used to prevent leaks)


2.  Locate cold water angle shut off valve underneath the sink, usually on right side and turn it 

off. Open cold water faucet to release the pressure. On single handle faucets, the hot water 
may need to be turned off to prevent any hot water from crossing over. If water  continues  
to come out of the faucet with angle valve turned off, the house main water will have to be 
turned off.


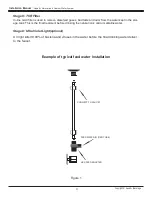
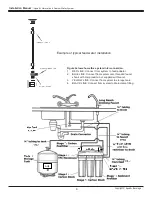
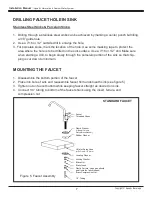
3. Disconnect  the cold-water rinse tube and install the hex feed connector.(flex line) Loosen 

nut and separate cold riser tube from faucet shank. Gently bend riser tube so that the hex 
feed adapter fits on to faucet shank. Replace the existing at washer (if needed) with new 
washer provided in installation kit onto cold riser tube. Re-install riser tube onto hex feed 
adapter and tighten. (Solid copper riser tube) same procedure as ex tubing except you 
must cut out a piece of the riser tube about 3/4” to 1” so the hex feed adapter can fit be- 
tween faucet and riser tube. Example drawings are provided.


SYSTEM START UP


1.  Slowly open the feed adapter valve to allow raw water to enter the system.


2.  Move ball valve lever on storage tank to open position.


3. Tighten all nuts and connections which may have loosened in transit. Check all connec- 

tions for leaks. Recheck several times during the first 48 hours of installation for any leaks, 
tighten or re-tape as required.


4.  Allow the system to run between 3 to 8 hours to fill the storage  tank.


5.  Turn on the faucet on top of the sink and let the water run for a few minutes clearing all new 

tubes and filters. It is recommended that you fill the tank overnight and drain it to complete- 
ly flush the system during initial start up. To do this raise the faucet handle to the up posi- 
tion where it will remain open. When the water stops running close the faucet by lowering 
the handle to the normal position.


6.  The system will start automatically filling the tank again.


7.  The system is ready to provide you with fresh clean water.


Содержание AQ9-200GPD

Страница 1: ...INSTALLATION MANUAL Natural Ionic Calcium Alkaline Water System AQ9 50GPD AQ9 200GPD AQ9 300GPD MADE IN THE U S A www aquanineplus com...

Страница 2: ...terials and rust It will also remove the unpleasant orders of chlorine that was used as a disinfectant and heavy chlorine by products such as chloramines THM and TCE Stage 3 Post Carbon The two carbon...

Страница 3: ...rom the water kept in the stor age tank This is the final treatment before drinking the natural ionic calcium alkaline water Stage 9 Ultra Violet Light optional UV light kills 99 99 of bacteria and vi...

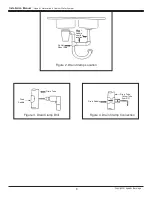
Страница 4: ...r installation Figure below shows the system interconnection 1 RED LINE Connect from system to feed adapter 2 BLUE LINE Connect from system onto threaded faucet shank with compression nut supplied wit...

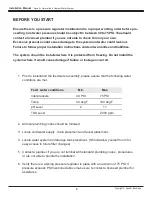
Страница 5: ...nd the faucet DRAIN CLAMP INSTALLATION 1 The drain clamp should be installed above the trap and on the vertical or horizontal tailpiece see figure 2 2 The hole position on the pipe should be marked an...

Страница 6: ...ter System 6 Copyright Aqua 9 Beverage Drain Tube Yellow Tube from RO Drain Saddle Figure 4 Drain Clamp Connection Drain Tube Drain Saddle Figure 3 Drain Clamp Drill Mount Drain Saddle on either locat...

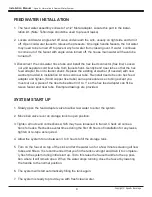
Страница 7: ...slowly through the porcelain portion of the sink so that chip ping is cut down to minimum MOUNTING THE FAUCET 1 Disassemble the bottom portion of the faucet 2 Place into hole of sink and reassemble f...

Страница 8: ...ere it would cause damage if failure or leakage occurred 1 Prior to installation the feed water assembly please assure that the following water conditions are met Feed water conditions Min Max Inlet p...

Страница 9: ...ed adapter and tighten Solid copper riser tube same procedure as ex tubing except you must cut out a piece of the riser tube about 3 4 to 1 so the hex feed adapter can fit be tween faucet and riser tu...

Страница 10: ...is mem brane and should be changed at the same time with the pre filter 3 The post filters should be changed when you experience an unusual taste and or order to the water and it has a normal life bet...

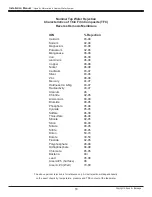
Страница 11: ...96 98 Mercury 94 97 Hardness Ca Mg 93 97 Radioactivity 93 97 Uranium 96 Chloride 92 95 Ammonium 80 90 Bromide 90 95 Phosphate 95 98 Cyanide 85 95 Sulfate 96 98 Thiosulfate 96 98 Silicate 92 95 Silica...

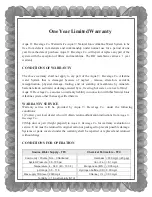
Страница 12: ...warranty liability in connection with this Natural Ionic Alkaline system other than as specified herein WARRANTY SERVICE Warranty service will be provided by Aqua 9 Beverage Co under the following co...

Отзывы: