background image

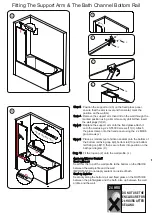
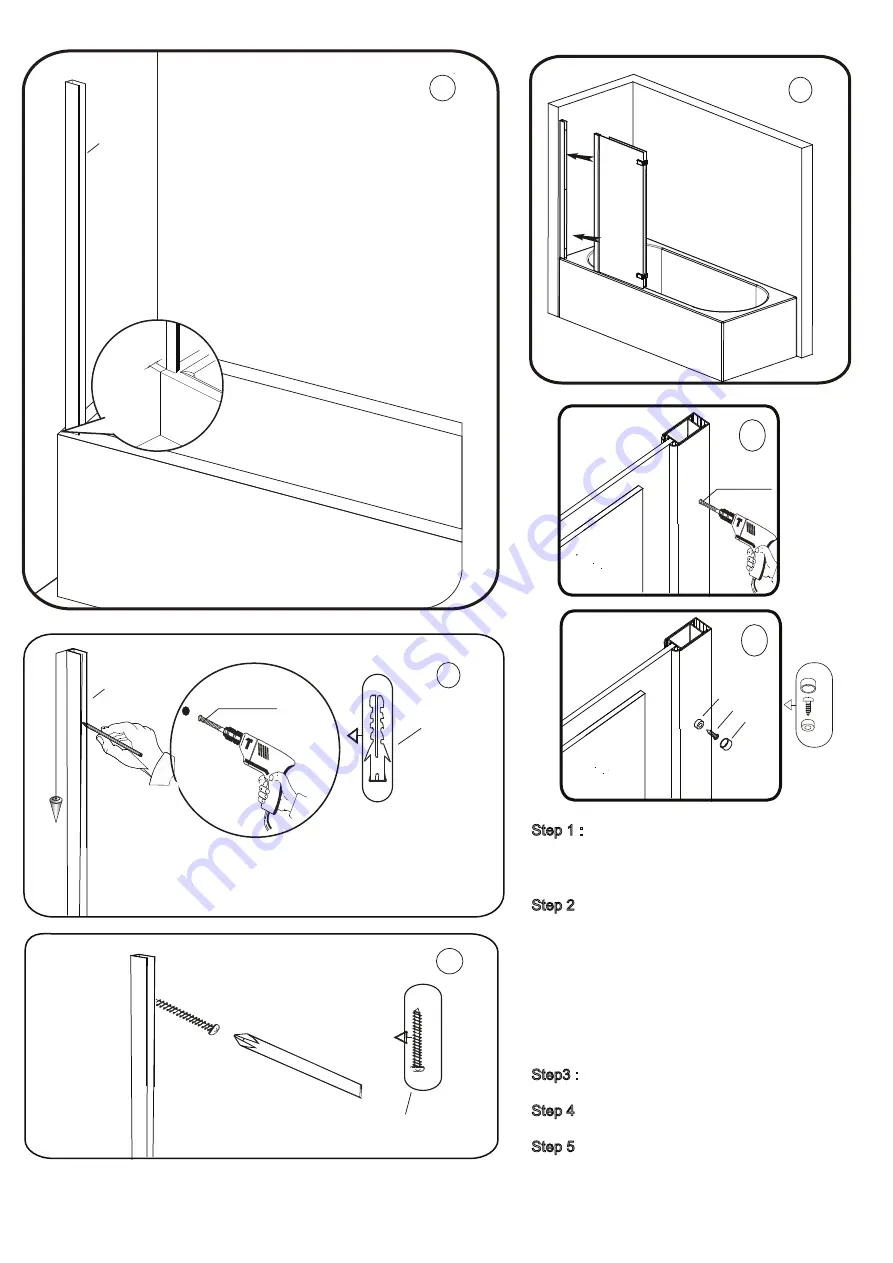
C

12-15mm

from bath 

    edge

E

Ф2.75 drill bit

F

Step 1 :

 Position the wall profile (1) onto the bath,

approximately 12-15mm from the outside

bath edge to ensure that the screen runs

along the inside edge of the bath rim.(A)

Step 2

 : Level the profile with a spirit level, then 

 mark the position using a pencil,mark

 through the 3 pre-drilled screw holes in the 

 wall profile then drill the marked points using

 a 6mm masonry drill bit.Once this is done

 insert 3 wall plugs(12).(B)

NOTE

: Y

ou may find it easier to mark and drill the 

wall if you apply masking tape to it first.

Step3 : secure the wall profile using 3 x ST4X30 

            screws (13). (C)

Step 4 : Carefully position the screen into the wall 

             profile. (D)

Step 5 

: Drill the holes in the wall profile through the

vertical profile of the fixed panel using 2.75 

drill bit (E), secure profiles together using 

the 3 x ST4X12(15) ,cover caps(14) and the 

screw cups(16).(F)

D

A

Ф6   drill bit

B

1

1

12

13

16

15

14

4X30mm screws 

Screw 4X12mm

Содержание Identiti AP6003L/R

Страница 1: ...er the product has been fitted PLEASE NOTE The minimum and maximum adjustment sizes noted on the product brochures are based on perfectly plumb walls and trays 6 PH2 TYPE 2 75 INSTALLATION INSTRUCTIONS www aprilproducts co uk Tools Required Lifetime Product Guarantee ATTENTION The Lifetime Product Guarantee is only valid has been completed and returned within 30 days of installation In addition th...

Страница 2: ...Qty NO 8 9 10 11 12 13 14 1 1 Screw cups 3 Wall profile Wall profile top cap Fixed panel assembly Hinges Vertical bubble seal Support arm Door panel Bottom seal Bottom rail Wall plug Screws ST 4x30 Screw caps Screws ST 4x12 1 2 3 4 5 6 7 10 8 9 11 12 14 16 13 15 Bottom rail fixing cap A Bottom rail fixing cap B 3 3 ...

Страница 3: ...extend at least to the corner of the bath FIXING KIT COMPONENTS SITE CONDITIONS FIXING KIT Wall Plug x3 Screw ST4x30 x3 Support arm x1 Glass Clip x1 Support Arm x1 Connector x1 Wall Fixing x1 Screw M8x6 x2 Gasket x2 Cover Cap x2 Wall Plug x2 Screw ST4x30 x2 Hinge x2 Screw ST4x12 x3 Horizontal rail fixing A x2 Horizontal rail fixing B x2 Screw Cover Cap x3 Cup x3 Wall profile top cap x1 Bottom rail...

Страница 4: ...l the marked points using a 6mm masonry drill bit Once this is done insert 3 wall plugs 12 B NOTE You may find it easier to mark and drill the wall if you apply masking tape to it first Step3 secure the wall profile using 3 x ST4X30 screws 13 C Step 4 Carefully position the screen into the wall profile D Step 5 Drill the holes in the wall profile through the vertical profile of the fixed panel usi...

Страница 5: ...8X6 grub screws J Step 9 Step 10 Place a small amount of silicon sealant onto the bottom of the bottom rail fixing cap A 9 bottom rail 10 and bottom rail fixing cap B 11 then secure them into position on the bath per diagram K Fit the top cap 2 onto the wall profile L L Applying Silicone Sealant Sealing Inside Seal from the top of the wall profile to the bottom on the INSIDE between the wall profi...

Страница 6: ... long as basic manufacturer maintenance recommendations are followed and no harsh or abrasive cleaners are used It is important to clean your April shower enclosure after every use Please wipe down all glass and metal parts with a clean soft cloth Ensure that all residual water on the glass is removed after every use For reliable watertight performance from your April enclosure your shower head sh...

Отзывы: