background image

2.4 AD Board (TB-6020) OSD Functions 


1.) Getting into Burn-in Mode 


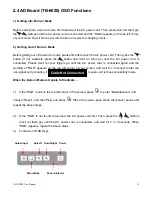
Before setting into a burn-in mode, first disconnect the AC power cord. Then press (don’t let them go) 

the


  buttons until the AC power cord is connected and the “RGB” appears on the top left corner 

of your screen. Now it can be put into the burn-in mode for changing colors. 


2.) Getting Out of Burn-in Mode 


Before getting out of the burn-in mode, please first disconnect the AC power cord. Then press the 


button (If not workable, press the 


button and don’t let them go) until the AC power cord is 

connected. Please don’t let your fingers go until the AC power cord is connected again and the 

wording of “RGB” appears on the top left corner of your screen, and wait for 3 second. Under the 

non-signal entry situation, if                             is seen, exit is thus successfully made.  

Cable Not Connected 


When the Burn-in Mode is Unable to Eradicate… 


1.)  If the “RGB” is still on the top left corner of the screen, press 

  to enter “Miscellaneous” and 

choose “Reset”, and then

 Yes, 

and press 

. When the screen goes black, disconnect power and 

repeat the above steps. 


2.)  If the “RGB” is not found, disconnect the AC power cord first. Then press the 


 buttons 

(don’t let them go) until the AC power cord is connected, and wait for 2 to 3 seconds. When 

“RGB” appears, repeat the above steps. 

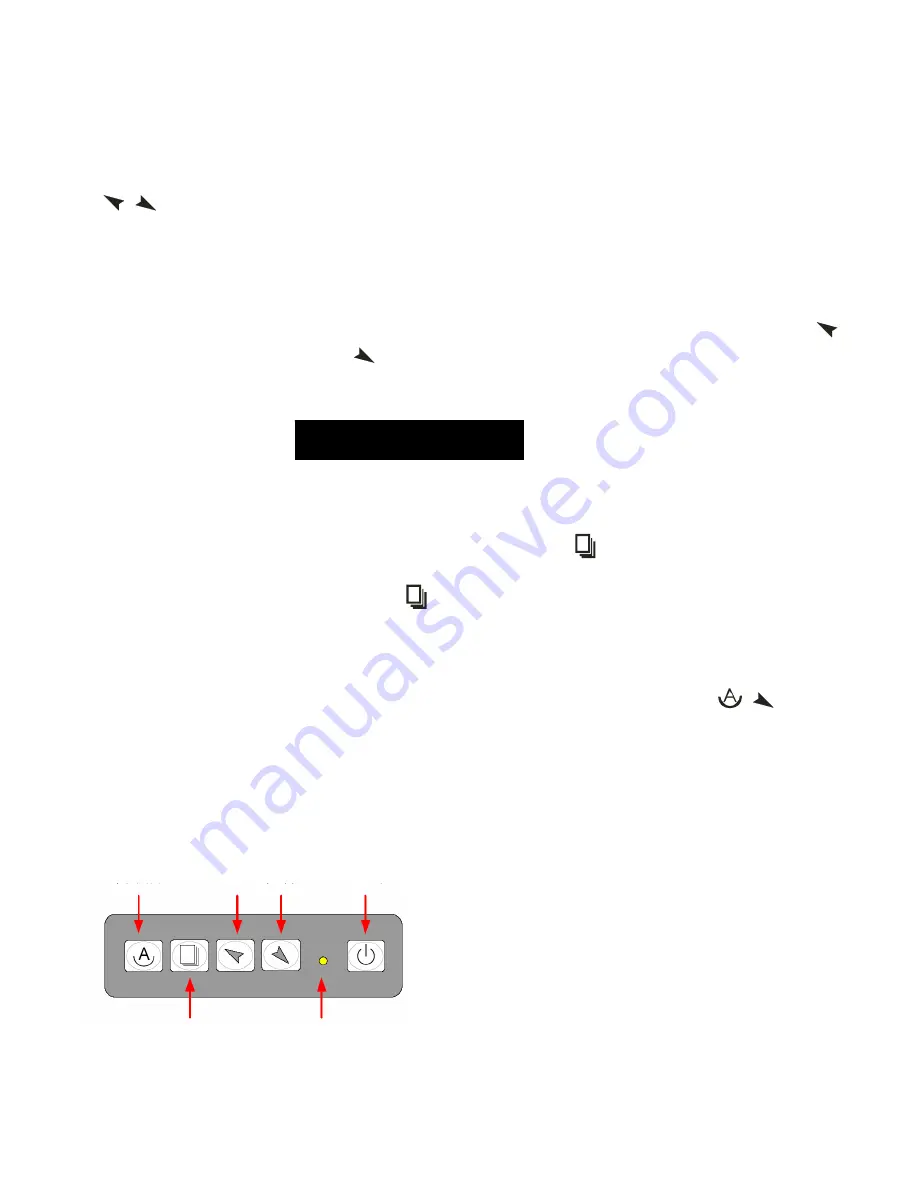
3.)  Functions of OSD Keys 


Auto Adjust     Up/Left  Down/Right  Power 


 Menu/Entry      Power Indicator 


ADP-1080 User Manual   

12

Содержание ADP-1080

Страница 1: ...er 2005 V0 1 2005 Aplex Technology Inc All Rights Reserved Published in Taiwan Aplex Technology Inc 9F 5 No 2 Jian Pa Road Chung Ho City Taipei County Taiwan Tel 886 2 82262881 Fax 886 2 82262883 E mail aplex aplex com tw URL www aplex com tw ADP 1080 User Manual 1 ...

Страница 2: ...ronment Operation of this equipment in a residential area is likely To cause interference in which case the user at his own expense will be required to take whatever Measures may be required to correct the interference Electric Shock Hazard Do not operate the workstation with its back cover removed There are dangerous high voltages inside Disclaimer This information in this document is subject to ...

Страница 3: ...Dimensions 6 1 4 Brief Description 7 1 5 Display Mode 8 Chapter 2 OSD 2 1 Front Panel Controls 9 2 2 OSD Controls 9 2 3 Main Menu 10 2 4 AD Board TB 6020 OSD Functions 12 Figures Figure 1 1 Dimensions of ADP 1080 6 Figure 1 2 Front View 7 Figure 1 3 Rear View 9 Figure A Panelmounting 13 Figure B VESAmounting 13 Appendix Panelmounting 13 VESAmounting 13 ...

Страница 4: ... Viewing angle 130 H 100 V Backlight life 40 000 hours OSD controls indicators automatic screen setup OSD brightness contrast horizontal vertical position image lock color balance video information power on and sync detection Touch screen resistive antiglare OS compatibility Win 95 98 XP 2000 NT4 0 QNX Linux Power Supply 12V DC 0 9A Mechanical Construction plastic housing and sealed touch screen N...

Страница 5: ...Relative humidity 10 to 90 40 non condensing without touch screen Vibration 1G peak 5 500Hz at random Shock 15G peak acceleration 11 msec duration EMC CE FCC Class A Ordering Information ADP 1080 8 industrial display monitor plastic bezel ADP 1080T 8 industrial display monitor with sealed touch screen plastic bezel ...

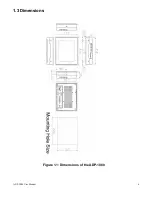
Страница 6: ...1 3 Dimensions Figure 1 1 Dimensions of the ADP 1080 ADP 1080 User Manual 6 ...

Страница 7: ...n its ruggedness the unit features an excellent viewing ability for monitoring and control applications It is available with resistive touch screen that is easy to use and maintain The front panel of the display monitor is sealed with gasket for NEMA 4 IP 65 rating when it is panel mounted in a NEMA rated cabinet or enclosure VESA 75 is another mounting option Figure 1 2 Front View of the ADP 1080...

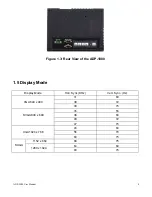
Страница 8: ...1080 1 5 Display Mode Display Mode Hori Sync KHz Vert Sync Hz 31 60 VGA 640 x 480 38 72 38 75 35 56 SVGA 800 x 600 38 60 48 72 47 75 48 60 XGA 1024 x 768 56 70 60 75 1152 x 864 68 75 64 60 SXGA 1280 x 1024 80 75 ADP 1080 User Manual 8 ...

Страница 9: ...u To enter OSD menu for related icon and item Auto Button One touch auto adjustment 2 2 OSD Controls To make any adjustment select the following 1 Press Menu to show the OSD menu or disable the OSD menu 2 Select the icon that you wish to adjust with the or key in the menu 3 Press Menu and then choose the item with the or key 4 Press Menu and then adjust the quality with the or key ADP 1080 User Ma...

Страница 10: ...icture check out the following H Position Shift the picture to the left or right V Position Shift the picture up or down Sharpness Fine tuning of image sharpness Phase This field allows you to fine tune the display quality Exit Back to icon For function check out the following z Auto Adjust z Auto Position z Auto Phase z Auto Clock z Auto Colour z Exit ...

Страница 11: ...he following ADP 1080 User Manual 11 z Language z OSD H Position z OSD V Position z OSD Timer z Translucent z Exit In the miscellaneous menu there are z Signal Source z Mode Select z Reset z Volume z Exit Exit to go back to icon ...

Страница 12: ...il the AC power cord is connected again and the wording of RGB appears on the top left corner of your screen and wait for 3 second Under the non signal entry situation if is seen exit is thus successfully made Cable Not Connected When the Burn in Mode is Unable to Eradicate 1 If the RGB is still on the top left corner of the screen press to enter Miscellaneous and choose Reset and then Yes and pre...

Страница 13: ...the hole and tighten the given 8 screws from the rear to secure the mounting Figure A Panelmounting of the ADP1080 VESA 75 Mounting optional The ADP 1082 display monitor can be VESA mounted as an option Just carefully mount the arm onto the rear of the unit by fastening the given four screws as shown in Figure B Figure B VESA mounting of the ADP1080 ADP 1080 User Manual 13 ...

Отзывы: