background image


More


Security,


More


Convenience


www.apexis.com.cn


/


www.apexis.cc


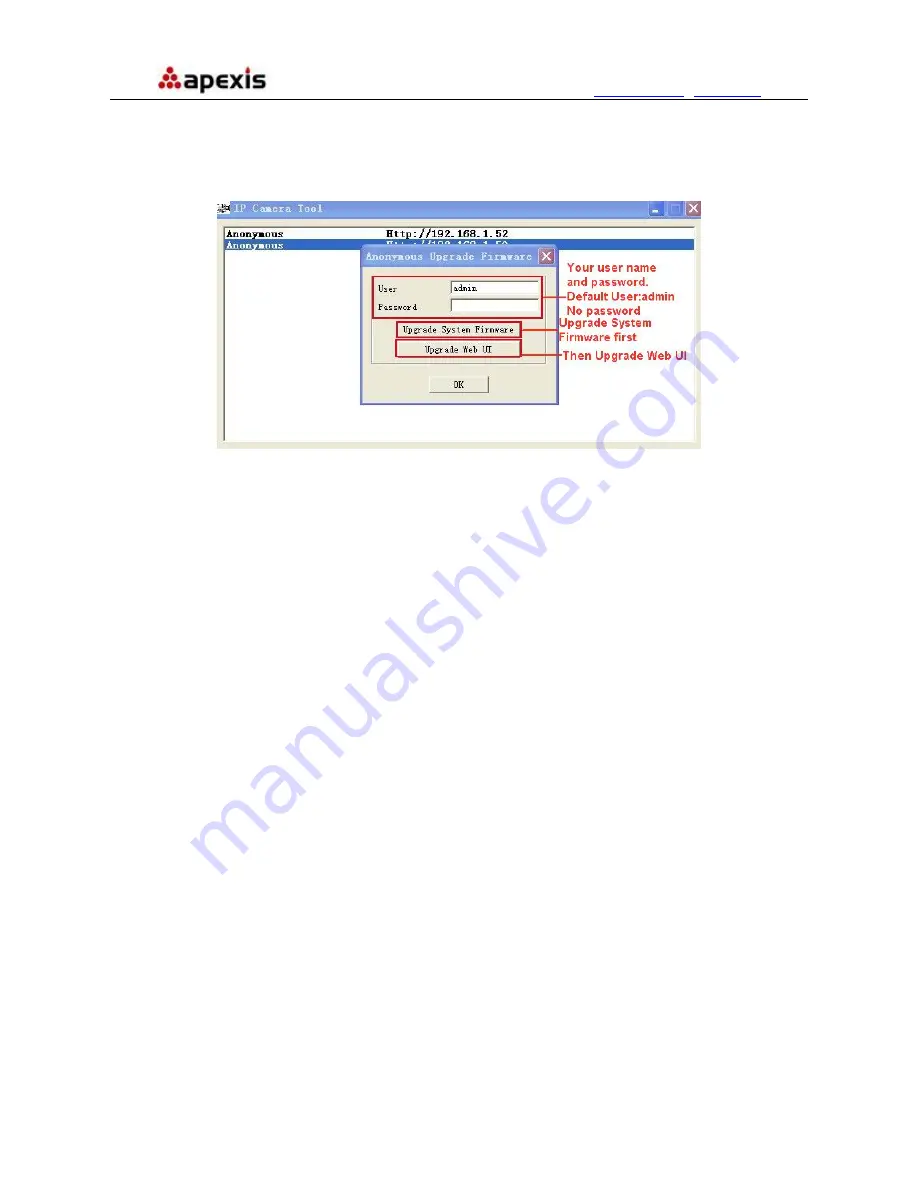
2.1.1.3 Upgrade Firmware


Enter the correct User and Password to upgrade system Firmware and Web UI. If you upgrade the camera, 
Please 

upgrade system firmware first

 and

 then upgrade Web UI

. Or it may damage the camera.

Figure 

2.3


Figure 2.3 


Please download the firmware package under the correct type of your camera before upgrade. 
Follow the upgrade document in the package carefully to upgrade. Please look readme firstly before you do 
upgrade. 
 

CAUTION:

 Please don’t upgrade the firmware freely. Sometimes, your camera may be damaged if wrong 

operation during upgrade.   
If your camera works well with the current firmware, we recommend you’d better not upgrade it. 
 

NOTE:

 When doing upgrade, please must keep the power on, and the best use wired mode, connect the 

network cable. 


2.1.1.4 Refresh Camera List 


Refresh camera list manually. 

2.1.1.5 Flush Arp Buffer


When cable network and wireless network of the device are fixed IP address .There is a problem you may 
encounter is can search the camera IP but can’t open the camera web page .you may try to use Flush Arp 
Buffer. 

2.1.1.6 About IP Camera Tool


Check the IP Camera Tool Version and IP Camera ActiveX Control Version here. 


2.2 Camera Login 


You can access the camera through 

IP Camera Tool

 or 

IE, Firefox, Safari, Google Chrome or other 

standard browser

 directly. 

1. Double click the IP address of the IP Camera listed (Figure 1.8). The default browser you use will run 
automatically and come to the camera login interface. (Figure 2.6) 

 
Shenzhen Apexis Electronic Co., Ltd


                 Tel: +86-755-26509025              Fax: +86-755-26509229 

10

Содержание APM-J901-Z-WS

Страница 1: ...IP Wireless Wired Camera REMOTE PAN TILT ROTATE User Manual...

Страница 2: ...27 3 3 BASIC NETWORK SETTINGS 28 3 4 WIRELESS LAN SETTINGS 29 3 5 ADSL SETTINGS 31 3 6 UPNP SETTINGS 31 3 7 DDNS SERVICE SETTINGS 32 3 8 SYSTEM SETTINGS 36 3 9 ALIAS SETTINGS 36 3 10 DATE TIME SETTIN...

Страница 3: ...website through the network 1 1 Features Powerful high speed video protocol processor High sensitivity 1 4 CMOS sensor Picture total 300k pixels Support 3x Optical Zoom Support PT control Pan 355 Tilt...

Страница 4: ...e Audio Input The jack is used to plug external microphone or audio input device I O Alarm Pin 1 Alarm input GND 2 Input 3 Output A 4 Output B Network Interface RJ 45 10 100 base T Network Light The g...

Страница 5: ...conds to boot up the camera then you will find the IP address from IP Camera Tool Figure 1 8 5 When the power on and network cable connected the green led of the real panel will keep on The yellow led...

Страница 6: ...ence www apexis com cn www apexis cc Figure1 5 Figure1 6 Figure1 7 After this done the icon IP Camera Tool will be displayed on desktop automatically Shenzhen Apexis Electronic Co Ltd Tel 86 755 26509...

Страница 7: ...hen the Device has been mounted properly you can double click the Icon IP Camera Tool and a dialog box as Figure 1 8 will pop up Figure1 8 Note The software searches IP Servers automatically over LAN...

Страница 8: ...ID which should be the same as showed on the sticker at the bottom of camera Every camera has its unique MAC ID So if there are many IP address showed in the list check the MAC ID you can ensure which...

Страница 9: ...our PC or router Gateway Make sure it is in the same subnet with PC s IP address Here gateway is the LAN IP of your router DNS Server IP address of IPS network provider You can also set it s the same...

Страница 10: ...not upgrade it NOTE When doing upgrade please must keep the power on and the best use wired mode connect the network cable 2 1 1 4 Refresh Camera List Refresh camera list manually 2 1 1 5 Flush Arp Bu...

Страница 11: ...ult user name is admin no password Input the correct user name and password the Sign In interface will pop up There are three models to login figure 2 6 Figure 2 6 1 Active Mode For IE Browser availab...

Страница 12: ...sign in Figure 2 7 The first time login the camera maybe get ActiveX prompt as the picture above please click the prompt and choose Run Add on refresh and login the camera again then will see live vi...

Страница 13: ...ctiveX options set to be Enable Especially Enable Download unsigned ActiveX controls Enable Initialize and script ActiveX controls not marked as safe Enable Run ActiveX controls and plu ins Figure3 0...

Страница 14: ...t see live video please close your firewall or anti virus software and try again 2 4 For Safari Firefox Google Browser Choose Server Push Mode For Safari Firefox Google Browser and sign in Server Push...

Страница 15: ...t can work with our IP Camera Figure 3 4 2 6 ActiveX Mode For IE Browser Login the camera in ActiveX mode the main User Interface as below NOTE There are 3 levels of users Visitor Operator Administrat...

Страница 16: ...e tatus of Channels There are 9 icons If you want to view 4 9 channels you should set the Multi Device firstly See 3 1 Mult Settings S at the bottom of the UI which show the status of each channel of...

Страница 17: ...26509229 17 OSD Settings Figure 3 6 OSD Means On Screen Display click Audio video OSD set display date and time on the video Disabled Click this one means clear the OSD Color Can set the OSD text colo...

Страница 18: ...u will find the snapshot file named by snapshot_MAC ID_date_time Click it to start record by manual and the icon will change to red color click it again it will stop record The record file will be sav...

Страница 19: ...Figure 2 6 please input the user name password for at least 3 times to login again 2 8 For Operator When login as Operator you can enter the IP Camera for Operator For operator it not only supports al...

Страница 20: ...s to adjust the image quality of video Click to adjust the value Default all Click it to set all the parameters back to factory setting NOTE If you login the camera there is no video displayed and the...

Страница 21: ...rd the last position setting only Call Preset Position It supports 8 preset positions If operator wants to monitor an important area quickly and precisely just click Call Preset Position button it wil...

Страница 22: ...in LAN The 1st device is the default one You can add more cameras listed in LAN for monitoring This web software supports up to 9 IP Cameras online simultaneously Click The 2nd Device and click the it...

Страница 23: ...enience www apexis com cn www apexis cc Figure 4 7 Click Live Video and then select to see four channels or click to see nine channels Figure 4 8 Shenzhen Apexis Electronic Co Ltd Tel 86 755 26509025...

Страница 24: ...ully View 3 7 DDNS Service Settings And also these cameras work well with DDNS Login the first camera by DDNS domain name and port this camera will be as the host camera Figure 5 0 Click Multi Device...

Страница 25: ...camera s DDNS domain name and without http it s not the Lan IP address If you have several cameras you can use the same DDNS domain name just set different port number for each different camera Figur...

Страница 26: ...evice Firmware If you want to upgrade the camera please upgrade Device Firmware first then upgrade Web UI Click Browse and choose correct bin file then click Submit to do upgrading NOTE Before doing u...

Страница 27: ...OK all the parameter will be returned to factory settings and the device will reboot Figure 5 5 3 1 5 Reboot Device Click Reboot the device will pop up a prompt select OK then the device will reboot F...

Страница 28: ...ool Figure 2 3 Figure 5 7 If you don t know Subnet Mask Gateway DNS Server Please check the Local Area Connection Status of your computer it contains all these information steps as below 1 Control Pan...

Страница 29: ...ice Provider blocks this port you may change it to another port number such as 85 3 4 Wireless Lan Settings Figure 6 1 1 Make sure the router is wireless router 2 Make sure the Wi Fi antenna installed...

Страница 30: ...t click Submit Figure 6 4 6 If there is encryption please input the share key then click Submit Figure 6 5 7 Wait about 30 seconds the camera will reboot then unplug the network cable Figure 6 2 Figur...

Страница 31: ...word obtained from ISP Figure 6 7 3 6 UPnP Settings Click UPnP Settings to choose Using UPnP to Map Port Figure 6 8 Select it and click Submit then the camera will support UPnP port forwarding automat...

Страница 32: ...we recommend you do port forwarding manually in your router Details see Figure 7 4 7 9 3 7 DDNS Service Settings Figure 7 0 There are 2 options Manufacturer s DDNS This domain is provided by manufact...

Страница 33: ...ke such as 81 100 8091 etc Click OK the camera will reboot wait about 30 seconds Figure 7 4 Make sure the Subnet Mask Gateway DNS Server is the same as your router Set Port Forwarding in the router Th...

Страница 34: ...same as Camera BELKIN 1 Login the router 2 Choose Firewall select Virtual Servers 3 Input the port except 80 and IP address then click save NOTE The port and IP address should be the same as Camera Fi...

Страница 35: ...fter all these 4 steps done then you can use the DDNS freely check the DDNS status from the camera as below and get the link of DDNS for internet view Step Login System Device Info Figure 7 8 Figure 7...

Страница 36: ...information about Device ID Firmware Version Embedded Web UI Version Alias Alarm Status DDNS Status and UPnP Status Figure 8 1 3 9 Alias Settings Default device name is anonymous You set any new name...

Страница 37: ...Settings Eight accounts are acceptable for this system Here you can set the user names and password as Administrator Operator or Visitor the permission for them as below z Visitor In this mode you can...

Страница 38: ...cruising upward 4 Downward patrol speed Set the speed of cruising downward 5 Leftward patrol speed Set the speed of cruising leftward 6 Rightward patrol speed Set the speed of cruising rightward NOTE...

Страница 39: ...Figure 8 8 1 Backup Backup IP Camera all the Parameter if you want to save all the current settings that you have set already you can click Submit then all the parameters you set will store as a param...

Страница 40: ...ill in the correct user name and password add the MSN buddy max upto 10 friends after submit the user will be shown in your MSN friend list Click System Device Info to check the MSN status After it ru...

Страница 41: ...no SMTP limitation SMTP Server The sender s SMTP Server SMTP Port The sender s SMTP Port usually is 25 some SMTP server have its own port such as 587 Need Authentication If there is SMTP user password...

Страница 42: ...age is denied by the server Maybe because of the anti spam privacy of the server 8 The server does not support the authentication mode used by the device Report Internet IP by Mail If select it you wi...

Страница 43: ...mpts error information as follows 1 Can not connect to the server Please check FTP Server is correct or not 2 Network Error Please try later 3 Server Error 4 Incorrect user or password Please check th...

Страница 44: ...ecord and make a sound of alarm when there is motion detection triggered Figure 9 7 After enable motion detect armed if there is motion triggered the Alarm Status will turn to Motion Detect Alarm Figu...

Страница 45: ...to enable it Figure 10 0 There are two options for Trigger Level Figure 10 1 High When the external alarm device is close then the alarm triggered Low When the external alarm device is switching off t...

Страница 46: ...to control IO output Switch ON OFF See Figure 4 4 NOTE All the pins work as switch only 3 19 Send Mail on Alarm Choose it it will sent picture and mail inform to customer s e mail once alarmed Firstl...

Страница 47: ...inking Figure 10 7 2 If you set Sound on Alarm plug an earphone or a speaker to the computer you use you can hear the beep sound when alarmed Figure10 6 3 If you set Record on Alarm the camera will re...

Страница 48: ...it will start alarm record automatically the record file will be saved to the specified path here set Figure 11 0 NOTE If you couldn t set the path here in Windows 7 or Vista please do it as below Wi...

Страница 49: ...op Record Audio Talk Multi device settings Path settings functions are controlled by ActiveX so if you use Safari Firefox Google chrome browser it is impossible to find these options The other functio...

Страница 50: ...me and or password To reset the administrator username and password press and hold down the RESET BUTTON for 15 seconds Release the power button and the username and password will be reset back to the...

Страница 51: ...software Sometimes it may be failed to do port forwarding automatically because of firewall or anti virus software It also has much relation with router s security settings So we recommend you do por...

Страница 52: ...orrect You could not see living video but only some undefined characters it may be the internet speed problems especially the camera work on Wi Fi 4 1 13 No pictures Problems with ActiveX Controller I...

Страница 53: ...ass Lens Viewing Angle 30 7 69 Input 1 channel audio input Output 1 channel audio output Audio Audio Compression ADPCM Image Compression MJPEG Image Frame Rate 15fps VGA 30fps QVGA Resolution 640 x 48...

Страница 54: ...rtification CE FCC RoHS 6 OBTAINING TECHNICAL SUPPORT While we hope your experience with the IP CAMERA network camera is enjoyable and easy to use you may experience some issues or have some questions...

Отзывы: