


17
Option: Ice-maker Connection
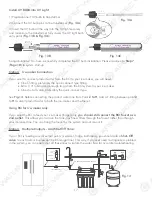
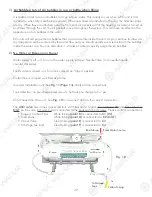
If you want to connect product water from the RO to your ice-maker, you will need:
•
One T-fitting, preferably the quick-connect type fitting
•
Extra 1/4” tubing long enough to go from the RO system to your ice-maker
•
One shut-off valve, preferably the quick-connect type.
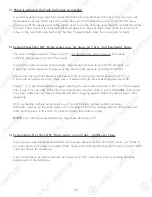
See
Fig.14.
Before connecting the product water line from Point
Z to H
, add a T-fitting between point
Z
to
H
to divert product water to both the ice-maker and the faucet.
Using RO for Ice-maker only:
If you want the RO to feed your ice-maker (fridge) only,
you should still connect the RO faucet as a
2nd outlet.
This allows you to drain the tank, flush new filters through the faucet rather than through
your icemaker line. You can hang the faucet by the system and not mount it.
Option: Multiple Outputs - Add Shut Off Valve:
If your RO is feeding several output points (icemaker, fridge, bathroom), you should add a
Shut-Off
valve
to each output line (except the RO spigot line). This way, if you ever need to diagnose a problem
in the system, you can easily shut off these lines to isolate the water flow for accurate troubleshooting.
Fig. 14
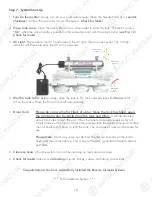
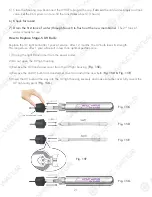
Install UV BULB into UV Light:
1) Please connect UV bulb to transformer.
2) Connect the UV bulb pins to the transformer (
Fig. 13A
)
3) Insert the UV bulb all the way into the UV light securely
and make sure the transformer fully covers the UV light bulb
entry point (
Fig. 13B & Fig.13C
)
Congratulations! You have successfully completed the UV bulb installation. Please continue to
Step 7
(
Page 18
) to system start-up.
Fig. 13A
Fig. 13B
Fig. 13C
Shut Off Valve
Tee fitting for icemaker & output
Ball Valve Position
ON
OFF
Z
H
Y
X
Insert
Sleeve
Tube
Metal Nut