AOpen MX34 Скачать руководство пользователя страница 5

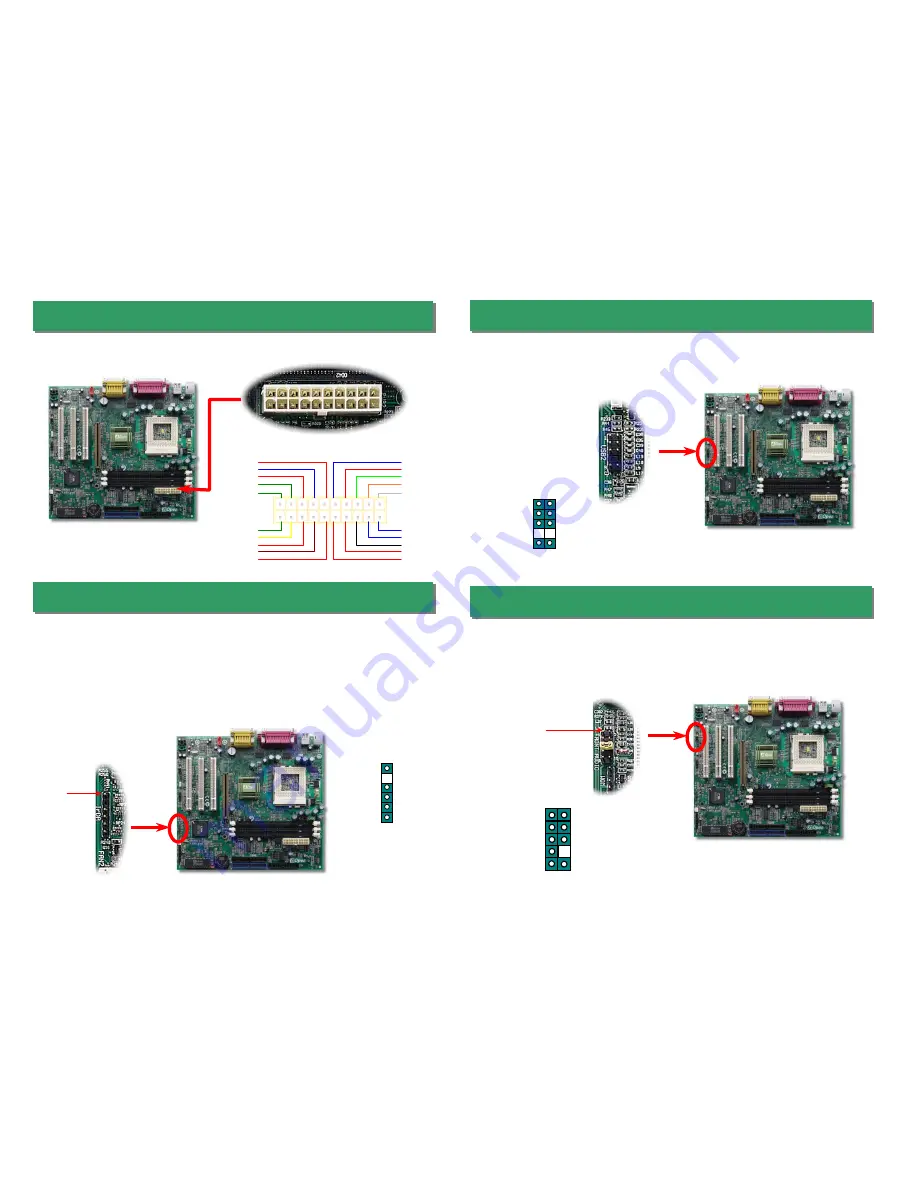
9. Connecting ATX Power Connector 

The ATX power supply uses 20-pin connector shown below. Make sure you plug in 
the right direction. 

10. Connecting IrDA Connector 

The IrDA connector can be configured to support wireless infrared module, with this
module and application software such as Laplink or Windows 95 Direct Cable
Connection, the user can transfer files to or from laptops, notebooks, PDA devices and
printers. This connector supports HPSIR (115.2Kbps, 2 meters) and ASK-IR (56Kbps). 

Install the infrared module onto the 

IrDA 

connector and enable the infrared function

from BIOS Setup, UART mode select, make sure to have the correct orientation when
you plug in the IrDA connector. 

+5V

NC 

IRRX 

GND 

IRTX 

NC 

1

2

3

4

5

6

Pin 1 

12. Front Audio 


If the housing has been design with an audio port on the front panel, you’ll be able to 
connect onboard audio to front panel through this connector. By the way, please 
remove the jumper cap from the Front Audio Connector before you connect the cable.
Do not remove this yellow jumper cap if housing without an audio port on the front 
panel. 

Pin 1 

+5V

+5V

+5V

+5V

+3.3V

+3.3V

+3.3V

COM

COM

COM

COM

COM

COM

-5V

COM

-12V

PS-ON

PW-OK

+12V

5VSB

MIC_IN2

VREFOUT
PHONE_R

NC

PHONE_L

GND 
+5V 
NC 
 
NC 

1   2

9  10

11. Support 2

nd

 USB Port 

This motherboard supports four USB ports. Two of them are on back panel connector, 
the other two are on the left-bottom area of this motherboard. With proper cable, you 
can connect them to front panel. 

1  2

D3-

D3+ 

GND 

NC 

+5V 

D2-

D2+

GND

NC

+5V

9  10

Содержание MX34

Страница 1: ...Thermal Protection CPU Fan Connector System Voltage Fan Monitoring ATX Power Connector AC Power Auto Recovery Housing Fan WOM Wake on Modem Front Panel Connector 168 pin DIMM Socket x3 supports PC100...

Страница 2: ...OS 1 Boot fail because of overclocking 2 Forget password 3 Troubleshooting You can clear CMOS to restore system default setting To clear the CMOS follow the procedure below 1 Turn off the system and u...

Страница 3: ...Core Frequency CPU FSB Clock CPU Ratio CPU CPU Core Frequency FSB Clock Ratio CELERON 300A 300MHz 66MHz 4 5x CELERON 600 600MHz 66MHz 9x CELERON 700 700MHz 66MHz 10 5x CELERON 800 800MHz 100MHz 8x CEL...

Страница 4: ...e 5 Connecting Front Panel Cable Locate the power switch cable from your ATX housing It is 2 pin female connector from the housing front panel Plug this connector to the soft power switch connector ma...

Страница 5: ...when you plug in the IrDA connector 5V NC IRRX GND IRTX NC 1 2 3 4 5 6 Pin 1 12 Front Audio If the housing has been design with an audio port on the front panel you ll be able to connect onboard audi...

Страница 6: ...34102 EXE 4 Reboot the system to DOS mode without loading any memory handler such as EMM386 or device driver It needs around 520K free memory space 5 Execute A MX34102 and the program will do the rest...

Страница 7: ...Setup Default Turn off the system and re connect the IDE cable Check if the system can reboot successfully The problem should be caused by the IDE cables or HDD itself Re install Windows 95 Windows 9...

Страница 8: ...obably had been answered by our support engineer or professional users on the news group http www aopen com tw tech newsgrp default htm 4 4 Contact Distributors Resellers We sell our products through...

Отзывы: