


After you finish the setting of jumpers and connect correct cables. Power on
and enter the BIOS Setup, press <Del> during POST (Power On Self Test).
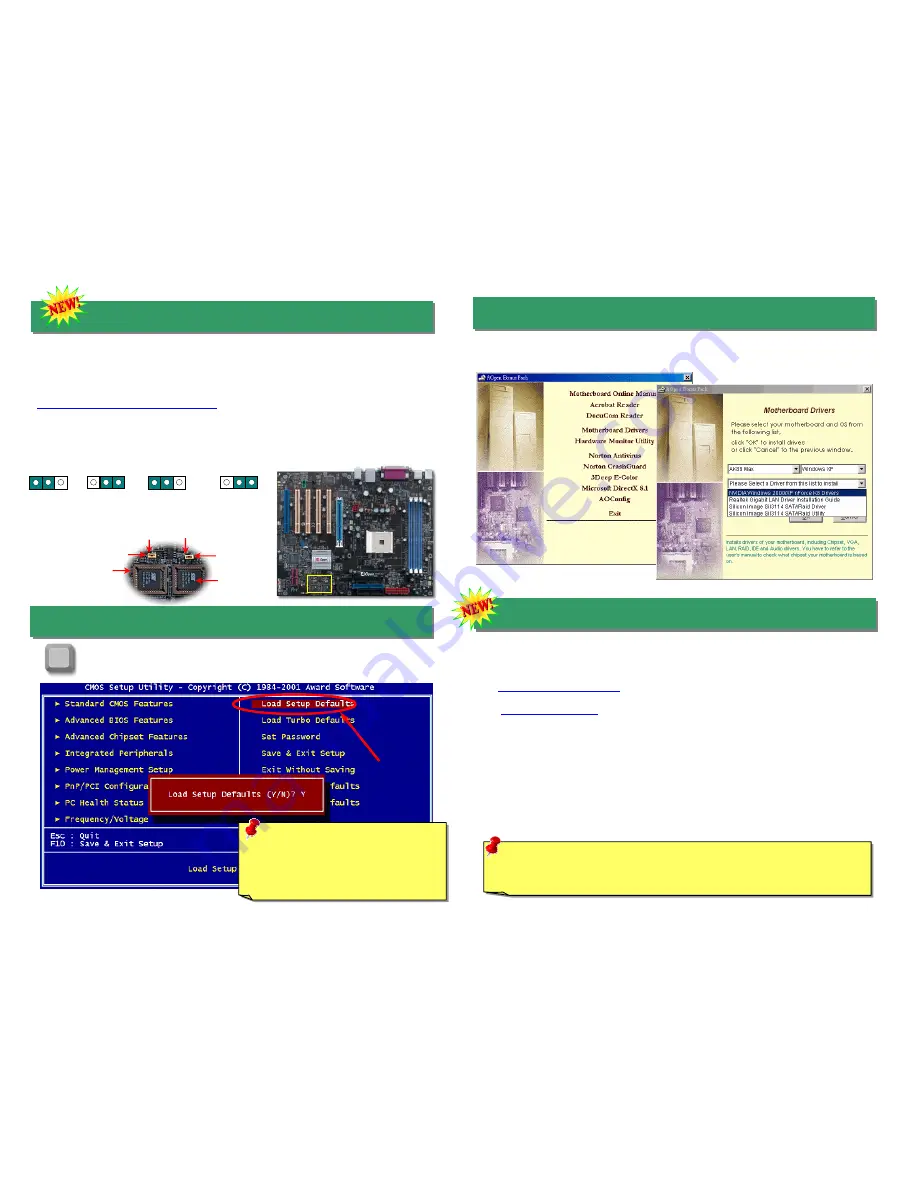
Choose "Load Setup Defaults" for recommended optimal performance.
Many viruses which destroy bios code and data area have been increasingly found these
days. This motherboard implements a very effective hardware protection method without
any software or BIOS coding involved, therefore it is 100% virus free. Once your BIOS is
crashed, it is easy to save it back. First step is to set JP24 to Pin2-3 to boot up the system
with BIOS 2. After that, please set the JP24 back to Pin1-2, go to AOpen website
(
http://download.aopen.com.tw/downloads
) to get your BIOS version suited for your
motherboard, download and installed it. In addition to read-only ROM, DieHard BIOS II
allows you to turn your second ROM into a Read-and-write ROM with larger space
provided. You may download fancy skins from our website to apply it on JukeBox, or
VividBIOS by adjusting JP25 to Pin2-3 (No Protection).
14. Power-on and Load BIOS Setup
13. Die Hard BIOS II (for AK89 Max only)
15. AOpen Bonus Pack CD
You can use the autorun menu of Bonus CD disc. Choose the utility and driver and select
model name.
Del
Warning: Please avoid of using "Load
Turbo Defaults", unless you are sure
your system components (CPU,
SDRAM, HDD, etc.) are good enough for
turbo setting.
16. BIOS Upgrade under Windows Environment
You may accomplish BIOS upgrade procedure with EzWinFlash by the following steps,
and it’s STRONGLY RECOMMENDED to close all the applications before you start the
upgrading.
1. Download the new version of BIOS package zip file from AOpen official web site. (ex:
http://english.aopen.com.tw/
)
2. Unzip the download BIOS package (ex: WAK89MAX102.ZIP) with WinZip
(
http://www.winzip.com
) in Windows environment.
3. Save the unzipped files into a folder, for example, WAK86L102.EXE &
WAK89MAX102.BIN.
4. Double click on the WAK89MAX102.EXE, EzWinFlash will detect the model name
and BIOS version of your motherboard. If you had got the wrong BIOS, you will not
be allowed to proceed with the flash steps.
5. You may select preferred language in the main menu, then click [Start Flash] to start
the BIOS upgrade procedure.
6. EzWinFlash will complete all the process automatically, and a dialogue box will pop
up to ask you to restart Windows. You may click [YES] to reboot Windows.
7. Press <Del> at POST to enter BIOS setup, choose "Load Setup Defaults", then
“Save & Exit Setup”. Done!
Warning: The upgrade of new BIOS will permanently replace your original BIOS
content after flashing. The original BIOS setting and Win2000/WinXP PnP
information will be refreshed and you probably need to re-configure your system.
1
st
BIOS
2
nd
BIOS
JP24
JP25
Pin 1
Pin 1
JP24 BIOS
Rescue Jumper
Rescue (Boot
from BIOS 2)
1
Normal (Default)
1
No
Protection
1
Protection
(Default)
1
JP25 BIOS2
Protection Jumper


