AOC SPX432 Скачать руководство пользователя страница 21

15

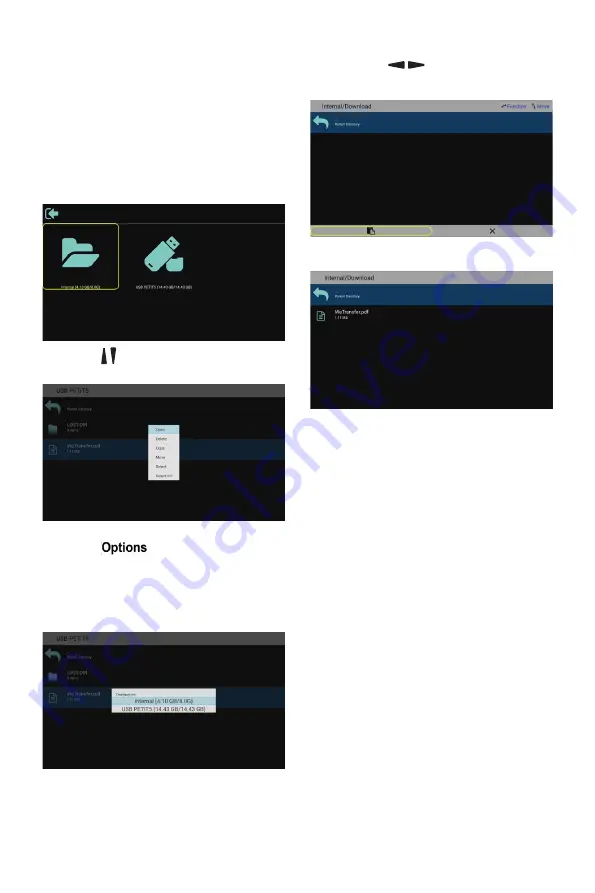
7.  After selecting the directory to copy to, 

press the [

/

] left / right  buttons 

on the remote control to select Paste or 

Cancel, as shown below.

8.  Press the [

OK

] button to complete the file 

copy.

4.3.  U disk Files Playback 

and Copy Instructions

1.  U disk can only have one partition. The 

format must be FAT32 and the capacity 

can not exceed 32G.

2.  Connect your USB device to the USB 

port on the display.

3. 

Select the USB flash drive icon and press 

OK

 to enter the file browser.

4.  Press [ / ] up/down button to select video 

or picture you want to play.

5.  Press the [

OK

] button to open directly. 

Press [

] OPTIONS button to pop 

up the option menu.

6.  Users can choose to play, copy, or move, 

etc., for example, if you want to copy a 

file to the internal storage movies folder, 

select copy, it will pop up “Destination”.

Содержание SPX432

Страница 1: ...www aoc com 2021 AOC All Rights Reserved User Manual Please read this manual before use and retain it for future reference SPX432 SPX502 SPX552 SPX652 SPX752 SPX862...

Страница 2: ...ar the apparatus and be easily accessible Read and follow these instructions when connecting and using your Public Information Display Unplug the display if you are not going to use it for an extensiv...

Страница 3: ...t containing lampblack such as kitchen restaurant etc use in similar environment will reduce product life 10 Do not defeat the safety purpose of the polarized or grounding type plug A polarized plug h...

Страница 4: ...socket outlet with a protective earthing connection WARNING Never place a Display in an unstable location A Display may fall causing serious personal injury or death Many injuries particularly to chi...

Страница 5: ...al regulations For additional information on recycling contact www eia org Consumer Education Initiative Waste Electrical and Electronie Equipment WEEE Attention users in European Union private househ...

Страница 6: ...ternal Equipment DVD VCR VCD 9 3 2 Connecting a PC 10 3 3 Connect USB 10 4 Operation 11 4 1 Media Player Instructions 11 4 2 PDF Reader Play 13 4 3 U disk Files Playback and Copy Instructions 15 4 4 A...

Страница 7: ...unt kit Items may differ in different locations Display design and accessories may differ from the images shown NOTES For all other regions apply a power cord that conforms to the AC voltage of the po...

Страница 8: ...ackaged beneath the screen surface so as not to scratch the screen face 2 Ensure you have all accessories for mounting this display wall mount ceiling mount table stand etc 3 Follow the instructions t...

Страница 9: ...the two hanging arms on both sides 4 Hang the display with bracket rails installed on the wall plate until it is formed hold off 5 Fasten the two bolts against the wall plate then down 1 4 2 VESA Gri...

Страница 10: ...4 Ventilation Requirements for enclosure locating To allow heat to disperse leave space between surrounding objects as shown in the diagram below 100 mm 100 mm 100 mm 100 mm...

Страница 11: ...nu Volume Menu Increase Audio Volume Volume shortcuts are only available under HDMI1 HDMI2 OPS Main Menu Go to Next level Item 5 button Home Menu Android Launcher Go to left Icon Root Menu Go to Audio...

Страница 12: ...LAN Internet function 4 AUDIO OUT Audio output for external AV device 5 AUDIO IN Audio input for external AV device 3 5mm stereo phone 6 HDMI2 IN 7 HDMI1 IN Connect to a source device via an HDMI cab...

Страница 13: ...SD menu 9 INFO button Show Information OSD 10 MUTE button Mute or restore volume 11 BACK button Return to the previous page or exit from the previous function 12 Vol VOLUME button Turn up the volume 1...

Страница 14: ...injury to your skin NOTE Remove the batteries from the battery compartment when not using for an extended period of time 2 3 3 Handling the remote control Do not drop or apply shock to the remote cont...

Страница 15: ...External Equipment 3 1 Connecting External Equipment DVD VCR VCD 3 1 1 Using HDMI video input HDMI out HDMI IN DVD VCR VCD RS232 RJ45 HDMI1 IN HDMI2 IN AUDIO IN 3 1 2 Using network interface INTERNET...

Страница 16: ...2 1 Using HDMI input HDMI out HDMI IN PC RS232 RJ45 HDMI1 IN HDMI2 IN AUDIO IN AUDIO OUT DVI OUT HDMI IN PC AUDIO IN AUDIO OUT RS232 RJ45 HDMI1 IN HDMI2 IN AUDIO IN AUDIO OUT 3 3 Connect USB USB2 0 5...

Страница 17: ...pty 3 Select the Compose on the home page and you should first select a playlist to edit from File 1 to File 7 The pencil icon represents the play list is not empty 4 If you select the empty playlist...

Страница 18: ...t Sort you can change the order of files one by one 9 Choose the desired file information in play list and press INFO button you can get information detail 10 Choose the desired file and press the pla...

Страница 19: ...cil icon means the playlist is non empty 4 If an empty playlist is chosen the app will guide you to select the media source All media files should be placed in root directory For example pdfs in root...

Страница 20: ...se Sort in the slidebar you can change the order of files one by one 9 Select Settings on home page this page has two parts Repeat Mode and Effect Duration Repeat Mode play mode Effect Duration photo...

Страница 21: ...be FAT32 and the capacity can not exceed 32G 2 Connect your USB device to the USB port on the display 3 Select the USB flash drive icon and press OK to enter the file browser 4 Press up down button to...

Страница 22: ...Language English and Chinese Network settings go to the network setting interface Terminal Con guration used to con gure cloud server information to get the program content edited by the cloud CMS 4 F...

Страница 23: ...ogether with the U Player auto play function Because the two function usage scenarios are different there will be a con ict when use at the same time It is recommended that users do not select the U P...

Страница 24: ...setting page Client setup StoreVue Signage Client setting page Exit Exit StoreVue Signage App Device Information Device information ex Android version IP address Notice Use StoreVue Signage platform...

Страница 25: ...the Menu button on the remote control on any interface 4 6 3 Wired network 1 There shall be wire access 2 the Ethernet switch shall be turned on 3 Ethernet information e g MAC address will be then di...

Страница 26: ...twork will be automatically shut down 2 Modify hotspot name 3 After modifying press the Back button to exit the virtual keyboard and move the remote control downward and then rightward to select OK 4...

Страница 27: ...wallpaper After selection keep pressing the downward button Select the Back symbol at the bottom to save the wallpaper Press the symbol below to import a wallpaper from an external device Keep pressi...

Страница 28: ...oot logo and rebooting to home page is omitted This is the so called fake shut down which has a relatively high power consumption but shorter boot time 6 Wakeup Wake on LAN Only wakeup the display who...

Страница 29: ...he USB disk a To play back the content of U_Player the system will switch the source to USB During insertion or removal of a USB disk the source shall remain USB source b Upon boot the system will rst...

Страница 30: ...turn off OPS source Steps for OPS entering into sleep wakeup A The Signal Wakeup switch in Device Management is turned on B Quick boot in Device Management is turned on C OPS Status in Sleep Mode is t...

Страница 31: ...to control RS232 the user shall use OPS as RS232 Source 4 6 12 Language 4 6 13 Date Time NTP Server The user may manually input the local NTP server website for quicker network time synchronization A...

Страница 32: ...by default In case of any OTA push the system will prompt the user whether or not to allow system update 4 6 15 Factory Reset 4 6 16 About The memory comes in 3GB or 2GB depending on the specific dev...

Страница 33: ...a range from 48x48 pixels 1920x1080 pixels Max frame rate 30fps Max bit rate 38 4Mbps Audio coder decoder MP2 MP3 AAC 1 MS MPEG4 v1 v2 v3 is not supported 2 GMC global movement compensation is not sup...

Страница 34: ...ing Coding Channel Remarks MPEG audio MPEG1 2 2 5 Audio Layer1 2 3 Decode MP1 MP2 MP3 V 2 Bit rate 8Kbps 320Kbps CBR and VBR Sampling rate 8KHz 48KHz Windows Media Audio WMA version 4 4 1 7 8 9 wmapro...

Страница 35: ...3 Software supports Adobe RGB JPEG GIF GIF File format GIF No limit in resolution ratio PNG PNG File format PNG V No limit in resolution ratio NOTES If the standard bite rate frame rate of the content...

Страница 36: ...GA 720 400 70 Hz 28 32 MHz 4 3 SVGA 800 600 60 Hz 40 MHz 4 3 SVGA 832 624 75 Hz 57 28 MHz 4 3 XGA 1024 768 60 Hz 65 MHz 4 3 WXGA 1280 720 60 Hz 74 5 MHz 5 3 SXGA 1280 1024 60 Hz 108 MHz 5 4 WXGA 1440...

Страница 37: ...50 Hz 148 5 MHz 16 9 1080 P 29 97 30 Hz 1920 1080 30 Hz 74 25 MHz 16 9 1080 P 25 Hz 1920 1080 25 Hz 74 25 MHz 16 9 1080 P 23 97 24 Hz 1920 1080 24 Hz 74 25 MHz 16 9 1080 I 59 94 60 Hz 1920 1080 60 Hz...

Страница 38: ...oth in a mild detergent solution Wring the cloth to remove excess liquid Wipe the surface of the display to remove dirt Then use a dry cloth of the same type to dry Do not scratch or hit the surface o...

Страница 39: ...nal is beyond the capabilities of the display 1 Make sure that the signal cable is attached firmly 2 Check the video signal source to see if it is beyond the range of the display Please verify its spe...

Страница 40: ...l pictures include logos video games computer images and images displayed in 4 3 normal mode A still picture is displayed for an over extended period of time Do not allow a still image to be displayed...

Страница 41: ...s Internal memory 16GB eMMC Power 100 240V 50 60Hz Power Consumption typ 140 W Power Consumption Max 300 W Power Consumption Standby Off 0 5 W Dimensions Without Stand W x H x D 973 0 x 561 2 x 98 1mm...

Страница 42: ...mory 16GB eMMC Power 100 240V 50 60Hz Power Consumption typ 150 W Power Consumption Max 310 W Power Consumption Standby Off 0 5 W Dimensions Without Stand W x H x D 1128 4 x 649 0 x 69 7mm Environment...

Страница 43: ...ory 16GB eMMC Power 100 240V 50 60Hz Power Consumption typ 180 W Power Consumption Max 320 W Power Consumption Standby Off 0 5 W Dimensions Without Stand W x H x D 1241 8 x 712 6 x 69 7mm Environmenta...

Страница 44: ...ry 16GB eMMC Power 100 240V 50 60Hz Power Consumption typ 220 W Power Consumption Max 350 W Power Consumption Standby Off 0 5 W Dimensions Without Stand W x H x D 1462 3 x 837 3 x 93 4 mm Environmenta...

Страница 45: ...ry 16GB eMMC Power 100 240V 50 60Hz Power Consumption typ 300 W Power Consumption Max 450 W Power Consumption Standby Off 0 5 W Dimensions Without Stand W x H x D 1683 5 x 961 7 x 95 3mm Environmental...

Страница 46: ...y 16GB eMMC Power 100 240V 50 60Hz Power Consumption typ 515 W Power Consumption Max 650 W Power Consumption Standby Off 0 5 W Dimensions Without Stand W x H x D 1929 0 x 1100 0 x 95 3mm Environmental...

Страница 47: ...2021 All rights reserved Speci cations are subject to change without notice...

Отзывы: