background image

14

15

in every prog.steps.The fixtures run their programs repeatedly (e.g. if master runs its program „P05“,all slaves 

will be executed program „P05“ too).

Note: If the master runs its editable program (EP1,EP2 or EP3),all slaves will execute their own editable pro-

grams (EP1,EP2 or EP3) according the master,but both fade time (FA.t.) and standing time (S.tI.) for each step 

will  be taken from the master´s step (slaves´ times are eliminated in each step).

8.6 Special functions 

Use this menu for special  services.

VEr. - Software Version

. Select this function to read the number of the fixture software.

bAL.

 -

 Balance

. Select this function to enable (On) or disable (OFF) the white balance which is set in „Colour 

balance” menu below. If this function is set OFF, ArcPower 144 will use maximum value (100%) of saturation 

for red, green and blue channel.

C.bA.

 -

 White colour balance.

 Using this menu you can set white balance:

1.

 Browse through the menu by pressing the [UP] and [DOWN] buttons until the display shows 

„C.bA

.

 menu.

Press  [ENTER] button and 

„rE.b.”

 will appear on the display.

2

. Press [ENTER] button again and use [UP] and [DOWN] buttons to adjust the new maximum value required 

for the red channel. Confirm your choice by pressing [ENTER]. Use the [UP] and [Down] buttons to select 

next colour.

3. 

Repeat step 2 for green channel 

„Gr.b.”

 and for blue channel 

„bL.b”

.

Note: 

Adjusted values are accepted for all LED outputs.

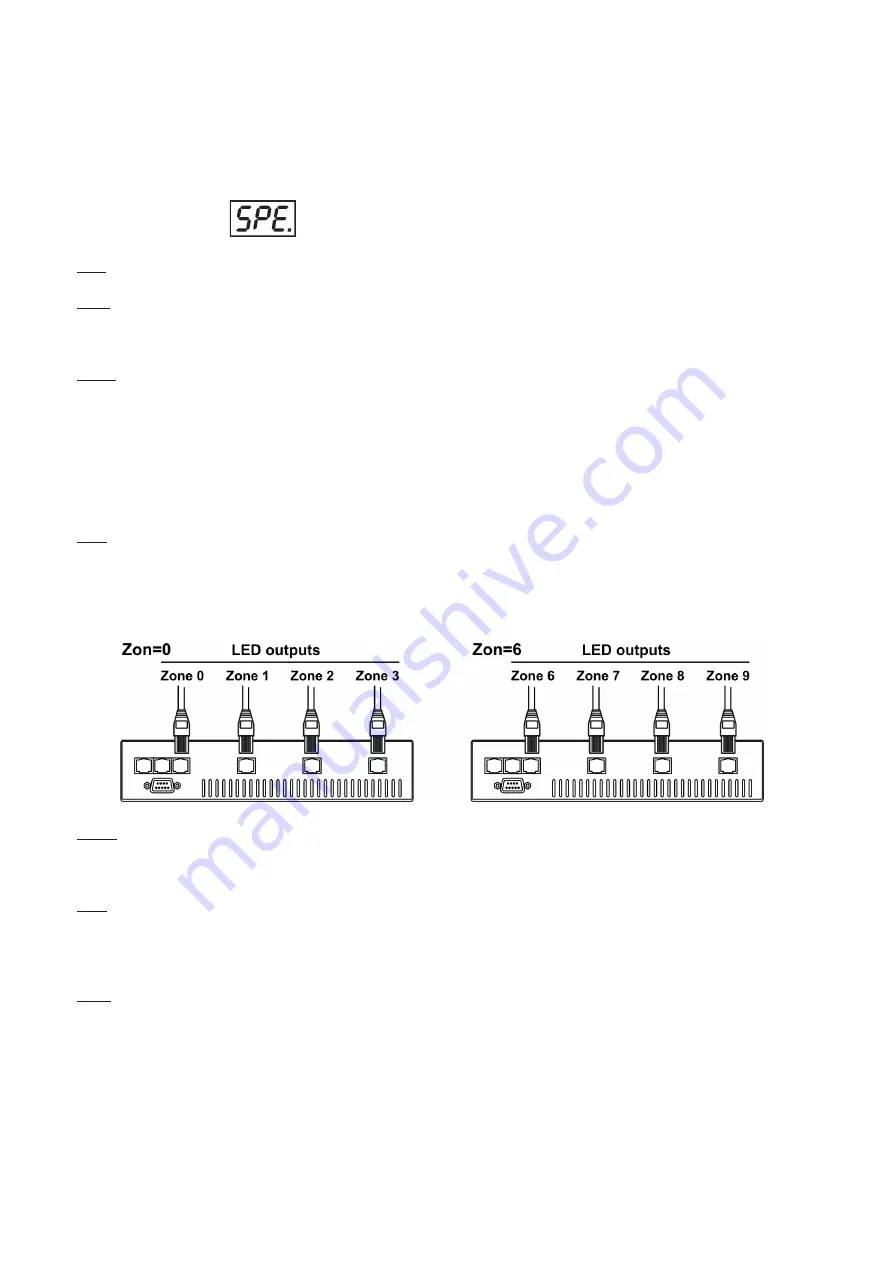
Zon.

 -

 Zone selecting

.The option enables select desired number of the zone (from 0 to 6).

The number of the zone distinguishes individual zones of the ArcPower 144 which is controled via RS-232 

interface.

Use [UP] and [DOWN] buttons  to select desired zone and press [ENTER] to confirm selection. The selected 

zone number is assigned to the first LED output and the second one has its zone number by one number 

higher etc. 


d.MP.

 -

 DMX presetting

. The function makes possible to select from 3 DMX- channels settings. Use [UP] and 

[DOWN] buttons  to select desired channel modes

 (“

Mo.1, Mo.2,Mo.3

”)

 and press [ENTER] to confirm.

For detail description of all channels see DMX protocol.

i.bL.

 -

 Initial blink

. If this function is on, ArcPower 144 makes  auto-calibration (All LEDs light on 100% for short 

time) after switching it on. If this function is set off, you have to set  manually every colour on max. brightness 

after switching on the driver before starting regular operating. This action should last min. one second. In this 

moment, the ArcPower 144 finds out the load connected to its LED output and makes auto-calibration.

UPd.

 -

 Software update

 - Using this function you can update  software in the fixture via PC and serial link.

The following are required in order to update software:


- PC running Windows 95/98/2000/XP or Linux


- DMX Software Uploader 


- Flash cable RS232/DMX (No.13050624)

Note1

: Software update should execute a qualified person. If you lack qualification, do not attempt the update 

yourself and ask for help your ANOLIS distributor.

Note 2

: DMX address, programs and all settings will be set to their default values.

To update software in the fixture:

- Installation of DMX Software Uploader:

Содержание ArcPower 144

Страница 1: ...USER MANUAL ArcPower 144 Version 2 0...

Страница 2: ......

Страница 3: ...rating 6 5 2 Master slave operating 8 6 Control menu map 9 7 DMX protocol 10 8 Control board 11 8 1 Addressing the ArcPower 144 12 8 2 Program running 12 8 3 Manual mode 13 8 4 Test sequences 13 8 5 S...

Страница 4: ...ried out by a qualified employee Do not connect this unit to a dimmer pack Use a source of AC power that complies with local building and electrical rules AC power has to have both overload and short...

Страница 5: ...plug A 3 prong grounding type plug must be installed following the manufacturer s instructions The earth has to be connected Cord plug connections Cable Pin International Brown Live L Light blue Neutr...

Страница 6: ...roller If your DMX controller has RJ45 socket for DMX output use RJ45 patch cable for connection with the ArcPower 144 RJ45 plug DMX 512 XLR plug male View facing pins Front view of the plug Pin 1 Not...

Страница 7: ...nd all its connected LED modules is 80 metres Single ArcPower 144 installation Multiple ArcPower 144 installation Connect the DMX output of the first ArcPower 144 with the DMX input of the next ArcPow...

Страница 8: ...ource 7 RGBW each other because white LEDs will not light 5 2 Master slave operating 1 Unplug from the mains before installation 2 Connect the LED module to the fixtures 3 Connect the DMX output of th...

Страница 9: ...OFF On Edl E P 1 E P 2 E P 3 S 01 S 30 End rE1 0 255 diM 0 255 FA t 0 255 S tl 0 255 COP MAn rE1 0 255 Gr1 0 255 bL1 0 255 0 255 MAC 0 255 Str 0 255 diM 0 255 tSt St A MSt E P 1 P06 SLA SPE VEr bAL On...

Страница 10: ...3 0 255 Blue LED 2 Blue LED saturation control 0 100 proportional 8 0 255 White LED 2 White LED saturation control 0 100 proportional ZONE 3 9 7 1 0 255 Red LED 3 Red LED saturation control 0 100 pro...

Страница 11: ...8 0 31 32 63 64 95 96 127 128 143 144 159 160 191 192 223 224 255 SHUTTER STROBE Shutter closed Shutter open Strobe effect from slow to fast Shutter open Opening pulses in sequences from slow to fast...

Страница 12: ...the current step and a Standing time the time during which effects last in the current step Programming procedure 1 Enter Edl menu 2 Press UP or DOWN to select the desired program which you wish to ed...

Страница 13: ...red LED 3 saturation value 0 255 rE4 a red LED 4 saturation value 0 255 Gr3 a green LED 3 saturation value 0 255 Gr4 a green LED 4 saturation value 0 255 bL3 a blue LED 3 saturation value 0 255 bL4 a...

Страница 14: ...esired number of the zone from 0 to 6 The number of the zone distinguishes individual zones of the ArcPower 144 which is controled via RS 232 interface Use UP and DOWN buttons to select desired zone a...

Страница 15: ...ff and on the fixture to leave this option 3 It is recommended that you exit all programs before running the Software Uploader 4 Start the Software Uploader program Select desired COM and then click C...

Страница 16: ...lect SPE in main menu of the ArPower 144 press ENTER use UP and DOWN buttons to select Zon The option enables to select desired number of the zone from 0 to 6 Press ENTER use UP and DOWN buttons to se...

Страница 17: ...means DMX value of the green colour 0 255 b means DMX value of the blue colour 0 255 means end of character sequence values of colours have to be separated by a comma Examples zone 0 234 126 165 zone...

Страница 18: ...colour Max load per zone 36 LED s in RGB mode 42 LED s in RGBW mode Total load 144 LED s in RGB mode 168 LED s in RGBW mode Maximum total cable length between one LED zone output and all its connecte...

Страница 19: ...e 1 Before replacing the fuse unplug mains lead 2 Unscrew the fuse holder on the rear side of the ArcPower 144 with a fitting screwdriver from the housing anti clockwise 3 Remove the old fuse from the...

Страница 20: ...20...

Отзывы: