background image

BLADE ALIGNMENT


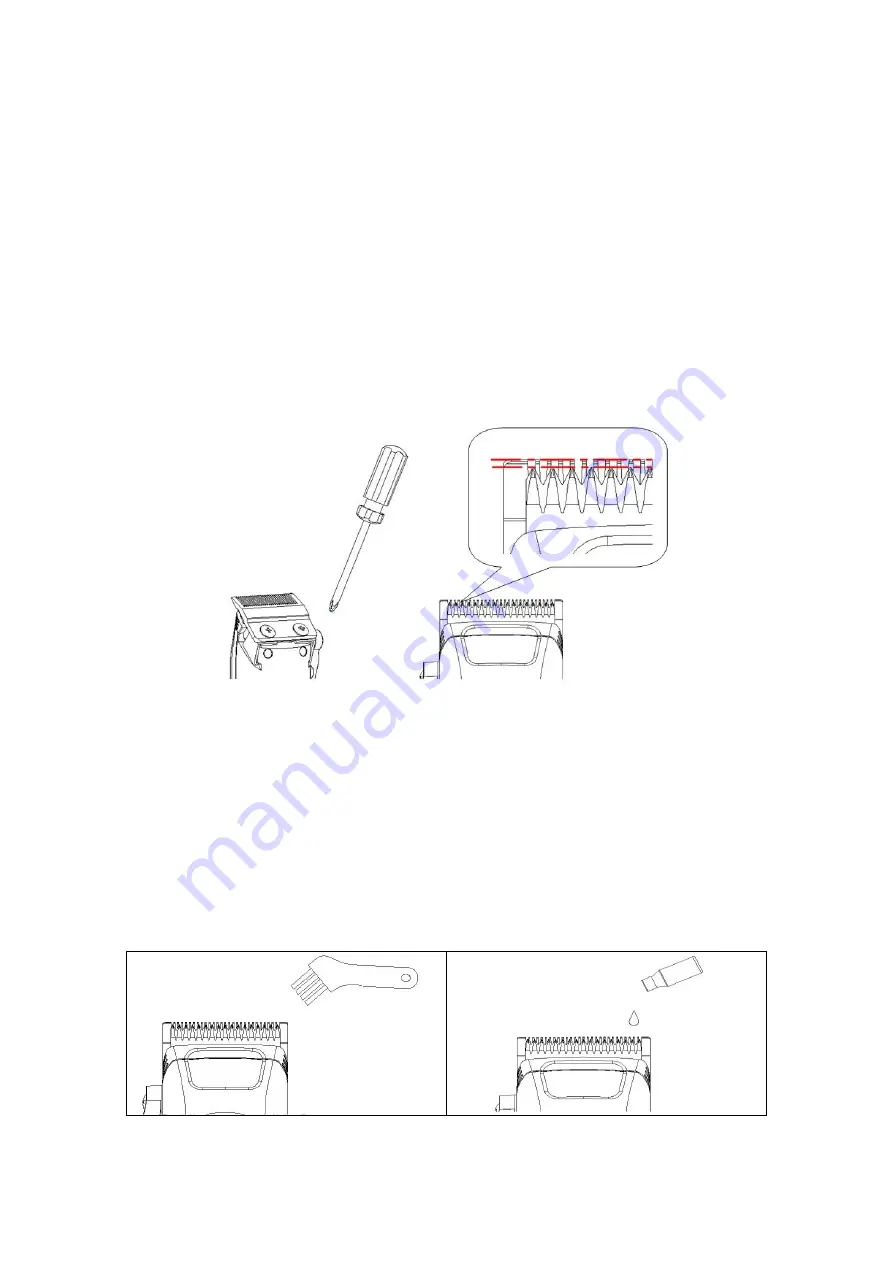
It  is  possible  the  blades  may  go  out  of  alignment  after  long  use.  Correct  blade 

alignment is essential for effective cutting.   

To align the blades, please follow below steps: 

1.  The end of the top blade should be closer to the body of the hair clipper than the 

moving blade. This is important 

so that the clipper doesn’t cut too close or allow the 

moving blade to touch the skin. 

2.  The moving blade should be as closely aligned as possible to the center of the top 

blade. 

3.  If the blades are not correctly aligned, turn the clipper on for a few seconds, then 

turn off. Loosen the two screws slightly and manually adjust the moving blade. 

4.  The top blade is parallel to the front edge of the moving blade. The blades should 

also be even on each side. 


5.  Re-tighten the screws. 

6.  Ensure the clipper is running smoothly before attempting to cut any hair. 


CLEANING AND MAINTENANCE 

To ensure long lasting performance, clean the blades and unit regularly. 


Ensure the clipper is switched off and wait until it is completely cool.   


Before cleaning, remove the accessory.   


Brush the accumulated hair from the blades with the aid of the cleaning supplied 

with the product. Do not submerge the clipper in water 


Place one or two drops of oil on the blades. Turn the clipper on to distribute the oil 

evenly. Wipe off any excess oil. 


To clean the unit, wipe with a damp cloth and then dry it. 

Содержание RFC-1708

Страница 1: ...Hair Clipper Instruction Manual Model no RFC 1708...

Страница 2: ...working properly if it has been dropped or if it has been immersed in any liquid 12 Do not leave the appliance unattended when it is plugged in 13 Before using the appliance ensure that the clipper b...

Страница 3: ...make sure blades are aligned properly 29 Do not submerge the appliance nor make it flow under water tap 30 Do not use salt water or boiling water when cleaning Also do not use cleaning products that...

Страница 4: ...the charger into the outlet make sure the voltage is compatible with the required voltage on the product PARTS 1 Blade Set 7 9mm Comb attachment 2 Taper lever 8 12mm Comb attachment 3 On Off Switch 9...

Страница 5: ...batteries in your rechargeable clipper follow these guidelines Do not recharge the hair clipper between sessions Wait until the batteries are exhausted before recharging Discharge the batteries comple...

Страница 6: ...ade cover from the unit 2 Disperse a few drops of lubricating oil across blades Wipe off excess with a clean dry cloth 3 Select the comb attachment with the desired comb length 4 Attach the attachment...

Страница 7: ...e two screws slightly and manually adjust the moving blade 4 The top blade is parallel to the front edge of the moving blade The blades should also be even on each side 5 Re tighten the screws 6 Ensur...

Страница 8: ...disposed safely Used batteries should be taken to a recycling station and not disposed of with household waste IMPORTANT Always fully discharge the batteries before removal and ensure the charger is u...

Страница 9: ...suse abuse or neglect Please retain your receipt as proof of purchase and contact our Customer Service Centre on 1800 124 125 Australia or 0800 945 995 New Zealand or alternatively via Customer Help a...

Отзывы: