background image


Using the Bread rack 

Use the bread rack to heat up bread.   

1.

  Open bread rack by turning the bread rack knob and place t

he bread on the   

      top of the rack.   

2.


IMPORTANT! only heat up one piece at a time.   

3.  Set the toasting level only to level 1.     

4.  Press the push-down lever down until it engages. The LED on the Cancel   

      button will light up. 

5.  Heat cycle will commence and the toaster will turn OFF after heating the bread   

      automatically. 


CAUTION 

1. Remove all protective wrappings on the toaster prior to toasting. 
2. If toaster starts to smoke excessively, Press the 

Cancel

 button to stop toasting   

    immediately. 
3. Avoid toasting food with extremely runny ingredients such as butter, jam or other   
    runny ingredients. 
4.  Never  attempt  to  remove  bread  jammed  in  the  slots  without  unplugging  the 

toaster  from  the  electrical  outlet  first.  Be  sure  not  to  damage  the  internal 
mechanism or heating elements when removing bread. 

5. The bread slot is for toasting regular bread slice.     
6. To achieve uniform toast colour, we recommend that you wait a minimum of 30s 

between  each  toasting  time  so  that  browning  colour  control  can  reset 
automatically. 


CARE AND CLEANING     

1. Before cleaning, unplug from the appliance and let the appliance cool down   
    completely. 
2. Pull out crumb tray at the bottom of the toaster and empty it. If the toaster is 
    used frequently, accumulated breadcrumbs should be removed at least once a   
    week. Make sure the crumb tray is completely closed before using the toaster   
    again. 
3. Wipe the outside of the toaster with a slightly dampened cloth and polish with a   
    soft dry cloth.   
4. Do not immerse the toaster in water.   
5. When not in use or during storage, the power cord may be wound under the   
    bottom of toaster. 


Содержание LD-T7051

Страница 1: ...Toaster LD T7051 User Manual PLEASE READ AND SAVE THESE INSTRUCTIONS FOR FUTURE REFERENCE...

Страница 2: ...azard or the product must be disposed 9 Do not let the cord hang over edge of table or counter or touch hot surfaces Allow the appliance to cool before wrapping cord around base for storage 10 Do not...

Страница 3: ...cations such as Staff kitchen areas in shops offices and other working environments Farmhouses By clients in hotels motels and other residential type environments Bed and breakfast type environments 2...

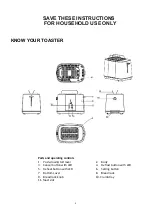
Страница 4: ...Y KNOW YOUR TOASTER Parts and operating controls 1 Push down start lever 2 Body 3 Cancel button with LED 4 Defrost button with LED 5 Reheat button with LED 6 Setting button 7 Bottom cover 8 Bread rack...

Страница 5: ...button Setting to adjust the toasting level you desire 3 Place the food to be toasted in the toast slot 4 Press the Push down lever down until it engages The LED on the Cancel button will light up 5 T...

Страница 6: ...slots without unplugging the toaster from the electrical outlet first Be sure not to damage the internal mechanism or heating elements when removing bread 5 The bread slot is for toasting regular bre...

Страница 7: ...re Hazard The crumb tray should be cleaned regularly Do not allow breadcrumbs to accumulate in the bottom of the toaster TECHNICAL DATA Voltage 220 240V 50 60Hz Power consumption 800 1000 W Capacity M...

Страница 8: ...isuse abuse or neglect Please retain your receipt as proof of purchase and contact our Customer Service Centre on 1800 124 125 Australia or 0800 945 995 New Zealand or alternatively via Customer Help...

Отзывы: