Instructions Manual – V6.10
CENTOR TOUCH Force Gauge – STAR / DUAL version
- 36 -
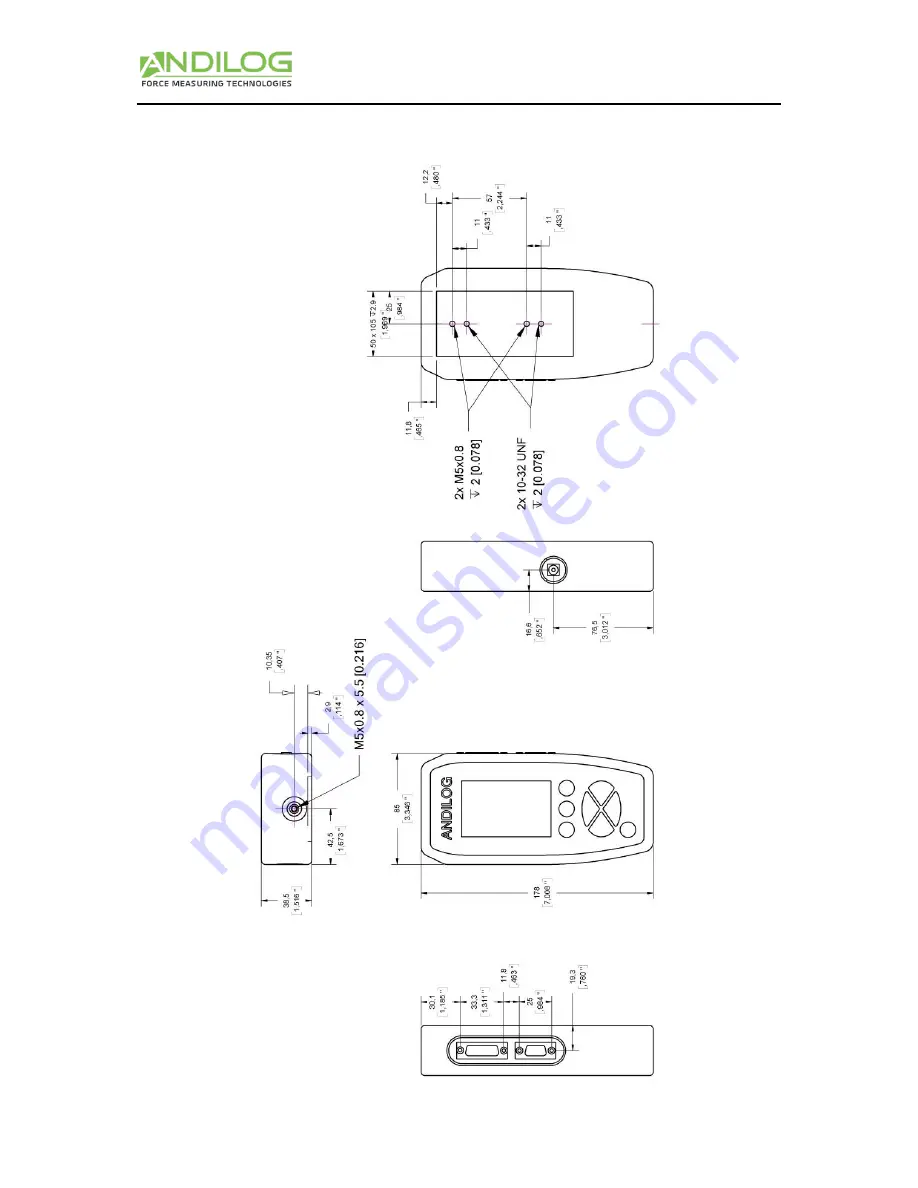
5.
Dimensions
Страница 1: ...anual CENTOR TOUCH Gauge Operating Manual CENTOR TOUCH STAR DUAL V6 10 ANDILOG Technologies BP62001 13845 Vitrolles Cedex 9 France Email info andilog com Site www andilog com Tel 33 0 820 888 202 Fax 33 0 820 888 902 ...
Страница 2: ... 13 6 Digits 13 7 Time unit 13 8 Sensor Units V1 14 9 Set points Limits 14 V SET POINTS Setting Limits 14 1 Activate Deactivate 14 2 Load cell tab 14 3 Type of Data 14 4 Top and Bottom limits 15 5 Activate an Output 15 VI GRAPH TEST Settings 15 1 Setups tab 15 2 Tests settings 16 3 Curve Resolution 16 4 Axe H Axe V 16 5 Output control 17 VII CALCULATION Settings 17 1 Calculation 17 2 Output action...
Страница 3: ...SSOCIATED PRODUCTS 31 1 Acquisition software 31 2 Interface Cables 31 XIV APPENDICES 32 1 Errors Messages 32 2 Factory Settings 33 3 Connections 34 4 Setup Examples 35 5 Dimensions 36 Revision Date Description Rev 5 4 15 08 2013 VII 1 Rev 5 5 03 03 2014 II 4 7 III IV V 1 V 3 VI 1 VII 1 VIII 1 VIII 2 IX IX 1 IX 2 IX 3 IX 4 IX 5 X XI XIII 2 XIII 3 XIII 4 XIII 5 XIII 6 XIII 7 XIII 8 XIII 9 Rev 6 0 09...
Страница 4: ...ue measurements with new electronic technologies offering a higher performance and more reliable instrument Though it is a very comprehensive instrument the CENTOR TOUCH force gauge is easy to use This instruction manual will guide you to set your first measurements Output RS232 USB TOR Colors Touch Screen Display Curve Force Time Connectors for additional sensors force torque displacement or angl...
Страница 5: ...t the gauge has not been damaged 1 Unpacking The Centor Touch is available in different configuration portable table top with internal sensor or SPIP 1 channel Star or 2 channels Dual Portable version with internal force sensor Portable version with SPIP sensor Portable verion with internal torque sensor Table top version The CENTOR TOUCH gauge is supplied with Carrying case according to your setu...
Страница 6: ...late directly to the sensor rod Use the extension rod delivered with your instrument In spite of its mechanical protection sensor overload can damage the instrument The instrument stops if the capacity has been exceeded 10 times You have to return it to ANDILOG TECHNOLOGIES for checking It is important that measured values are under 90 of the sensor capacity c Test Stand The gauge can be affixed t...
Страница 7: ...d to CENTOR TOUCH Gauge through a special connector called SPIP If an internal sensor is detected AND NO EXTERNAL SENSOR IS DETECTED the internal channel is the measuring channel If an external sensor is detected the external channel is the measuring channel For a Centor Touch Dual both sensors internal and external are simultaneously scrutinized The following information regarding the sensor is d...
Страница 8: ...e external sensor 3 Bar Graph A black line is the representation of the applied force If the bar graph is full it means that the sensors maximum range is reached risk of overload If the limit set pints are activated colours may change accordingly to the current applied value see dedicated chapter 4 Main display Many values can be displayed in this window See display screen chapter for details 5 Au...
Страница 9: ...e in Chapter IV how to change the displayed value 7 Sensor direction An easy to remember small symbol indicates the direction of the force applied to the sensor tensile and compression 5 Touch area on the Measure screen Each area of the measurement screen provides access to the configuration menus of the force gauge Main MENU Test Statistics Tare Validated Help Send Set points Stop test ...
Страница 10: ...auge This action tares the gauge The gauge will take into consideration the weight of accessories hook or plate fixed on the sensor s rod Taking this action resets all memories and peak values NOTE When turned ON the CENTOR TOUCH completes several self tests to check the sensor s health It is possible to leave tools fixed on the force gauge but the total weight must not exceed 10 of the sensor s m...
Страница 11: ...Gauge STAR DUAL version 10 III START your measurements The CENTOR TOUCH Version allows you to draw the graph of the test The following screen is displayed State of TTL outputs Graph Displaying Area First chanel axis Time axis Test state Indicators ...
Страница 12: ...yed Stand by mode Waiting an event to start Acquisition mode Acquiring data Test complete To start a new test tares the force gauge If you would like to stop the test before the end of the time press the state indicator 3 Graph displaying area To start measuring and drawing the graph you must touch the main display area to do the tare When the CENTOR TOUCH detects a load on the sensor it will star...
Страница 13: ...raph and test settings At the end of the acquisition the state indicator changes to At this step you can Read the graph Read calculated values during the test by touching the statistics window Download calculated values or the graph on a PC through the RS232 output using the send data key Set a different Test setup Erase the graph by touching the graph display area To start a new test or change to...
Страница 14: ...creen so it allows you to display a second selection 3 Curve You have 3 choices Displays the curve and two values select curve as in the figure above Show two values but no curve select None Show a three value but no curve select the third value to be displayed When the curve is not displayed the bar graph option always represents the time 4 Bar Graph Select sensor and type of data displayed in th...
Страница 15: ...h on the main screen or touch the button limits from the Display screen The limits feature allows you to setup action under the condition of the current values Those actions can be enable an output or the buzzer 1 Activate Deactivate Touch the area Touch to activate or Touch to deactivate to activate or disable the set points menu 2 Load cell tab A separate tab is displayed for each sensor Select ...
Страница 16: ... reached 5 Activate an Output The limit can control a TTL output action Select the desired output The output action is chosen by setting the desired output in the output control Set the action and state as required Operations If the bottom limit is the only one set the state of the output will change when the measured value will exceed the limit value If the bottom and the top limit are set the st...
Страница 17: ...resolution of the curve is 1000 so you will record a point every 0 01 seconds Touch the control to activate the keypad Enter desired test time Note A test can be stopped before the end of the running time by touching the icon or using an Input from the force gauge See Chapter X Input Output The test may also be stopped on the activation of an output as the result of a calculation by example Howeve...
Страница 18: ...be done in the Test menu It is possible to perform simultaneous 2 calculations in addition of the raw data the maximum and the minimum 1 Calculation The Centor Touch allows you to select 2 calculations derived from the graph Select the Calcul 1 or 2 tab The Test running mode should be activated to perform calculation The following calculations are available Average The average of load readings ove...
Страница 19: ...eed Speed calculation in real time of the selected channel Stiffness Calculate the slope of the curve between two values Time of peak Return the time value when the peak have been reached 2 Output actions After each calculation it is possible to activate an output of the force gauge Select the output control from the drop down menu to activate from 1 to 6 then select its running mode pulse or swit...
Страница 20: ...e to connect the force gauge to a computer or used the memory USB stick called DATASTICK to save multiples curves Statistics and memory must be enabled by touching the statistics symbol on the setup screen 1 Statistics setup 1 Select the desired result to be entered into the statistic arrays you can choose 3 types of values to record maximum minimum calculation1 or calculation2 for each channel Se...
Страница 21: ...above to validate and save the data The values are added to the array and the average value is calculated and displayed in the window on the top right To view all the calculation and the statistical results touch the mean window You can then transfer those results to a computer through USB RS232 or a memory USB stick See the Chapter Communication Setup IX COMMUNICATION Settings You can connect you...
Страница 22: ...a the main screen 1 RS232 or Serial commands Input output of the RS232 can be set for continuous or on demand Continuous Data can be sent continuously using the serial command with a frequency rate around 100Hz Demand You have to send a command to the force gauge to receive data This command can be send by a computer with an ASCII charater a TTL input or using the key icon from the main measuring ...
Страница 23: ...ensor2 W Last Graph Z Tare the gauge The following rules applied to the communication protocols on Demand mode The force gauge doesn t send trailing characters The force gauge sent the sign or none according to the measured values and the settings The resolution of the sent values depends of the load cell capacity The force and displacement values are separated by a TAB characters 09 decimal and 0...
Страница 24: ...onal The Bluetooth connection allows wireless communication with a computer It can replace by example RS232 or USB cable It requires a module sold separately which is connected to the connector on the side of the Centor Touch The Bluetooth connection has the same features as the RS232 request and continuous mode The controls remain the same too 4 Analogue Connection The Centor Touch is able to sen...
Страница 25: ...k to choose from Calculated values max min and calculations selected in the menu TEST Raw data the value measured by the sensor at the time of communication Curve save the curve plotted on the screen Curve and calculations the plotted curve max min and calculations selected in the menu TEST Statistics data saved in the statics table of the CENTOR TOUCH 2 You can change the default file name for th...
Страница 26: ...hich display a virtual keyboard The 1 2 3 button allows to insert an automatic counter to the name of the directory curve This counter is symbolized by the sign 3 The button is used to eject safely the USB Datastick 4 You can choose to save your data on the Datastick either Manually at the end of each test by pressing the button Automattically at the end of each test After confirmation at the end ...
Страница 27: ... timer disappears you can safely disconnect the USB stick On the left bottom corner the button allows to access directly to the Stick setttings screen d Use multiples USB stick The USB stick supplied by ANDILOG at the time of the purchase of the DATASTICK option has been set to communicate with your CENTOR TOUCH and it recognize the serial number of your CENTOR TOUCH However you can duplicate this...
Страница 28: ... output from 1 through 6 can be set separately Those outputs can change state under different conditions depending of the settings of the force gauge The main states are Nothing no action Calcul 1 changes state at the end of calculation 1 Calcul 2 changes state at the end of calculation 2 Test End changes state at the end of the test Limits changes state after reaching a set points channel 1 or ch...
Страница 29: ...ouch can be set separately Those Inputs allow you to do the following actions Active Test start the test End Test Stop the test Tare Vx tare the channel Vx F Contact uses during the calculation For each input it is possible to define its default value at the beginning of the test high or low Low Level Hhigh Level The Centor Touch can be connected to an external pedal switch set the pedal action in...
Страница 30: ... display keypad Erase then enter new time in seconds then touch the check key on the keypad Times out Screen Individually adjustable times for display back light power down Separately set times for battery and charger Touch the selected time to display keypad Erase then enter new time in seconds then touch the check key on the keypad 4 Orientation You can rotate the display of your CENTOR Touch by...
Страница 31: ...tion of the touch pad 2 Setting the clock Date and time are set from the maintenance Setups tab Touch the date format control Access is granted to the date and time panel Change date and time but touching the appropriate up or down arrows Select AM or PM You can also choose the clock format EU day month year US month day year Touch the check arrow to save changes and exit or the x to forget change...
Страница 32: ...LOGIES dealer 2 Interface Cables Several interface cables can be used with CENTOR TOUCH force gauge External pedal allows simulation of a keyboard button Cable for external contact allows force calculation from closing opening of contact equipped with male female plugs Linking cable for motorised test stand STENTOR allows to stop the stand according to a condition defined by CENTOR TOUCH force gau...
Страница 33: ...ion screen This screen is displayed after completion of internal tests and a minor or major defect has been found Minor defects Low battery Number of overloads less than 10 Expired calibration date Touch Measure to continue Major defects Damaged sensor High number of overloads 10 Internal error Sensor not attached ...
Страница 34: ...Instructions Manual V6 10 CENTOR TOUCH Force Gauge STAR DUAL version 33 2 Factory Settings Screens default Communications default Test default Setups default Statistics default Maintenance default ...
Страница 35: ...ector requires 50 k ohm pull up to 5 volts DC 9 Gauge reset 10 Analogue output 11 I2 input 12 Not used 13 Not used 14 USB device power 15 USB host power 16 O4 output Open collector requires 50 k ohm pull up to 5 volts DC 17 O5 output Open collector requires 50 k ohm pull up to 5 volts DC 18 GND 19 Chassis ground 20 Pedal input 21 Not used 22 RS232 transmit data 23 USB device data plus 24 USB host ...
Страница 36: ...Ave V FORCE1 Send peak data after test complete with send key to the RS232 port Touch information bar Touch the communications icon RS232 touch to activate Set FORCE 1 to peak Set speed parity stop bits and number of bits to match com port on computer Set Send to key After the test is complete touch the send key to transmit data Start from pedal Touch information bar Touch maintenance icon Set ped...
Страница 37: ...Instructions Manual V6 10 CENTOR TOUCH Force Gauge STAR DUAL version 36 5 Dimensions ...