background image

Installation Guide

For Andersen® 1000 Handle Set and Closer

READ ENTIRE GUIDE BEFORE BEGINNING INSTALLATION.   Please handle your components with care to avoid damage and/or scratches.

pLEASE NOTE: Proper assembly, installation and maintenance are essential if the benefits of your Andersen

®

 product are to be fully attained. Therefore, 

please read and follow this guide completely. If your abilities do not match this procedure’s requirements, contact an experienced contractor. 

You may direct any questions to the Solution Center at 1-800-933-3626, Monday through Friday, 7 a.m. to 7 p.m. Central Time, and Saturday 

and Sunday, 8 a.m. to 5 p.m. Central Time.

IMpORTANT

    w a r n i n g

Improper use of hand or power tools could result in injury and/or product damage. Follow equipment manufacturer’s instruc-
tions for safe operation. Always wear safety glasses.

RECOMMENDED TOOLS

• Safety Glasses
• Phillips Head Screwdriver
• Hammer

• Pencil
• 3/32” & 5/32” Drill Bits
• Drill

• Chisel

• Center Punch

EMCO Enterprises, Inc. 

PO Box 853 

Des Moines, IA 50306-0853 

Revised 04-2007 7057 

Part Number 616316

EMCO Enterprises, Inc. is a wholly owned subsidiary of Andersen Corporation.  EMCO manufactures Andersen® and EMCO® 

doors. EMCO supports the limited warranties covering Andersen® storm and screen doors. “Andersen”, “EMCO” and all other 

marks where denoted are trademarks of Andersen Corporation. ©2007 Andersen Corporation. All rights reserved.  

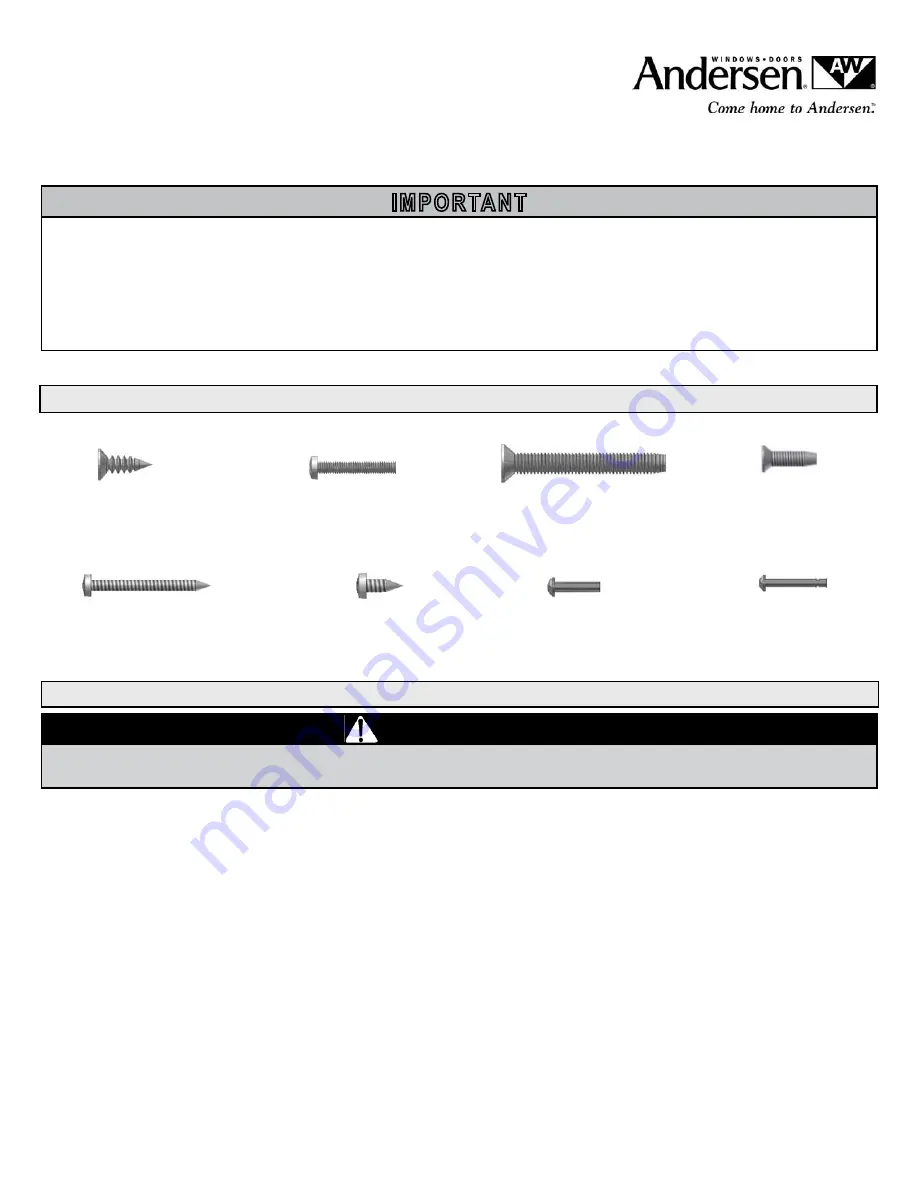
FASTENER IDENTIFICATION

#6 X 0.8”

PHiLLiPS Pan HEaD SCrEw

QTY: 2

#6 X 1/2”

PHiLLiPS FLaT HEaD SCrEw

SELF-TaPPing

QTY: 4

#10 X 1-1/2”

PHiLLiPS FLaT HEaD SCrEw

QTY: 1

#8 X 1/2”

PHiLLiPS FLaT HEaD SCrEw

QTY: 2

#12 X 5/8”

PHiLLiPS Pan HEaD SCrEw

QTY: 2

SHOrT Pin 

QTY: 1

LOng Pin 

QTY: 1

#10 X 2”

PHiLLiPS Pan HEaD SCrEw

QTY: 4

Содержание Andersen 1000

Страница 1: ...ge Follow equipment manufacturer s instruc tions for safe operation Always wear safety glasses recommended tools Safety Glasses Phillips Head Screwdriver Hammer Pencil 3 32 5 32 Drill Bits Drill Chise...

Страница 2: ...ded portion of the latch bolt needs to be facing the handle side Z bar If latch bolt is in correct position proceed to Step 3 Rotate the latch bolt to correct position for a left hinge or right hinge...

Страница 3: ...door and place the striker on the handle side Z bar Center the bottom striker opening vertically on the deadbolt marks on the handle side Z bar Center the openings in the striker horizontally over th...

Страница 4: ...oser with long pin CLOSE STORM DOOR Swing closer assembly so door bracket touches door frame and level Center the holes of the door bracket on the line drawn on the door frame and mark Drill a 5 32 pi...

Страница 5: ...t closing speed Use Phillips head screwdriver to adjust closer to desired speed For faster closing speed turn adjustment screw to the left counter clockwise For slower closing speed turn adjustment sc...

Страница 6: ...s de seguridad herramientas recomendadas Antiparras de seguridad Destornillador Phillips Martillo L piz Broca de taladro de 3 32 5 32 Taladro Cincel Punz n para centrar EMCO Enterprises Inc PO Box 853...

Страница 7: ...cerradura est en la posici n correcta siga con el Paso 3 Rote el pestillo de la cerradura hasta la posici n correcta para una puerta con bisagra a la izquierda o a la derecha Ubique la caja de la cer...

Страница 8: ...del lado de la manija Centre las aberturas del tope superior verticalmente en las marcas del cerrojo muerto en el perfil en Z del lado de la manija Centre las aberturas en el tope horizontalmente sobr...

Страница 9: ...oporte de la puerta hacia el orificio exterior del cierrapuertas con el pasador largo CIERRE LA PUERTA CONTRA INTEMPERIE Ubique el montaje del cierrapuertas de modo que el soporte de la puerta toque e...

Страница 10: ...estornillador Phillips para ajustar el cierrapuertas a la velocidad deseada Para una velocidad de cierre m s r pida gire el tornillo de ajuste hacia la izquierda en sentido antihorario Para una veloci...

Страница 11: ...r des blessures et des dommages aux produits Pour votre s curit suivez les directives du fabricant de mat riel Portez toujours des lunettes de s curit outils recommand s Lunettes de s curit Tournevis...

Страница 12: ...uche ou droite La partie arrondie du p ne demi tour doit faire face au montant en Z c t poign e Si le p ne demi tour se trouve dans la position appropri e passez l tape 3 Faites tourner le p ne demi t...

Страница 13: ...ure par la fente sur la plaque de garniture int rieure en vous assurant que la barrette tournante se trouve l int rieur de la porte Fixez le barillet de serrure l aide d une vis m taux n 10 x 1 1 2 po...

Страница 14: ...e dans le trou ext rieur du ferme porte l aide du goujon long FERMEZ LA CONTRE PORTE Faites pivoter le ferme porte de fa on ce que l attache de porte touche le cadre de porte et soit de niveau Centrez...

Страница 15: ...tesse de fermeture l aide d un tournevis lame Phillips r glez la vitesse de fermeture Pour qu elle se ferme plus rapidement tournez la vis de r glage vers la gauche sens antihoraire Pour qu elle se fe...

Отзывы: