background image


4

2.  Charging the Battery 

Notes 


Charging the battery before it is completely discharged will shorten the battery life. Whether 
the battery is completely discharged or not can be determined by the POWER SUPPLY LED 
indicator when the charger and the battery are disconnected:   

Indicator “ON”= The battery has some charge remaining.   
Indicator “OFF” =The battery is completely discharged. 


Charge the battery fully, until the START LED indicator turns off and the FINISH LED indicator 
turns on. This procedure will take about 15 hours. 


During the charging operation, the battery will not supply power to the balance. 


In case that both indicators of the START LED and FINISH LED blink, the output voltage of the battery 
charger is not enough. Use the specified charger and confirm the voltage of the power source. 


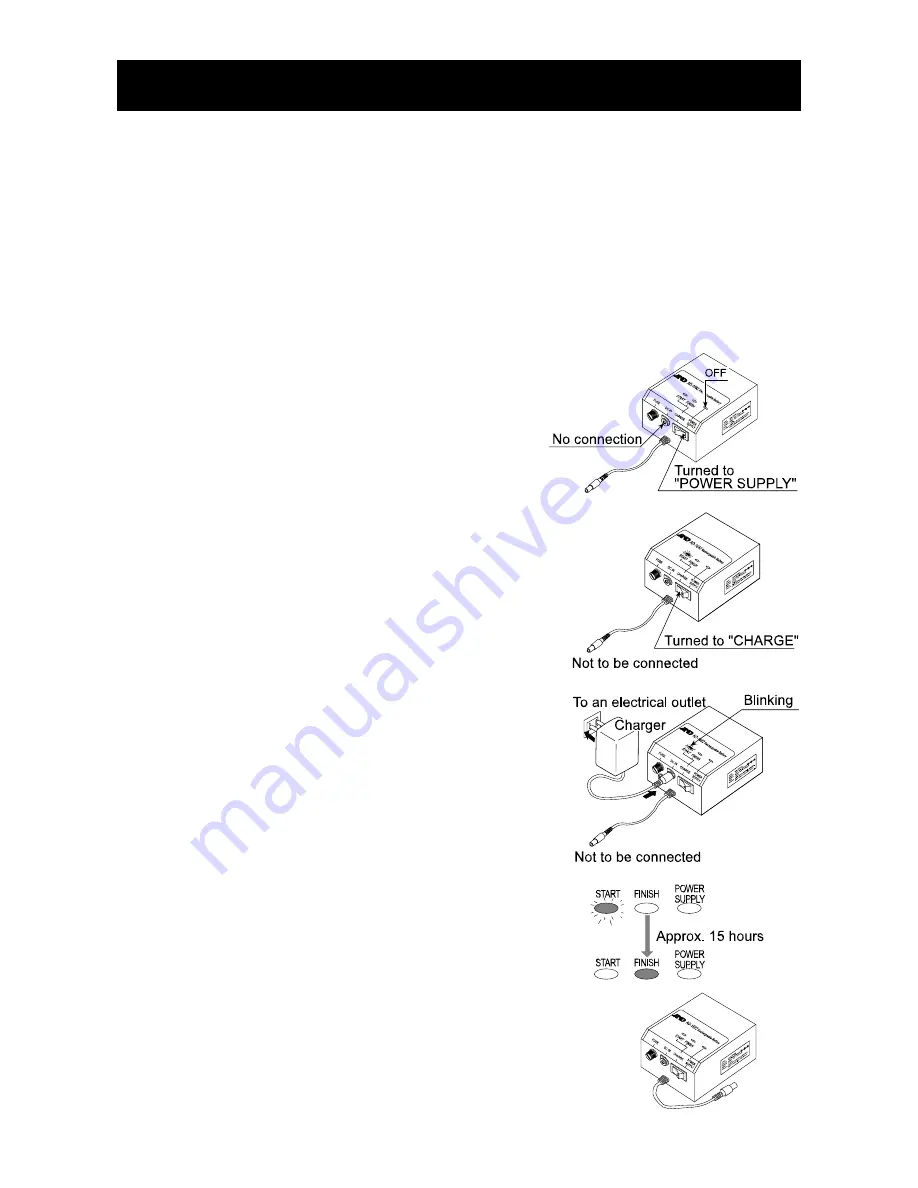
Charge the battery as follows: 

1.  Make sure that the battery is completely discharged.   

When the battery is completely discharged: 

  With the charger disconnected, when the power switch is 

turned to the "POWER SUPPLY" position, the POWER 
SUPPLY LED indicator will be off. 

  If the balance can detect the low battery, "

lb

" is 

displayed. 

Note 

The battery can start charging even when the POWER 
SUPPLY LED indicator is on. 


2.  Turn the power switch to the “CHARGE” position. 


3.  Connect the charger to the battery. The battery will start 

charging. The START LED indicator will blink during the 
charging operation. 


4.  Charging will complete automatically after about 15 

hours, when the START LED indicator turns off and the 
FINISH LED indicator turns on. 


5.  After charging is complete, disconnect the charger from 

the battery to avoid recharging. 

Содержание Rechargeable Battery AD-1682

Страница 1: ...WM PD4000270C ...

Страница 2: ...duced transmitted transcribed or translated into any language in any form by any means without the written permission of A D Company Ltd The contents of this manual and the specifications of the instrument covered by this manual are subject to change for improvement without notice ...

Страница 3: ...o be used with balances manufactured by A D Using the AD 1682 with products other than specified may cause heat buildup and could cause a fire Before use see 1 4 List of Applicable Balances to check which balances can be powered by the AD 1682 Keep the battery out of the reach of children Do not drop or apply shock to the battery Compliance Compliance with FCC Rules Please note that this equipment...

Страница 4: ... see 1 4 List of Applicable Balances to check which balances can be powered by the AD 1682 1 2 Unpacking the AD 1682 In the carton you should find this manual and the following Battery unit 1 pc 800 mA time delay fuse 1 pc Battery charger 1 pc Please confirm that this charger type is correct for your local voltage and receptacle type Identification label 1 pc Paste this label onto the battery char...

Страница 5: ... 66 hours The AD 1682 can be used for other instruments than balances as shown below Instruments Continuous operation hours Depends on operating conditions SV series Viscometer 5 hours AD 8922 Remote controller 12 hours Note In this manual balance s refers to the A D manufactured products listed in the tables above 1 5 Notes on Using the AD 1682 The continuous operation hours depend on the operati...

Страница 6: ...harger is not enough Use the specified charger and confirm the voltage of the power source Charge the battery as follows 1 Make sure that the battery is completely discharged When the battery is completely discharged With the charger disconnected when the power switch is turned to the POWER SUPPLY position the POWER SUPPLY LED indicator will be off If the balance can detect the low battery lb is d...

Страница 7: ...ower to the balance 5 While the balance is in use if the remaining charge decreases and the voltage drops the POWER SUPPLY LED indicator will be turned off automatically to shut off the battery Under this condition turn the power switch to the CHARGE position to protect the battery Note Much care is required with the connection as illustrated at the right The charger and the battery are connected ...

Страница 8: ...the balance CHARGE Connected The output voltage of the battery charger is not enough Use the specified charger and confirm the voltage of the power source CHARGE Not connected None POWER SUPPLY Not connected The battery is supplying power to the balance See note 2 POWER SUPPLY Connected The charger is supplying power to the balance Note 1 Charge the battery after it is completely discharged Note 2...

Страница 9: ...7 MEMO ...

Страница 10: ...8 MEMO ...

Отзывы: