background image

CENTRIX™ & EVENTIX™ 

APPENDIX A / ANNEXE A  


PAGE 125 


  COMMAND  RESPONSE 

COMMAND DESCRIPTION 

VALUE /

VALEUR


COMMANDE  RÉPONSE 

DESCRIPTION DE LA COMMANDE 

TYPE

MIN MAX

DESCRIPTION 


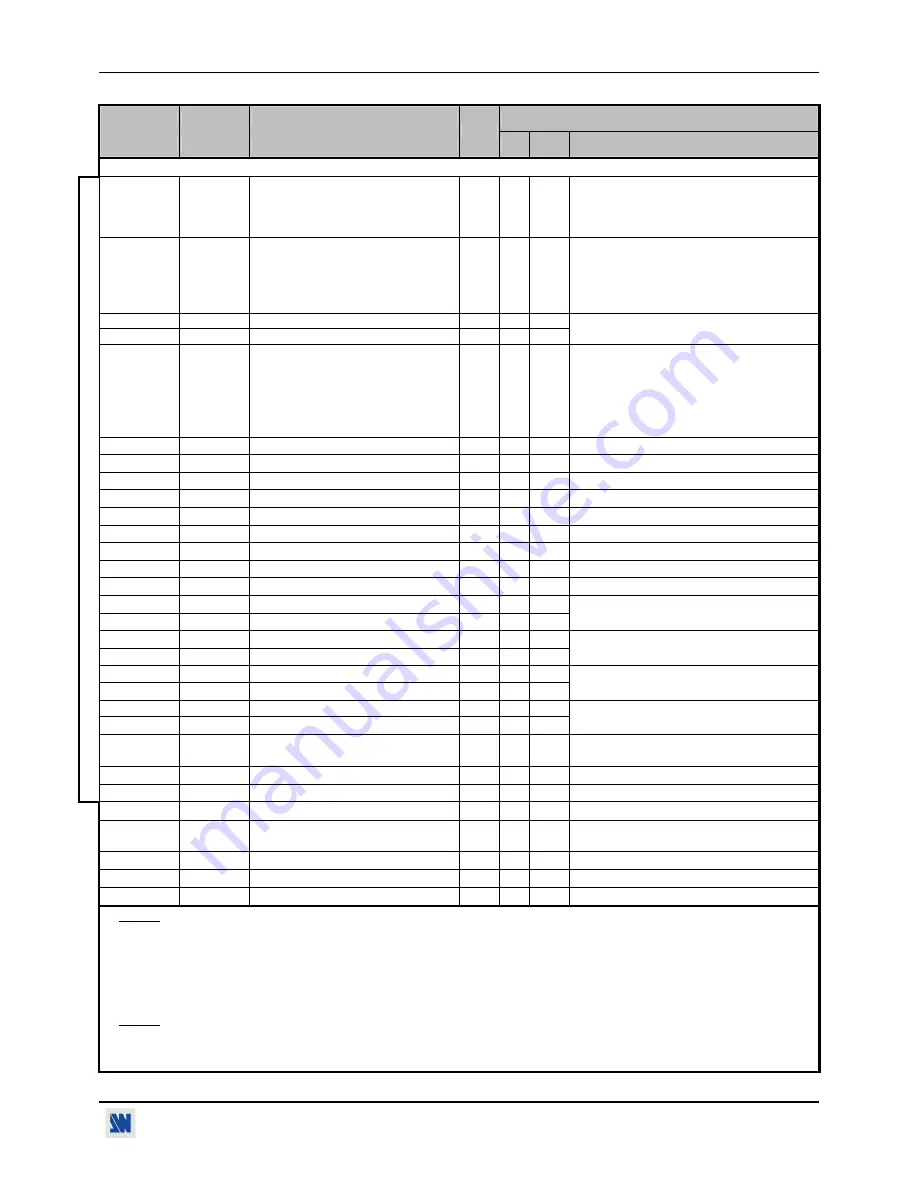
FRAME & LOGOS COMMANDS (continued) / 

COMMANDES DU MENU LOGOS & FRAME (suite)


lM lmod 

Frame/logo 

mode. Rd/Wr

0 = use & assignment mode. 
1 = logo recording mode. 
2 = frame recording mode. 
3 = erasing mode. 

lX 

lsta 

Status of the logo programmer 

Rd 

0 4 

0 = free. 
1 = logo/frame in recalling process. 
2 = logo/frame in storing process. 
3 = output format incompatible with the logo. 
4 = logo/frame in erasing process. 

lA 

lpga 

Logo 1 & frame assignment. 

Rd/Wr

10 

lB 

lpgb 

Logo 2 & frame assignment. 

Rd/Wr

10 

0 = none 

1 = frame 1 

2 = frame 2 

3 = logo 1 

4 = logo 2........ 10 = logo 8 

lC lcur 

 In logo recording mode: Number of 

the logo to be store (3 to 10). 

 In frame recording mode: Number of 

the frame to be store (1 or 2). 

 In erase mode: number of the logo to 

be erase (0 = erase all). 

Rd/Wr

0 10 

0 = no logo 

1 = frame 1 

2 = frame 2 

3 = logo 1 

4 = logo 2...................  10 = logo 8 

lD 

ldys 

Display logo (according to PCH) 

Rd/Wr

0 = Display OFF 

1 = Display ON 

lU 

lhcp 

Horiz. position of the logo storing area.  Rd/Wr

255   

lu 

lvcp 

Vert. position of the logo storing area.  Rd/Wr

255   

lW 

lhsa 

Horizontal size of the logo storing area. Rd/Wr

255  5 = 3% 

255 = 100% 

lS 

lvsa 

Vertical size of the logo storing area. 

Rd/Wr

255  5 = 3% 

255 = 100% 

lH 

lhpa 

Horizontal position of the logo 1. 

Rd/Wr

255   

lh 

lhpb 

Horizontal position of the logo 2. 

Rd/Wr

255   

lV 

lvpa 

Vertical position of the logo 1. 

Rd/Wr

255   

lv 

lvpb 

Vertical position of the logo 2. 

Rd/Wr

255   

lP 

lpxa 

Pixels number in a line of the logo 1. 

Rd 

0 65535

lL 

llna 

Lines number in a logo 1. 

Rd 

0 65535

These 2 commands allow to calculate the 
duration of the storing. 

lp 

lpxb 

Pixels number in a line of the logo 2. 

Rd 

0 65535

ll 

llnb 

Lines number in a logo 2. 

Rd 

0 65535

These 2 commands allow to calculate the 
duration of the storing. 

lT 

ltya 

Logo 1 type. 

Rd/Wr

0 1 

lt 

ltyb 

Logo 2 type. 

Rd/Wr

0 1 

0 = frame 

1= logo. 

lO 

lofa 

Output format during the logo1 storing.

Rd 

0 11 

lo 

lofb 

Output format during the logo2 storing.

Rd 

0 11 

Identical as F command. 

lR lsto 

 In recording mode: frame/logo storing.

 In erase mode: frame/logo erasing.  

Rd 

1 = STORE or ERASE (automatic reset). 

lr 

labt 

Stop the frame storing. 

Rd/Wr

1 = stop the frame storing (automatic reset). 

PREVIEW / OUTPUT 2 

lZ 

LPTP 

Logo transparency  

Rd/Wr

15  0 = mini  

15 = maxi 


LE 

LLEV 

Luma key level. 

Rd/Wr

255   


lE LEMP 

Status of the frame/logo memories. 
(according to lcur) 

Rd 0 1 

0 = logo/frame memorized. 
1 = empty memory. 


Lb LBKC 

Background 

color. 

Rd/Wr


Ld 

LLD 

Fade logo duration (0.01 second step).  Rd/Wr 15 

255  15 = 0.15 second 

255 = 2.5 seconds 


Lf 

LFD 

Fade frame duration (0.1 second step).  Rd/Wr

50  5 = 0.1 second 

50 = 5 seconds 


NOTE:  To store a logo from the PREVIEW display you should:


c

 Select the logo recording mode with the lM command (1lM). 

d

 Adjust the position and size of the logo storing area with the lU, lu, lH and lh commands. 

e

 Adjust the luma key level (with LE command) and the background color (with Lb command). 

f

 Select a logo memory with the lC command and make a store with lR command (1lR).  

To store a frame from the PREVIEW display you should:


c

 Select the frame recording mode with the lM command (2lM), and make a store with the lR command (1lR). 

NOTE:


To assign a logo/frame to an input on the PREVIEW display you should:


c

 Select the assignment mode with the lM command (0lM). 

d

 Select a stored logo/frame with lA, or lB commands. 

e

 Adjust the horizontal & vertical position of the logo with the lH, lh, lV & lv commands. 

www.liveline.be

Содержание CentriX CTX8022

Страница 1: ...ANALOG WAY CENTRIX EVENTIX EDITION 07 05 MODELS CTX8022 CTX8022 D MODELS EVX8022 EVX8022 D EVX8022HD D User s Manual Manuel Utilisateur www liveline be ...

Страница 2: ...www liveline be ...

Страница 3: ...ONNECTIONS 38 4 2 UPDATE INSTRUCTIONS 38 Chapter 5 USING FRAME STORE AND LOGO INSERTION 39 5 1 USING LOGO INSERTION WITH THE REMOTE CONTROL SOFTWARE 39 5 2 USING FRAME STORE WITH THE REMOTE CONTROL SOFTWARE 40 5 3 USING LOGO INSERTION WITH THE REMOTE KEYPAD OR EVENTIX 41 5 4 USING FRAME STORE WITH THE REMOTE KEYPAD OR THE EVENTIX 42 Chapter 6 EVENTIX REMOTE KEYPAD LCD SCREEN DESCRIPTION 43 6 1 INT...

Страница 4: ...m wall outlet In both cases please follow these instructions The power cord of the device should be unplugged from the outlet when left unused for several days To unplug the device do not pull on the power cord but always on the plug itself The outlet should always be near the device and easily accessible Power supply cords should be routed so that they are not likely to be walked on or pinched by...

Страница 5: ... jamais obstruer ses ouvertures Si un liquide ou un objet pénètre à l intérieur de l appareil débranchez immédiatement l appareil et faites le contrôler par un personnel qualifié avant de le remettre en service ISTRUZIONI DI SICUREZZA Allo scopo di capire meglio il funzionamento di questa apparecchiatura vi consigliamo di leggere bene tutti i consigli di sicurezza e di funzionamento prima dell uti...

Страница 6: ...e lea cuidadosamente todas las consignas de seguridad y de funcionamiento del aparato antes de usarlo Conserve las instrucciones de seguridad y de funcionamiento para que pueda consultarlas posteriormente Respete todas las consignas indicadas en la documentación relacionadas con el producto y este documento PRECAUCIONES Y OBSERVACIONES CUIDADO Para prevenir cualquier riesgo de choque eléctrico y d...

Страница 7: ...al size and position increases readability on bright images CENTRIX EVENTIX enables to display a title over a computer or a video image CUT Seamless Switching between any 2 inputs WIPES available with EVENTIX only Numerous Horizontal and vertical wipe transitions NATIVE MATRIX MODE CENTRIX EVENTIX when used as a Hi Res Matrix allow to switch any of the 8 inputs to one of the 2 outputs The inputs a...

Страница 8: ...ware for 16 CENTRIX EVENTIX Allows to control up to 16 devices 1 5 CENTRIX EVENTIX INSTALLATION IMPORTANT Please read all of the safety instructions pages 4 to 6 before starting Table top mounting The device can be used directly on a table the unit is equipped with 4 plastic feet Rack mounting The device is compatible with a 19 enclosure Please follow the instructions below to install the device i...

Страница 9: ...UT 2 PREVIEW OUTPUT 2 selection for adjustments or input selection ADJUST LOGO 1 POSITION Horizontal Vertical logo 1 position adjustment Adjust with H V knobs LOGO 2 POSITION Horizontal Vertical logo 2 position adjustment Adjust with H V knobs LOGO ON OFF Display ON or OFF the assigned logos of the displayed input IMAGE CENTERING Automatically position the selected source in the centering pattern ...

Страница 10: ... on a DVI connector SDI IN Optional SDI input on a BNC connector REMOTE IP LAN LAN communication port on a RJ45 connector MAIN OUTPUT 1 DISPLAY 2 MAIN outputs for the MAIN display devices video projector PLASMA data monitor on HD15 female connectors OPTIONAL OUTPUT Optional video SDTV or HDTV output 1 on DB9 female connector PREVIEW OUTPUT 2 DISPLAY 2 PREVIEW outputs for the PREVIEW display device...

Страница 11: ... ON the projector the local monitors the device rear panel switch and then all of your input sources Figure 4 2 1 1 UNIVERSAL COMPUTER VIDEO INPUTS The UNIVERSAL INPUTS can accept both COMPUTER sources RGBHV RGBS and RGsB SOG signals standard TV VIDEO sources Composite video S VIDEO Component YUV RGBS RGsB SOG and HDTV sources 720p 1080i c COMPUTER SOURCES The device accepts COMPUTER signals RGBHV...

Страница 12: ...tor of the device For the inputs 5 to 8 connect a HD15 to BNC cable between the HD15 connector of the device and your Composite source as follow Figure 6 e S VIDEO SOURCES The S VIDEO signal also called Y C HI 8 or S VHS is available on DVD players and high quality VCRs S VHS The S VIDEO signal in which the Luminance Y and Chrominance C information are separately transmitted 2 wires gives a higher...

Страница 13: ... to 8 connect a HD15 to BNC cable between the HD15 connector of the device and your Component source as follow Figure 8 g RGBS VIDEO SOURCES This signal is widely used in broadcasting and is available on European DVD player The RGB S signal is transmitted with 4 coaxial cables and also has a better picture quality than COMPOSITE and S VIDEO signals The RGB S connectors are usually BNC connectors f...

Страница 14: ...tputs display the same image as the MAIN output Figure 10 2 1 4 HDTV VIDEO OUTPUTS available on the EVX8022HD D model only The device provides simultaneously HD YUV HDSDI signals These two video outputs display the same image as the MAIN output Figure 11 2 1 5 OPTIONAL AUDIO INPUTS The devices with the OPT iX A option are equipped with 8 audio inputs 1 auxiliary input on 5 pin MCO male connectors ...

Страница 15: ...DATA Tx 3 RECEIVE DATA Rx 5 GROUND Gnd 2 2 2 CONNECTING TO THE LAN PORT Connect the LAN port RJ45 connector of the CENTRIX EVENTIX to your network according to your installation 2 3 CONNECTING THE REMOTE KEYPAD 2 3 1 CONNECTING TO A CENTRIX EVENTIX WITH THE RS 232 PORT c Turn OFF your CENTRIX EVENTIX rear panel switch d Connect the RS 232 connector DB9 female of your CENTRIX EVENTIX to the DB9 mal...

Страница 16: ...windows desktop open My Computer and select the CD ROM drive Select the Autorun folder and then select the autorun exe file f Follow the Windows installation instructions 3 1 2 COMMUNICATION SETUP CASE OF RS 232 PORT c Connect the RS 232 cable between the CENTRIX EVENTIX and the control device according to your installation as indicating in the section 2 2 1 d Then only power ON all of the devices...

Страница 17: ...e the RS232 communication port Figure 15 IMPORTANT The CENTRIX EVENTIX can be used in two different modes the MIXER MODE and the MATRIX MODE The MIXER MODE allows switching seamlessly fading and titling between all the inputs The MATRIX MODE allows displaying the inputs onto two independents display devices The default mode is the MIXER MODE To set the CENTRIX EVENTIX in MATRIX MODE please refer t...

Страница 18: ... EVENTIX make the following adjustments c Select the source you want to adjust d Click on the Image main or Image preview tab e Use the Centering function to automatically position the image in the Centering pattern IMPORTANT For best results display a full size bright image no black border to perform a centering If necessary correct the adjustment with the position size functions NOTE The centeri...

Страница 19: ... Effects tab then click on the Effect button and select an Effect d Click on the EFFECT ANIMATION button select an Effect opening and an Effect closing and select the durations NOTE The Effect opening and Effect closing available are write in black and depend of the selected Effect e Then make the effect adjustment available in the Effects windows Figure 19 Figure 20 d e c www liveline be ...

Страница 20: ...e Effects windows Press the TAKE key to activate the effect ACTION 1 in the example below the PREVIEW image is now inserted into the MAIN image NOTE You can change the image in the PIP PREVIEW image by selecting another input of the PREVIEW output ACTION 2 Press the SWITCH PREVIEW key and select the needed input the transition operates with a fading to black You can change the background image MAI...

Страница 21: ...le below then pre select the source used for create the text the image appears on the PREVIEW output INPUT 1 in the example below Click on the Effects tab Assign the TITLE effect to one of the EFFECT keys Click on the arrow of an EFFECT key and select title or shadow title then make all the needed adjustments duration in the Effects windows Press the TAKE key to activate the effect ACTION 1 the te...

Страница 22: ...IPE to one of the EFFECT keys Click on the arrow of an EFFECT key and select a WIPE for example hor wipe from left Select an effect opening and closing then select the duration in the Effects windows Press the TAKE key to activate the transition the PREVIEW image appears onto the MAIN display with a wipe transition Figure 23 Wipe transition wipe opening Figure 24 Wipe transition slide opening www ...

Страница 23: ...ick on STORE and select 1 or 2 to store the frame into a memory The memorization starts and will take about 2 minutes Display onto the MAIN PREVIEW outputs the 2 sources to be used for the PIPs Select an EFFECT key Then click on the Effect tab and select Double PIP type Then select the holding duration Click on the Background and Inlay button and select a frame Click on TAKE the frame store is dis...

Страница 24: ... zoom mode U Over scan AUDIO ADJUSTMENTS Click on the Audio tab and make for each AUDIO output the following adjustment c Adjust the master volume d Select the mono or stereo audio mode e Select an AUDIO input breakaway mode or automatic auto follow mode auto follow the audio switching follows automatically the video switching breakaway the selected audio input is permanently diffused f For each a...

Страница 25: ...rresponding to the native resolution of your display device Thus the display device will not have to scale the image and the result will be better i Select the type of screen 4 3 or 16 9 according to your wall mounted projection screen shape j Click on the Output 2 tab Then renew the steps g to i for the display device connected to the OUTPUT 2 Figure 27 Figure 28 INPUT SELECTION c Pre select an i...

Страница 26: ...ments available in the IMAGE menu color brightness NOTE To set the image adjustments to the factory settings use the Preset function NOTE The adjustments are automatically stored in NON volatile memories The CENTRIX EVENTIX are provided with 40 NON volatile image memories Each of these memories contains the input channel number the input and output format parameters and all of the image adjustment...

Страница 27: ...r display device with the LCD menu OUTPUT output sync g Select the output rate mode with the LCD menu OUTPUT output rate h Select one of the output formats with the LCD menu OUTPUT output format NOTE For fixed pixels display device DMD LCD PLASMA always select the output format corresponding to the native resolution of your display device Thus the display device will not have to scale the image an...

Страница 28: ...h the LCD menu IMAGE centering or with the front panel IMAGE centering key to automatically position the image in the Centering pattern IMPORTANT For best results display a full size bright image no black border to perform a centering If necessary correct the position size with the IMAGE POS SIZE key or with the LCD menu IMAGE pos settings NOTE The centering function is only available for computer...

Страница 29: ...ility you also can display a shadow bar onto your text Create the text to display with the computer connected to the EVENTIX thanks to a drawing software like PowerPoint text in white onto a black background Display on the MAIN output the source to titling then pre select the source used for create the text the image appears on the PREVIEW output Assign the TITLE effect to one of the USER keys Pre...

Страница 30: ...e store is displayed onto the MAIN output together with the 2 PIP Adjust with the position size of each PIP double PIP position or size Adjust the mask size position of each PIP in such manner that the 2 PIP will not be superposed into the black areas double PIP mask position or size Select inlay yes if you want to set the PIP in background double PIP inlay See Figure 25 Double PIP Page 23 VIDEO O...

Страница 31: ...t the output format corresponding to the native resolution of your display device Thus the display device will not have to scale the image and the result will be better Select the type of screen 4 3 or 16 9 with the LCD menu OUTPUT X type of screen 4 3 or 16 9 according to your wall mounted projection screen shape g Then renew the adjustments of the step f for the display device connected to the O...

Страница 32: ...able in the LCD IMAGE menu color brightness NOTE To set the image adjustments to the factory settings use the Preset function IMAGE preset yes NOTE The adjustments are automatically stored in NON volatile memories The EVENTIX is provided with 40 NON volatile image memories Each of these memories contains the input channel number the input and output format parameters and all of the image adjustmen...

Страница 33: ...D to your network according to your installation g Then configure the REMOTE KEYPAD LAN communication port with the LCD menu CONSOLE LAN setup h Activate the REMOTE KEYPAD LAN communication port with the LCD menu CONSOLE RS232 LAN port LAN NOTE If the communication doesn t work CENTRIX only you need to reconnect the RS 232 communication port to your Remote Keypad and restart the device The device ...

Страница 34: ...nput source connected to the CENTRIX EVENTIX make the following adjustments c Select the source you want to adjust d Select the aspect ratio of your input source with the LCD menu IMAGE aspect ratio e Use the Centering function with the LCD menu IMAGE centering or with the front panel IMAGE centering key to automatically position the image in the Centering pattern IMPORTANT For best results displa...

Страница 35: ...ith and validate with ENTER Press the TAKE key to activate the effect ACTION 1 the text is now displayed onto the image of the MAIN output NOTE You can change the background image MAIN image by selecting another input of the MAIN output ACTION 2 Press the MAIN output select key and select the needed input the transition operates with a fading to black To remove the TITLE effect press the TAKE key ...

Страница 36: ...your display device Thus the display device will not have to scale the image and the result will be better Select the type of screen 4 3 or 16 9 with the LCD menu OUTPUT X type of screen 4 3 or 16 9 according to your wall mounted projection screen shape g Then renew the adjustments of the step f for the display device connected to the OUTPUT 2 INPUT SELECTION c Select an output OUT 1 or OUT 2 with...

Страница 37: ...eset yes NOTE The adjustments are automatically stored in NON volatile memories The CENTRIX EVENTIX are provided with 40 NON volatile image memories Each of these memories contains the input channel number the input and output format parameters and all of the image adjustments position size brightness When the 40 memories are used each new memorization erases the oldest record VIDEO OUTPUT ADJUSTM...

Страница 38: ...ar panel switch O Figure 33 Updating 4 2 UPDATE INSTRUCTIONS c Open the file iX updater in start Program ANALOG WAY iX8022 d Click on START on the SOFTWARE e Switch ON the device The POWER LED blinking slowly and the update will start f When the software displays Program operation completed SWITCH OFF and ON the device with the rear panel switch g Click on the QUIT button to close the update softw...

Страница 39: ... the logo with the background color function f Click on STORE to store the logo into a memory The memorization of the logo starts and will take about few seconds NOTE Renew the steps c to f to store another logo up to 8 5 1 2 HOW TO ASSIGN A LOGO NOTE You can assign the stored logos to one or many of the 8 inputs up to 2 logos by inputs g In the assignment table assign for each input the needed lo...

Страница 40: ...esponding to the frame selection area onto the output If necessary adjust the position and size of the frame area with the position size functions e Adjust the Luma Key level to get to the desired Luma Keying f Click on STORE to store the frame into a memory The memorization starts and will take about 2 minutes NOTE For motion picture you can use the FREEZE function before doing the memorization 5...

Страница 41: ...logos to one or many of the 8 inputs up to 2 logos by inputs g In the assignment menu LOGOS FRAME use logo frame assignment select the displayed input MAIN or PREVIEW that you want to assign a logo then select an index 1 or 2 and finally select the needed logo NOTE To remove a logo from an input select the corresponding input index and select none NOTE To assign the same logo to all inputs select ...

Страница 42: ...uma Key f Store the frame LOGOS FRAME record frame MAIN or PREVIEW store The memorization starts and will take about 2 minutes NOTE For motion picture you can use the FREEZE function before doing the memorization 5 4 2 HOW TO ASSIGN A FRAME g In the assignment menu LOGOS FRAME use logo frame assignment select the displayed input MAIN or PREVIEW that you want to assign the frame then select frame i...

Страница 43: ...ess on this button to return to the previous menu without safeguarding the item return to the STATUS MODE press several times ENTER button From the STATUS MODE press on this button to display the CONTROL MODE From the CONTROL MODE press on this button to confirm a selected item 6 3 STATUS MODE When switching ON the device the LCD screen shows the product s name and status as follows c DEVICE VERSI...

Страница 44: ... follow input 8 3 output sync output sync main preview H V COMP SOG H V COMP SOG 4 type of screen output screen 4 3 16 9 5 test pattern test pattern main preview 1 no pattern 2 centering 6 video output 3 color bar 4 V grey scale 5 grid 1 video standard 2 output rate 6 softedge 7 output status 4 IMAGE image main preview 1 centering 2 pos settings 5 pos setting 6 input stab 7 color tracking 3 flicke...

Страница 45: ...ONSOLE 1 1 RS232 LAN port 9 CONTROL 11 erase memories 1 versions 3 RS232 LAN port 4 LAN setup 8 tally 7 2 2 pull down 14 default value effect duration xxs 4 shadow title 1 duration holding effect duration xxs custom 2 size 3s 3 position 5s 4 intensity 8 effect closing 2 size 3 position 1s 3s 5s custom 1 fade color auto off 1 tally 1 6 netmask 7 default setup 3 clean cut 4 Eventix port 5 remote por...

Страница 46: ... HV C 5 SDTV RGB SOG 6 SDTV RGBS ana 6 6 Comp HV C 7 7 Comp HV C 8 8 Comp HV C 9 Computer HV C 5 test pattern test pattern out 1 out 2 3 output sync 4 type of screen output sync out 1 out 2 1 output format 6 input status 4 VCR mode 8 HDTV 720p 3 OUTPUT 1 7 D ILA 16 9 5 SXGA 1400x1K 4 OUTPUT 2 2 SVGA 800x600 3 XGA 1024x768 4 SXGA 1280x1K 1 WVGA 852x480 6 D ILA 4 3 2 V position 1 H position 1 displa...

Страница 47: ... port select RS232 LAN 5 RK8022 version 6 default value no yes 2 LAN setup 2 TCP 3 key locking 1 menus 2 input 3 all 4 auto lock 4 key brightness 1 this menu is available on the REMOTE KEYPAD only 12 languages 1 UDP 1 versions 13 default value no yes 2 TCP 4 tally status 11 erase memories no yes 8 tally 1 tally 1 1 RK addr 4 auto lock 10 key locking 1 menus 2 input 3 all 2 frame 2 1 fade color 1 r...

Страница 48: ...tion allows improving the image contour of low quality VHS tapes Select on with ENTER 2 5 synchronized ENTER This function allows defining the sources which are synchronized together external genlock The synchronized sources can be seamless switched between themselves during an effect into a PIP for example This switching mode is called VIS Vertical Interval Switching 2 6 input status ENTER Indica...

Страница 49: ... frame rate for YUV SDI outputs PAL PAL for composite and S VIDEO outputs 50Hz frame rate for YUV SDI outputs NTSCj Japan NTSC for composite and S VIDEO outputs 60Hz frame rate for YUV SDI outputs Or select an output format for the HDTV video outputs with ENTER between 720p 59 94Hz 1035i 59 94Hz 1080i 50Hz 720p 60Hz 1035i 60Hz 1080i 59 94Hz 1080i 60Hz 3 6 2 output rate ENTER Select a function with...

Страница 50: ...owing items 4 5 brightness ENTER Adjust the Brightness with ENTER 4 6 contrast ENTER Adjust the Contrast with ENTER 4 7 color ENTER Adjust the Color with ENTER 4 8 hue ENTER Adjust the Tint of the picture NTSC only with ENTER 4 9 under over ENTER underscan Underscan mode The entire image is visible on the screen Computer mode is underscan overscan Overscan mode The image is displayed about 8 bigge...

Страница 51: ...n allows adjusting the fade duration of the logo when you display ON or OFF a logo Adjust the duration with and validate with ENTER 5 2 record logo ENTER This mode allows storing up to 8 logos in order to incrust them into the displayed image up to 2 logos at a same time Select an item with ENTER 5 2 1 H position ENTER Adjust the Horizontal position of the logo area with ENTER 5 2 2 V position ENT...

Страница 52: ...is menu allows to store an effect in each of the effect keys USER keys 6 1 current effect The LCD screen displays the current effect c First select an effect key with ENTER between 6 2 USER 1 key 6 3 USER 2 key 6 4 USER 3 key 6 5 USER 4 key d Then select one of the following effects 6 x 1 cut allows to switch seamlessly the pre selected input onto the MAIN output NOTE The opening closing animation...

Страница 53: ...c First select a horizontal wipe effect with ENTER between From left From left to right From right From right to left to center from center d Then select the duration of the transition 1s 1 second transition 3s 3 seconds transition 5s 5 seconds transition custom Allows selecting a duration from 0 5 second up to 25 seconds by 0 5 second step 6 x 6 vert wipe Allows to switch the pre selected input o...

Страница 54: ...ation from 0 5 second up to 25 seconds by 0 5 second steps d Adjust the size of the PIP between 15 and 100 with H and V and validate with ENTER e Set the horizontal and vertical position of the PIP windows with the H and V knobs and validate with ENTER f Adjust the mask size with the H and V knobs and validate with ENTER This function allows for example cutting the black bars of a letterbox source...

Страница 55: ...dio input 7 6 AUX input ENTER Auxiliary input for mixing with the diffused source 7 7 mute off ENTER Switch ON or OFF the audio output Validate with ENTER 8 AUDIO PRELIST ENTER This menu is available with the OPT iX A option only The following commands allow controlling the PRELIST AUDIO output OUT 2 8 1 master volume ENTER Adjust the audio output level with ENTER 8 2 audio mode ENTER Select the o...

Страница 56: ... 1 local port Every TCP connection and every UDP datagram is defined by a destination IP address and a port number Select a local port number with ENTER between 10000 and 10999 Default value 10500 remote port You must set the remote TCP port number for the unit to make outgoing connections This parameter defines the port number on the target host to which a connection is attempted Select a remote ...

Страница 57: ...ffect Select YES and validate with ENTER 9 13 default value ENTER This function allows setting all the image parameters to the factory settings Select YES and validate with ENTER Then switch OFF and ON the device FUNCTION POSITION FUNCTION POSITION 1 MODE mixer mode 6 1 USER 1 key Fading 2s 2 1 input type computer HV C 6 2 USER 2 key Title holding 2 2 used Inputs used 6 3 USER 3 key Shadow title h...

Страница 58: ...eway addr The gateway address or router allows communication to other LAN segments The gateway address should be the IP address of the router connected to the same LAN segment as the unit Select the gateway address with ENTER Default value 192 168 0 1 local port Every TCP connection and every UDP datagram is defined by a destination IP address and a port number Select a local port number with ENTE...

Страница 59: ... G B 0 7 Vp p SYNC 0 3 Vp p or TTL Impedance RGB 75 ohms SYNC 75 ohms or Hi Z COMPONENT Connectors BNC female inputs 1 to 4 or HD15 female inputs 5 to 8 Frequency 15 625 kHz 50 Hz 625 lines 15 735 kHz 60 Hz 525 lines Levels Y 1 Vp p 0 7 V Luma 0 3 V Sync Cr Pr Cb Pb 0 7 Vp p Impedance 75 ohms HDTV Connectors BNC female inputs 1 to 4 or HD15 female inputs 5 to 8 Formats 720p 1035i 1080i Levels Y 1 ...

Страница 60: ...E Cb Pb PIN 6 RED return RED return Cr Pr return C return PIN 7 GREEN return GREEN return Y return Y return return PIN 8 BLUE return BLUE return Cb Pb return PIN 10 GND GND PIN 13 H sync or C sync S C sync S PIN 14 V sync HD15 female connector of the device 7 2 MAIN PREVIEW OUTPUTS Connectors HD15 female Levels R G B 0 7 Vp p Sync Separate H V TTL Composite TTL SOG 0 3 Vp p Impedance R G B 75 ohms...

Страница 61: ... Levels Y 1 Vp p 0 7 V Luma 0 3 V Sync C 0 3 Vp p chroma burst Impedance 75 ohms COMPONENT Connector DB9 female Frequency 15 625 kHz 50 Hz 625 lines 15 735 kHz 60 Hz 525 lines Levels Y 1 Vp p 0 7 V luma 0 3 V sync Cr Pr 0 7 Vp p Cb Pb 0 7 Vp p Impedance 75 ohms SDI OUTPUT Connector BNC female Signal 270 Mbps serial digital output conforming to SMPTE 259M Impedance 75 ohms DB9 PIN ASSIGNMENT PIN FU...

Страница 62: ...ector BNC female Data rate 720p 59 94 or 60 Hz 1 5 Gbps serial digital output conforming to SMPTE 296M 1080i 59 94 or 50 or 60 Hz 1 5 Gbps serial digital output conforming to SMPTE 274M 1035i 59 94 Hz 1 5 Gbps serial digital output conforming to BTA S004B 1035i 60 Hz 1 5 Gbps serial digital output conforming to BTA S001 Impedance 75 ohms 7 8 ENVIRONMENTAL Power Supply Internal CE UL CSA IEC 950 13...

Страница 63: ...TIONS DE MISE A JOUR 95 Chapitre 5 UTILISATION DU FRAME STORE ET DE L INCRUSTATION DE LOGO 96 5 1 INCRUSTATION DE LOGO AVEC LE LOGICIEL DE CONTRÔLE 96 5 2 UTILISATION DU FRAME STORE AVEC LE LOGICIEL DE CONTRÔLE 97 5 3 INCRUSTATION DE LOGO AVEC LE REMOTE KEYPAD OU L EVENTIX 98 5 4 UTILISATION DU FRAME STORE AVEC LE REMOTE KEYPAD OU L EVENTIX 99 Chapitre 6 DESCRIPTION DE L ÉCRAN LCD DE L EVENTIX ET ...

Страница 64: ...que est l ombrage de la zone de titre avec la possibilité de régler la taille et la position verticale De plus le CENTRIX et l EVENTIX permettent d afficher un titre sur une image vidéo ou informatique MODE NATIVE MATRIX Le CENTRIX et l EVENTIX utilisés en mode Matrice haute résolution permettent de commuter une des 8 entrées vers 1 ou 2 sorties Les entrées sont scalées et peuvent être affichées s...

Страница 65: ...NTIX SWM OE Logiciel de contrôle à distance permettant de contrôler jusqu à 16 CENTRIX EVENTIX 1 5 INSTALLATION DU CENTRIX EVENTIX IMPORTANT Merci de prendre connaissance des instructions de sécurité page 4 à 6 avant d installer votre appareil Montage sur table L appareil est directement utilisable sur table Il est équipé de pied en caoutchouc Montage en baie L appareil est compatible avec les bai...

Страница 66: ... la sélection d entrée PREVIEW OUT 2 Sélection de la sortie PREVIEW OUTPUT 2 pour les réglages ou la sélection d entrée ADJUST LOGO 1 POSITION Réglage de la position Horizontale et Verticale du logo 1 Réglez avec H V LOGO 2 POSITION Réglage de la position Horizontale et Verticale du logo 2 Réglez avec H V LOGO ON OFF Permet de faire apparaître disparaître les logos de l entrée sélectionnée IMAGE C...

Страница 67: ...teur DVI SDI IN Entrée SDI optionnelle sur un connecteur BNC REMOTE IP LAN Port de communication LAN sur un connecteur RJ45 MAIN OUTPUT 1 DISPLAY 2 sorties MAIN pour les afficheurs principaux projecteur vidéo PLASMA moniteur data sur connecteurs HD15 femelle OPTIONAL OUTPUT Sortie vidéo optionnelle n 1 SDTV ou HDTV sur connecteur DB9 femelle PREVIEW OUTPUT 2 DISPLAY 2 sorties PREVIEW pour les affi...

Страница 68: ...ojecteur les moniteurs de contrôle l appareil interrupteur en face arrière et toutes les sources Figure 41 2 1 1 ENTRÉES UNIVERSELLES INFORMATIQUE ET VIDÉO Les entrées universelles peuvent accepter à la fois les sources INFORMATIQUE signaux RGBHV RGBS et RGsB SOG les sources VIDÉO standard signaux YUV Component RGBS et RGsB SOG et les sources au format HDTV 720p 1080i c SOURCES INFORMATIQUE L appa...

Страница 69: ...Pour les entrées 5 à 8 raccordez un câble HD15 vers BNC entre les connecteurs HD15 de l appareil et vos sources vidéo Composite comme ci dessous Figure 43 e S VIDEO SOURCES Le signal S VIDEO aussi appelé Y C HI 8 ou S VHS est disponible sur les lecteurs de DVD et sur les magnétoscopes haute qualité S VHS Les informations de Luminance Y et de Chrominance C du signal S VIDEO sont transmis séparément...

Страница 70: ...8 raccordez un câble HD15 vers BNC entre le connecteur HD15 de l appareil et votre source YUV comme ci dessous Figure 45 g SOURCES RGB S VIDÉO Ces signaux sont largement utilisés dans le milieu broadcast mais sont aussi disponible sur les lecteurs de DVD Les signaux RGB S sont transmis sur 4 câbles coaxiaux donnant ainsi une meilleure qualité d image que les signaux COMPOSITE et S VIDEO Les connec...

Страница 71: ... la sortie MAIN Figure 47 2 1 4 SORTIE VIDÉO HDTV disponible sur le modèle EVX8022HD D uniquement L appareil fourni simultanément des signaux HD YUV et HDSDI Ces deux sorties vidéo affichent la même image que la sortie MAIN Figure 48 2 1 5 ENTRÉES AUDIO OPTIONNELLES Les appareils avec l option OPT iX A sont équipés de 8 entrées audio et d une entrée auxiliaire sur connecteurs MCO 5 points mâle Ce ...

Страница 72: ...TIONS 2 TRANSMISSION Tx 3 RÉCEPTION Rx 5 MASSE Gnd 2 2 2 RACCORDEMENT AU PORT LAN Raccordez le port LAN connecteur RJ45 du CENTRIX EVENTIX à votre réseau en fonction de votre installation 2 3 RACCORDEMENT DU REMOTE KEYPAD 2 3 1 RACCORDEMENT DU CENTRIX EVENTIX PAR LE PORT RS 232 c Éteignez votre CENTRIX EVENTIX interrupteur en face arrière d Raccordez le connecteur RS 232 DB9 femelle de votre CENTR...

Страница 73: ...st pas actif A partir du bureau de Windows ouvrez Poste de Travail et sélectionnez le lecteur de CD ROM Sélectionnez le dossier Autorun ensuite sélectionnez le fichier autorun exe f Suivez les instructions d installation de Windows 3 1 2 CONFIGURATION DE LA COMMUNICATION CAS DU PORT RS 232 c Raccordez le câble RS 232 entre le CENTRIX EVENTIX et l appareil de contrôle comme indiqué dans la section ...

Страница 74: ...RIX et l EVENTIX peuvent être configuré en deux mode différents le MODE MIXER et le MODE MATRIX Le MODE MIXER permet de commuter sans coupure par fondu ou faire du titrage entre toutes les entrées Le MODE MATRIX permet d afficher les entrées sur 2 sorties indépendantes Le mode par défaut est le MODE MIXER Pour configurer le CENTRIX EVENTIX en MODE MATRIX merci de vous référer à la section 3 1 4 3 ...

Страница 75: ...réglages suivants c Sélectionnez la source que vous souhaitez régler d Cliquez sur l onglet Image main ou Image preview e Utilisez la fonction Centering pour cadrer automatiquement l image dans la mire IMPORTANT Pour un meilleur résultat affichez une image lumineuse en plein écran pas de bandes noires avant de réaliser un centering Si nécessaire corrigez le cadrage avec les réglages de position et...

Страница 76: ...cliquez sur le bouton Effect et sélectionnez un Effet d Cliquez sur le bouton EFFECT ANIMATION sélectionnez un Effect opening et un Effect closing puis sélectionnez les durées NOTE Les Effect opening et les Effect closing disponibles sont écrits en noir et dépendent de l effet sélectionnée e Ensuite effectuez les réglages d effet disponible dans la fenêtre Effects Figure 56 Figure 57 d e c www liv...

Страница 77: ...s Appuyez sur la touche TAKE pour activer l effet ACTION 1 dans l exemple ci dessous l image PREVIEW est maintenant insérée dans l image MAIN NOTE Vous pouvez changer l image en PIP image PREVIEW en sélectionnant une autre entrée sur la sortie PREVIEW ACTION 2 Appuyez sur la touche SWITCH PREVIEW et sélectionnez l entrée souhaitée la transition s effectue par un fondu au noir Vous pouvez changer l...

Страница 78: ...source utilisée pour créer le texte l image apparaît sur le PREVIEW INPUT 1 dans l exemple ci dessous Cliquez sur l onglet Effects Attribuez l effet TITLE à l une des touches EFFECT Cliquez sur la flèche de l une des touches EFFECT et sélectionnez title ou shadow title ensuite effectuez tous les réglages nécessaires durée dans la fenêtre Effects Appuyez ensuite sur la touche TAKE pour activer l ef...

Страница 79: ...es EFFECT Cliquez sur la flèche d une touche EFFECT et sélectionnez un WIPE par exemple hor wipe from left sélectionnez une animation d ouverture et de fermeture puis sélectionnez une durée dans la fenêtre Effects Appuyez sur la touche TAKE pour activer la transition l image PREVIEW apparaît sur l afficheur MAIN par une transition en volet Figure 60 Transition par volet WIPE opening Figure 61 Tran...

Страница 80: ...ectionnez 1 ou 2 pour enregistrer la frame dans une mémoire La mémorisation commence et prendra environ 2 minutes Affichez sur les sorties MAIN PREVIEW les 2 sources utilisées pour les PIP Sélectionnez une touche EFFECT Ensuite cliquez sur l onglet Effect et sélectionnez Double PIP Ensuite sélectionnez la durée holding Cliquez sur le bouton Background Inlay et sélectionnez une frame Cliquez sur TA...

Страница 81: ... mode U Over scan RÉGLAGES DE L OPTION AUDIO Cliquez sur l onglet Audio et effectuez pour chaque sortie AUDIO les réglages suivants c Réglez le volume principal master volume d Sélectionnez le mode audio mono ou stéréo e Sélectionnez une entrée AUDIO breakaway mode ou automatique auto follow mode auto follow la commutation audio suit automatiquement la commutation vidéo breakaway l entrée audio sé...

Страница 82: ...urs à matrice de pixel fixe DMD LCD PLASMA sélectionnez toujours le format de sortie correspondant à la résolution native de votre afficheur Ainsi votre afficheur n aura pas à modifier la résolution et le résultat sera meilleur i Sélectionnez votre type de toile d écran type of screen 4 3 ou 16 9 j Cliquez sur l onglet Output 2 Renouvelez les étapes g à i pour l afficheur raccordée à la sortie OUT...

Страница 83: ...onctions clock ou phase f Si nécessaire effectuez les autres réglages disponibles dans le menu IMAGE color brightness NOTE Pour effacer vos réglages utilisez la fonction Preset NOTE Les réglages sont automatiquement enregistrés dans des blocs mémoires Le CENTRIX et l EVENTIX sont équipés de 40 blocs mémoire de réglage Chacun de ces blocs mémoire contient le numéro de la voie les paramètres d entré...

Страница 84: ...hro output sync qui correspond à votre afficheur avec le menu LCD OUTPUT output sync g Sélectionnez le mode de synchronisation avec le menu LCD OUTPUT output rate h Sélectionnez un des formats de sortie avec le menu LCD OUTPUT output format NOTE Pour les afficheurs à matrice de pixel fixe DMD LCD PLASMA sélectionnez toujours le format de sortie correspondant à la résolution native de votre affiche...

Страница 85: ...E centering ou avec la touche IMAGE centering de la face avant pour cadrer automatiquement l image dans la mire IMPORTANT Pour un meilleur résultat affichez une image lumineuse en plein écran pas de bandes noires avant de réaliser un centering Si nécessaire corrigez le cadrage avec la touche IMAGE POS SIZE ou avec le menu LCD IMAGE pos settings NOTE La fonction centering est disponible uniquement ...

Страница 86: ...vez afficher une zone ombragée shadow title sous votre texte Créez le texte à afficher avec l ordinateur raccordé à l EVENTIX grâce à un logiciel de dessin tel que PowerPoint texte en blanc sur fond noir Affichez sur la sortie MAIN la source à titrer ensuite présélectionnez la source utilisée pour créer le texte l image apparaît sur la sortie PREVIEW Attribuez l effet TITLE à l une des touches USE...

Страница 87: ...i que les 2 PIP sont alors affichés sur la sortie Réglez avec le menu LCD la position et la taille de chaque PIP Réglez la taille et la position du masque mask de chaque PIP double PIP mask position or size de telle manière que les 2 PIP ne se superposent pas dans les zones noires Sélectionnez inlay yes si vous souhaitez mettre les PIP en arrière plan double PIP inlay Figure 62 PIP double Page 80 ...

Страница 88: ...xe DMD LCD PLASMA sélectionnez toujours le format de sortie correspondant à la résolution native de votre afficheur Ainsi votre afficheur n aura pas à modifier la résolution et le résultat sera meilleur Sélectionnez votre type de toile d écran avec le menu LCD OUTPUT X type of screen 4 3 ou 16 9 g Renouvelez les réglages de l étape f pour l afficheur raccordé sur la sortie OUTPUT 2 SÉLECTION DES E...

Страница 89: ...ou phase IMAGE optimize clock ou phase f Si nécessaire effectuez les autres réglages disponibles dans le menu IMAGE color brightness NOTE Pour effacer vos réglages utilisez la fonction Preset IMAGE preset yes NOTE Les réglages sont automatiquement enregistrés dans des blocs mémoires L EVENTIX est équipé de 40 blocs mémoire de réglage Chacun de ces blocs mémoire contient le numéro de la voie les pa...

Страница 90: ...KEYPAD à votre réseau en fonction de votre installation g Configurez ensuite le port LAN du REMOTE KEYPAD avec le menu LCD CONSOLE LAN setup h Activez le port LAN du REMOTE KEYPAD avec le menu LCD CONSOLE RS232 LAN port LAN NOTE Si la communication ne s établie pas CENTRIX uniquement vous devez reconnecter le port de communication RS 232 à votre REMOTE KEYPAD et redémarrer le CENTRIX Le CENTRIX va...

Страница 91: ...MAGE Pour chaque source raccordée au CENTRIX EVENTIX effectuez les réglages suivants c Sélectionnez la source que vous souhaitez régler d Sélectionnez l aspect ratio de votre source d entrée avec le menu LCD IMAGE aspect ratio e Utilisez la fonction Centering du menu LCD IMAGE centering ou avec la touche IMAGE centering de la face avant pour cadrer automatiquement l image dans la mire IMPORTANT Po...

Страница 92: ...avec et validez avec ENTER Appuyez ensuite sur la touche TAKE pour activer l effet ACTION 1 le texte est maintenant affiché sur l image de la sortie MAIN NOTE Vous pouvez changer l image de fond image MAIN en sélectionnant une autre entrée sur la sortie MAIN ACTION 2 Appuyez sur la touche MAIN OUTPUT SELECT et sélectionnez l entrée souhaitée la transition s effectue par un fondu au noir Pour arrêt...

Страница 93: ...spondant à la résolution native de votre afficheur Ainsi votre afficheur n aura pas à modifier la résolution et le résultat sera meilleur Sélectionnez votre type de toile d écran avec le menu LCD OUTPUT X type of screen 4 3 ou 16 9 g Renouvelez les réglages de l étape f pour l afficheur raccordé sur la sortie OUTPUT 2 SÉLECTION DES ENTRÉES c Sélectionnez la sortie OUT 1 ou OUT 2 avec les touches O...

Страница 94: ...fonction Preset IMAGE preset yes NOTE Les réglages sont automatiquement enregistrés dans des blocs mémoires Le CENTRIX EVENTIX est équipé de 40 blocs mémoire de réglage Chacun de ces blocs mémoire contient le numéro de la voie les paramètres d entrée et de sortie ainsi que les réglages d image Lorsque les 40 mémoires sont utilisées chaque nouvelle mémorisation efface la mémoire la plus ancienne RÉ...

Страница 95: ...Figure 70 Mise à jour 4 2 INSTRUCTIONS DE MISE A JOUR c Ouvrez le fichier iX updater Démarrer Programmes ANALOG WAY iX8022 d Cliquez sur le bouton START du logiciel e Allumez l appareil La LED POWER clignote lentement et le téléchargement de la mise à jour commence f Lorsque le logiciel affiche Program operation completed éteignez puis rallumez l appareil avec l interrupteur de la face arrière g C...

Страница 96: ...go back color f Cliquez sur STORE pour enregistrer le logo dans une mémoire La mémorisation du logo commence alors et prendra quelques secondes NOTE Renouvelez les étapes c à f pour mémoriser d autres logos jusqu à 8 5 1 2 ATTRIBUTION DES LOGOS NOTE Vous pouvez attribuer les logos mémorisés à une ou plusieurs des 8 entrées jusqu à 2 logos par entrée g Dans la table assignment attribuez pour chaque...

Страница 97: ...rame un rectangle blanc Si nécessaire réglez la position et la taille de la frame avec les réglages de position et de taille e Réglez le niveau de Luma Key afin d obtenir le découpage souhaité f Cliquez sur STORE et sélectionnez frame 1 ou 2 pour enregistrer la FRAME La mémorisation commence alors et prendra environ 2 minutes NOTE Pour les images en mouvement vous pouvez utiliser la fonction FREEZ...

Страница 98: ...usqu à 2 logos par entrées g Dans le menu assignment LOGOS FRAME use logo frame assignment sélectionnez l entrée affichée en MAIN ou PREVIEW sélectionnez ensuite un index 1 ou 2 et enfin sélectionnez le logo souhaité NOTE Pour retirer un logo attribué à une entrée attribuez none à l index correspondant h Avec les touches de sélection des entrées affichez successivement toutes vos entrées pour véri...

Страница 99: ...EVIEW Luma Key f Enregistrez la frame LOGOS FRAME record frame MAIN ou PREVIEW store La mémorisation commence alors et prendra environ 2 minutes NOTE Pour les images en mouvement vous pouvez utiliser la fonction FREEZE avant d effectuer la mémorisation 5 4 2 ATTRIBUTION DE LA FRAME g Dans le menu assignment LOGOS FRAME use logo frame assignment sélectionnez l entrée affichée en MAIN ou PREVIEW sél...

Страница 100: ...ODE RÉGLAGE permet de revenir au menu précédent sans valider la sélection revenir au MODE ÉTAT plusieurs appuis ENTER Dans le MODE ÉTAT permet d accéder au mode RÉGLAGE Dans le MODE RÉGLAGE permet de valider la sélection affichée sur l écran LCD 6 3 MODE ÉTAT Lorsque que vous allumez l appareil l écran LCD affiche le nom du produit et ses états comme ci dessous c VERSION DU PRODUIT d FORMAT DE SOR...

Страница 101: ... 2 8 follow input 8 3 output sync output sync main preview H V COMP SOG H V COMP SOG 4 type of screen output screen 4 3 16 9 5 test pattern test pattern main preview 1 no pattern 2 centering 6 video output 3 color bar 4 V grey scale 5 grid 1 video standard 2 output rate 6 softedge 7 output status 4 IMAGE image main preview 1 centering 2 pos settings 5 pos setting 6 input stab 7 color tracking 3 fl...

Страница 102: ...ize 3 position 1s 3s 5s custom 1 from left 3 position 4 mask size 5 mask position 1 duration 2 size effect duration xxs custom 2 size 3s 3 position 5s 4 intensity effect duration xxs 4 shadow title 1 duration holding 10 CONSOLE 1 1 RS232 LAN port 9 CONTROL 11 erase memories 1 versions 3 RS232 LAN port 4 LAN setup 8 tally 7 2 2 pull down 14 default value 6 EFFECT 2 USER 1 key 3 USER 2 key 4 USER 3 ...

Страница 103: ... 5 Comp HV C 5 SDTV RGB SOG 6 SDTV RGBS ana 6 6 Comp HV C 7 7 Comp HV C 8 8 Comp HV C 9 Computer HV C 5 test pattern test pattern out 1 out 2 3 output sync 4 type of screen output sync out 1 out 2 1 output format 6 input status 4 VCR mode 8 HDTV 720p 3 OUTPUT 1 7 D ILA 16 9 5 SXGA 1400x1K 4 OUTPUT 2 2 SVGA 800x600 3 XGA 1024x768 4 SXGA 1280x1K 1 WVGA 852x480 6 D ILA 4 3 2 V position 1 H position 1...

Страница 104: ...N port comm port select RS232 LAN 5 RK8022 version 6 default value no yes 2 LAN setup 2 TCP 3 key locking 1 menus 2 input 3 all 4 auto lock 4 key brightness 1 ce menu est disponible avec le REMOTE KEYPAD uniquement 12 languages 1 UDP 1 versions 13 default value no yes 2 TCP 4 tally status 11 erase memories no yes 8 tally 1 tally 1 1 RK addr 4 auto lock 10 key locking 1 menus 2 input 3 all 2 frame ...

Страница 105: ...TER Cette fonction améliore le contour des images de cassette VHS de faible qualité Sélectionnez on avec ENTER 2 5 synchronized ENTER Cette fonction permet de définir les sources qui sont synchronisées ensemble genlock externe Les sources synchronisées peuvent alors être commutées proprement entre elles pendant un effet à l intérieur d un PIP par exemple Ce mode de commutation est appelé VIS Verti...

Страница 106: ...les sorties composite et S VIDEO Fréquence trame à 50Hz pour les sorties YUV et SDI NTSCj Standard NTSC japon pour les sorties composite et S VIDEO Fréquence trame à 60Hz pour les sorties YUV et SDI Ou sélectionnez un format pour la sortie HDTV avec ENTER entre 720p 59 94Hz 1035i 59 94Hz 1080i 50Hz 720p 60Hz 1035i 60Hz 1080i 59 94Hz 1080i 60Hz 3 6 2 output rate ENTER Sélectionnez une fonction avec...

Страница 107: ...ghtness ENTER Réglez la luminosité avec ENTER 4 6 contrast ENTER Réglez le contraste avec ENTER 4 7 color ENTER Réglez la couleur avec ENTER 4 8 hue ENTER Réglez la teinte de l image NTSC uniquement avec ENTER 4 9 u over scan ENTER Sélectionnez Underscan ou Overscan avec ENTER underscan Mode underscan Toute l image est visible sur l écran C est le mode utilisé en informatique overscan Mode oversca...

Страница 108: ... Cette fonction permet de régler la durée du fondu lors de l apparition disparition des logos Réglez la durée avec et validez avec ENTER 5 2 record logo ENTER Cette fonction permet de mémoriser jusqu à 8 logos dans le but de les incruster dans l image de sortie jusqu à 2 logos en même temps Sélectionnez une fonction avec ENTER 5 2 1 H size ENTER Réglez la taille horizontale de la zone du logo avec...

Страница 109: ...ENTER 6 EFFECT Ce menu permet de mémoriser un effet dans chacune des touches d effet touches USER 6 1 current effect L écran LCD affiche l effet actuellement sélectionné c Sélectionnez d abord une touche mémoire avec ENTER 6 2 USER 1 key 6 3 USER 2 key 6 4 USER 3 key 6 5 USER 4 key d Sélectionnez ensuite un des effets suivants 6 x 1 cut Commutation propre entre l entrée présélectionnée et la sorti...

Страница 110: ... horizontal de gauche à droite from right Volet horizontal de droite à gauche to center Volet horizontal vers le centre from center Volet horizontal à partir du centre d Sélectionnez ensuite la durée de la transition 1s Transition de 1 seconde 3s Transition de 3 secondes 5s Transition de 5 secondes custom Sélectionnez une durée entre 0 5 et 25 secondes paliers de 0 5 seconde 6 x 6 vert wipe Permet...

Страница 111: ...des custom Sélectionnez une durée entre 0 5 et 25 secondes par paliers de 0 5 seconde d Sélectionnez la taille size du PIP entre 15 et 100 avec ou avec H et V et validez avec ENTER e Sélectionnez position puis positionnez la fenêtre du PIP avec les boutons H et V et validez avec ENTER f Réglez la taille du masque mask size avec les boutons H et V et validez avec ENTER Cette fonction permet par exe...

Страница 112: ...iffusée 7 6 AUX input ENTER Entrée auxiliaire pour mixage avec l entrée diffusée 7 7 mute off ENTER Cette fonction permet de couper la sortie audio Validez avec ENTER 8 AUDIO PRELIST ENTER Ce menu est disponible avec l option OPT iX A uniquement Les commandes suivantes permettent de contrôler la sortie AUDIO PRELIST OUT 2 8 1 master volume ENTER Réglez le niveau de sortie audio avec ENTER 8 2 audi...

Страница 113: ...méro de port Sélectionnez un numéro de port avec ENTER entre 10000 et 10999 Valeur par défaut 10500 remote port Vous devez sélectionner le numéro de port de l appareil utilisé pour la connexion sortante Ce paramètre défini le numéro de port de l ôte auquel une connexion est tentée Sélectionnez un numéro de port avec ENTER entre 00000 et 655000 Valeur par défaut 10500 netmask Le masque de sous rése...

Страница 114: ...et validez avec ENTER 9 13 default value ENTER Cette fonction permet de positionner tous les réglages du produit à leurs valeurs usine Sélectionnez YES et validez avec ENTER Ensuite éteignez puis rallumez l appareil FONCTION POSITION FONCTION POSITION 1 MODE mixer mode 6 1 USER 1 key Fading 2s 2 1 input type computer HV C 6 2 USER 2 key Title holding 2 2 used Inputs used 6 3 USER 3 key Shadow titl...

Страница 115: ...TER Value par défaut 192 168 0 1 gateway addr L adresse gateway ou passerelle permet de communiquer vers d autres réseaux LAN L adresse gateway doit être l adresse IP du router raccordé au même réseau LAN que l appareil Sélectionnez l adresse gateway avec ENTER Valeur par défaut 192 168 0 1 local port Chaque connexion TCP et UDP est définie par une adresse IP et un numéro de port Sélectionnez un n...

Страница 116: ... R G B 0 7 Vc c SYNCHRO 0 3 Vc c ou TTL Impédance RGB 75 ohms SYNCHRO 75 ohms ou Hi Z COMPOSANTES YUV Connecteurs BNC femelle entrées n 1 à 4 ou HD15 femelle entrées n 5 à 8 Fréquence 15 625 kHz 50 Hz 625 lignes 15 735 kHz 60 Hz 525 lignes Niveaux Y 1 Vc c 0 7 V Luma 0 3 V Synchro Cr Pr Cb Pb 0 7 Vc c Impédance Y Cr Pr Cb Pb 75 ohms HDTV Connecteurs BNC femelle entrées n 1 à 4 ou HD15 femelle entr...

Страница 117: ...roche 7 masse du VERT masse du VERT masse de Y masse du Y masse Broche 8 masse du BLEU masse du BLEU masse de Cb Pb Broche 10 masse du H et V masse du H et V Broche 13 Synchro H ou C S Synchro C S Broche 14 Synchro V Connecteur HD15 femelle de l appareil 7 2 SORTIES MAIN PREVIEW Connecteurs HD15 femelle Niveaux R G B 0 7 Vc c Synchro H et V Séparées TTL Composite TTL SOG 0 3 Vc c Impédance R G B 7...

Страница 118: ...525L Niveaux Y 1 Vc c 0 7 V Luma 0 3 V Synchro C 0 3 Vc c burst chroma Impédance 75 ohms COMPOSANTES YUV Connecteur DB9 femelle Fréquence 15 625 kHz 50 Hz 625 lignes 15 735 kHz 60 Hz 525 lignes Niveaux Y 1 Vc c 0 7 V Luma 0 3 V Synchro Cr Pr 0 7 Vc c Cb Pb 0 7 Vc c Impédance 75 ohms SORTIE SDI Connecteur DB9 femelle Signal Sortie digitale à 270 Mbps conformément à la norme SMPTE 259M Impédance 75 ...

Страница 119: ...cteur BNC femelle Débit 720p à 59 94 ou 60 Hz Sortie digitale à 1 5 Gbps conformément à la norme SMPTE 296M 1080i à 59 94 ou 50 ou 60 Hz Sortie digitale à 1 5 Gbps conformément à la norme SMPTE 274M 1035i à 59 94 Hz Sortie digitale à 1 5 Gbps conformément à la norme BTA S004B 1035i à 60 Hz Sortie digitale à 1 5 Gbps conformément à la norme BTA S001 Impédance 75 ohms 7 8 ENVIRONNEMENT Alimentation ...

Страница 120: ...aire d appuyer sur ENTER du clavier Une commande peut être précédée d une valeur voir chapitre A 2 STRUCTURE D UNE COMMANDE Lorsque l appareil reçoit une commande valide il exécute cette commande puis renvoie à l appareil de contrôle l état de tous les paramètres qui ont été modifiés suite à l envoie de cette commande Si la commande n est pas reconnue valeur en dehors de la plage pas de signal sur...

Страница 121: ...with PC command Rd Wr 0 10 0 composite 1 S VIDEO 2 YUV 3 RGBS TTL 4 RGsB SOG 5 RGBS ana 6 SDI 7 computer SOG 8 comp HV or C 9 comp DVI 10 HDTV PI PSTD Input standard selection works with PC command Rd Wr 0 4 0 NTSC PAL SECAM 1 NTSC 2 PAL 3 SECAM 4 Black White PP PPRC VCR mode Rd Wr 0 1 0 OFF 1 ON OUTPUT COMMANDS COMMANDES DE SORTIE FM OFTM Output formats selection M Rd Wr 0 20 fp oftp Output forma...

Страница 122: ...stment M Rd Wr 0 31 yP PRES PRESET M Rd Wr 0 1 1 PRESET action automatic reset yc acad Automatic centering P Rd Wr 0 1 1 centering action automatic reset h hp Horizontal position P Rd Wr 0 255 v vp Vertical position P Rd Wr 0 255 w hw Horizontal size P Rd Wr 0 255 s vs Vertical size P Rd Wr 0 255 b brg Brightness adjustment P Rd Wr 0 255 d con Contrast adjustment P Rd Wr 0 255 o col Color adjustme...

Страница 123: ...frame 2 2 size mini 3 size maxi ej EFPJ Border color Rd Wr 0 255 eu EFOP Effect opening type Rd Wr 0 15 ev EFCL Effect closing type Rd Wr 0 15 0 Cut 1 fade 2 slide Left Right 3 slide Right Left 4 slide Bottom Up 5 slide Up Bottom 6 wipe Left Right 7 wipe Right Left 8 wipe H to center 9 wipe V to center 10 wipe Bottom Up 11 wipe Up Bottom 12 wipe V to center 13 wipe V from center 14 wipe H V to cen...

Страница 124: ...ion of the storing Lp LPXB Pixels number in a line of the logo 2 Rd 0 65535 Li LLNB Lines number in a logo 2 Rd 0 65535 These 2 commands allow calculating the duration of the storing LT LTYA Logo 1 type Rd Wr 0 1 0 frame 1 logo Lt LTYB Logo 2 type Rd Wr 0 1 0 frame 1 logo LO LOFA Output format during the logo1 storing Rd 0 11 Lo LOFB Output format during the logo2 storing Rd 0 11 Identical as F co...

Страница 125: ...alculate the duration of the storing lp lpxb Pixels number in a line of the logo 2 Rd 0 65535 ll llnb Lines number in a logo 2 Rd 0 65535 These 2 commands allow to calculate the duration of the storing lT ltya Logo 1 type Rd Wr 0 1 lt ltyb Logo 2 type Rd Wr 0 1 0 frame 1 logo lO lofa Output format during the logo1 storing Rd 0 11 lo lofb Output format during the logo2 storing Rd 0 11 Identical as ...

Страница 126: ...rame 2 3 black 4 input 1 11 input 8 xI I_ Identification number Rd 0 65535 Values displayed in hexadecimal in the device xU VERU Update version Rd 0 65535 Example VERU104 version 1 4 Y FRES DEFAULT VALUE Rd Wr 0 1 1 Default value action automatic reset COMMUNICATION COMMANDS COMMANDES DE COMMUNICATION ne LANE Communication port selection Rd Wr 0 1 0 RS232 1 LAN nr LANR Reset of the LAN parameters ...

Страница 127: ...ed ii iin Interlaced signal detection P Rd 0 1 0 not interlaced 1 interlaced IO IOO Out of range signal detection M Rd 0 1 0 In range 1 Out of range io ioo Out of range signal detection P Rd 0 1 0 In range 1 Out of range IF IFA Standard input signal detection M Rd 0 29 if ifa Standard input signal detection P Rd 0 29 0 no signal 15 SVGA 1 wrong signal 16 MAC 2 NTSC std 3 58 60 17 XGA 3 PAL std 4 4...

Страница 128: ...al position Rd Wr 0 255 kY SHSZ Horizontal size Rd Wr 0 255 kZ SVSZ Vertical position Rd Wr 0 255 SOFT EDGE BLENDING COMMANDS CBD UP option COMMANDES DE SOFT EDGE BLENDING option CBD UP eS EDGS Covering size Rd Wr 1 eA EDGA Device position in the screen Rd Wr 1 255 bits 0 to 3 device position bits 4 to 7 number of devices eP EFA Effect position in the screen bits 0 to 3 device position bits 4 to 7...

Страница 129: ... balance works with PC Rd Wr 0 64 0 left to maximum 64 right to maximum RX AXMU Auxiliary source to MAIN Rd Wr 0 1 0 used 1 unused rx axmu Auxiliary source to PRELIST Rd Wr 0 1 0 used 1 unused NOTE M MAIN output sortie MAIN Rd Wr Read and write command Commande de lecture et d écriture P PREVIEW output sortie PREVIEW Rd Read only command Commande de lecture uniquement A 5 ASCII HEX DEC TABLE A 5 T...

Страница 130: ... the problem and then call your authorized dealer GARANTIE Analog Way garantie le produit contre les défauts matériels et vices de fabrication pour une période de 3 ans à partir de la date d achat retour en nos locaux En cas de mauvais fonctionnement pendant la période de garantie Analog Way décidera à son choix de réparer ou de remplacer l appareil défectueux incluant gratuité des pièces et de la...

Отзывы: