EVAL-ADAS3022EDZ User Guide
UG-484
Rev. A | Page 5 of 32
POWER SUPPLIES AND GROUNDING
The on-board
ADP3334
low dropout regulators are provided
for 2.5 V, 3.3 V, and 5 V and also for the FPGA I/O supply
which is user configurable and set to 3.3 V by default. The
FPGA core is supplied by a pair of
ADP1715
devices set for
1.2 V. Additional power is supplies via the CED board for an
alter5 V analog and digital 3.3 V/5 V digital through P4.
The
ADAS3022
device also requires ±15 V supplies for
VDDH and VSSH. These must be supplied by the user using
a standard lab supply ensuring that the return paths are at the
same potential. Refer to
CN-0201
for the complete information
on generating these ±15 V supplies from a +5 V single supply.
The differential input common-mode voltage (VCM) range
changes according to the maximum input range selected and
the high voltage power supplies (VDDH and VSSH). In other
words, the specified operating input voltage of any input pin
requires 2.5 V of headroom from the VDDH and VSSH
supplies.
The evaluation board ground plane consists of a solid plane
on one PCB layer shared on another layer with the power plane.
To attain high resolution performance, the board was designed
to ensure that all digital ground return paths do not cross the
analog ground return paths, that is, all analog on one side and
digital on the other.
EVALUATION BOARD SCHEMATICS/PCB LAYOUT
The evaluation board is a 6-layer board carefully laid out and
tested to demonstrate the specific high accuracy performance
of the
ADAS3022
devices. The Evaluation Board Schematics
and Artwork section of this user guide shows the schematics of
the evaluation board.
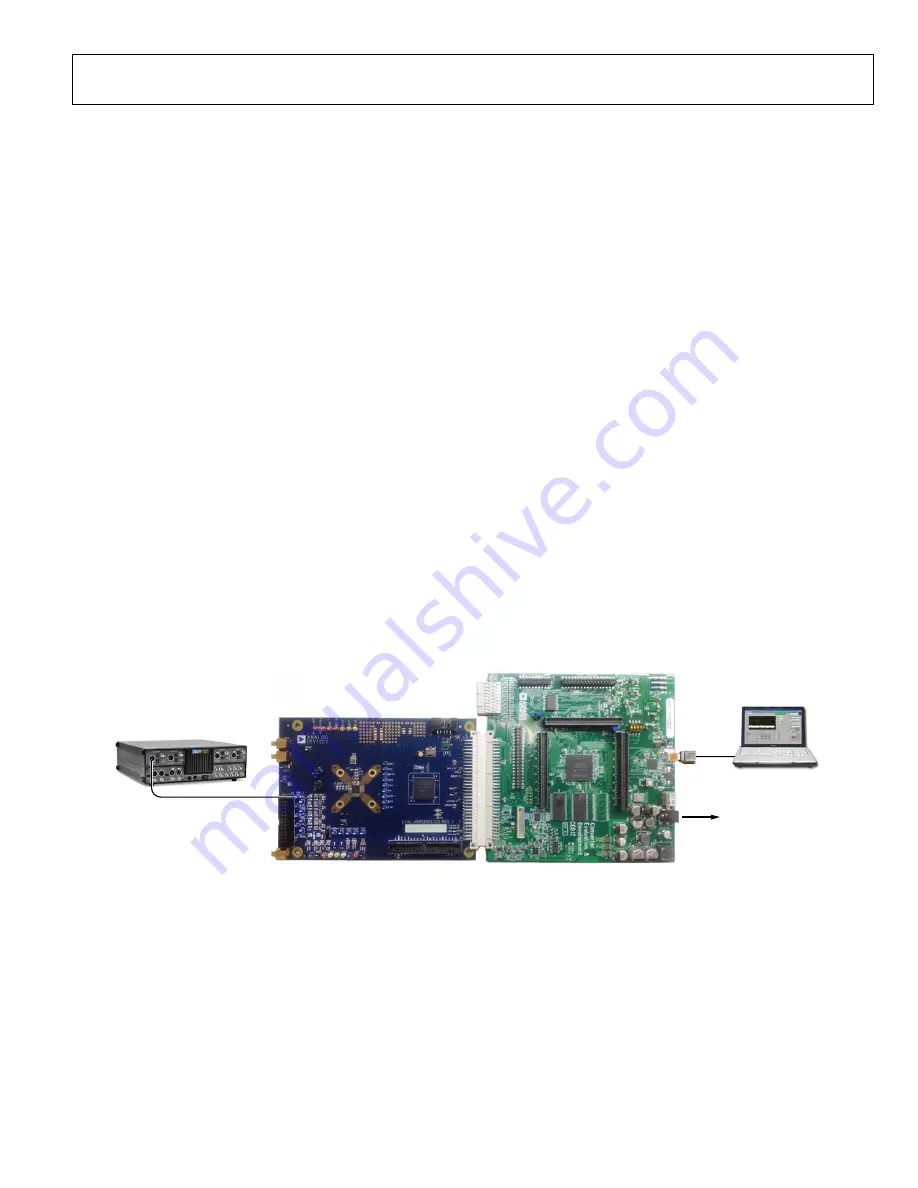
BASIC HARDWARE SETUP
The
ADAS3022
evaluation board connects to the
EVAL-CED1Z
converter evaluation and demonstration board. The
EVAL-
CED1Z
board is the controller board, which is the communi-
cation link between the PC and the main evaluation board.
Figure 3 shows a photograph of the connections made between
the
ADAS3022
daughter board and the
EVAL-CED1Z
board.
1.
Before connecting power, ensure that the
EVAL-
ADAS3022EDZ
and the
EVAL-CED1Z
boards are
connected firmly together.
2.
Connect the power supplies on the
EVAL-ADAS3022EDZ
board. The
EVAL-ADAS3022EDZ
requires external power
supplies of ±15 V. Connect them from a bench top power
supply.
3.
Connect the
EVAL-CED1Z
board to the PC via the USB
cable enclosed in the EVAL-SDPCB1Z kit. If using a
Windows® XP platform, you may need to search for the
EVAL-CED1Z
drivers. Choose to automatically search for
the drivers for the
EVAL-CED1Z
board if prompted by the
operating system.
4.
Proceed to the Software Installation section to install the
software. Note that the
EVAL-CED1Z
board must not
be connected to the PC’s USB port until the software is
installed. The 7 V dc supply can be connected, however,
to check that the board has power (green LED lit).
Figure 3. Hardware Configuration—Setting up the
EVAL-ADAS3022EDZ
SIGNAL SOURCE
EVAL-ADAS3022EDZ
EVAL-CED1Z
USB
TO WALL WART
PC
1
1064-
002


