GEBRUIKERSHANDLEIDING – PROFESSIONELE BLENDER 1800W
USER MANUAL – PROFESSIONAL BLENDER 1800W
MANUEL D'UTILISATION – BLENDER PROFESSIONNEL 1800W
MODEL NO.: ZM5003
LEES DE INSTRUCTIES VOOR GEBRUIK
PLEASE READ THE MANUAL
VEUILLEZ LIRE LE MANUEL
Страница 1: ...DING PROFESSIONELE BLENDER 1800W USER MANUAL PROFESSIONAL BLENDER 1800W MANUEL D UTILISATION BLENDER PROFESSIONNEL 1800W MODEL NO ZM5003 LEES DE INSTRUCTIES VOOR GEBRUIK PLEASE READ THE MANUAL VEUILLE...
Страница 2: ...nt SECTION 1 IMPORTANT SAFEGUARDS 19 SECTION 2 PARTS FEATURES 23 SECTION 3 PANEL CONTROL 25 SECTION 4 FUNCTIONS 26 SECTION 5 OPERATING INSTRUCTIONS 27 SECTION 6 CLEANING MAINTENANCE 31 SECTION 7 TROUB...
Страница 3: ...ebruik is een verkeerd gebruik van uw blender wat het risico op ernstig letsel kan veroorzaken en uw garantie ongeldig kan maken 1 Lees alle instructies 2 Neem alle waarschuwingen en instructies zorgv...
Страница 4: ...ft een gepolariseerde stekker de ene poot is breder dan de andere Om het risico op elektrische schokken te verminderen past deze stekker maar op n manier in een gepolariseerd stopcontact Als de stekke...
Страница 5: ...e en letsel kan veroorzaken 26 Probeer nooit te werken met beschadigde messen 27 Gebruik het apparaat NIET als de mesconstructie verbogen of beschadigd is 28 Inspecteer de messen voor elk gebruik op b...
Страница 6: ...nderbroken 41 Probeer de messen NIET te slijpen 42 Stel de schenkkan NIET bloot aan extreme temperatuurschommelingen 43 De apparaataccessoires zijn niet bedoeld voor gebruik in de magnetron Plaats de...
Страница 7: ...product niet buiten zijn functies Laat kinderen het product niet gebruiken Stop met het gebruik van het product als de stroomkabel of stekker beschadigd is of als andere functies niet werken Zorg erv...
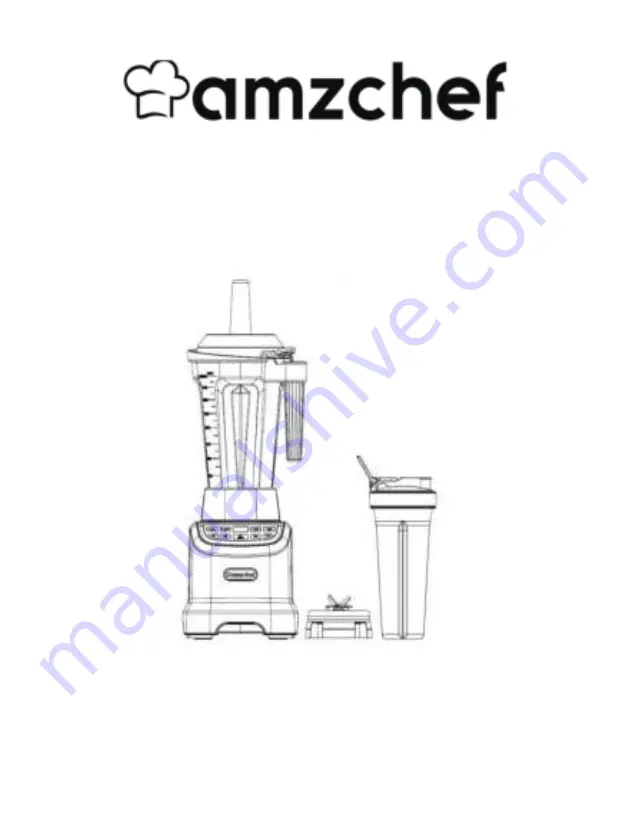
Страница 8: ...j de stamper door de opening van de dekselplug wordt gestoken Gebruik de blender nooit zonder dat de deksel tijdens het gebruik goed vergrendeld is Schenkkan Milliliter en liter streepjes zijn duideli...
Страница 9: ...gsels te verwerken en ingredi nten naar de messen te laten bewegen LET OP 1 De stamper kan alleen worden gebruikt als het hoofdgedeelte van het deksel op zijn plaats zit Houd de schenkkan vast terwijl...
Страница 10: ...T STOP toets wordt gebruikt om de machine te starten en te stoppen HOOFDSTUK 4 FUNCTIES Nr Modus Functie 1 SMOOTHIES 120s Zacht fruit en groenten kunnen worden gemengd met melk om een smoothie te make...
Страница 11: ...0 ml markering op de schenkkan niet overschrijden 3 Als dit product continu fruit en groentesap moet roeren wordt aanbevolen om elke functie in totaal 3 keer te gebruiken Als u het moet blijven gebrui...
Страница 12: ...te hoeveelheid water toe aan de schenkkan 5 Schroef de navullingsdeksel op de deksel en lijn de deksel aan de zijkant uit met de schenkkan 6 Plaats de schenkkan op het hoofdgedeelte in de juiste posit...
Страница 13: ...wordt deze niet ingeschakeld 8 Selecteer de bijbehorende functietoets bijv BLEND enz Druk op de START STOP knop en begin met werken Het is normaal dat het geluid op het werk snel en langzaam is 9 Wann...
Страница 14: ...met een uitgewrongen vochtige doek 13 Nadat u de watervlekken op het oppervlak van de machine hebt afgeveegd scheidt u het hoofdgedeelte en de mengbeker op een koele en geventileerde plaats om aan de...
Страница 15: ...T STOP knop 16 Selecteer de bijbehorende functietoets bijv BLEND enz Druk op de START STOP knop en begin met werken Het is normaal dat het geluid op het werk snel en langzaam is 17 Wanneer het werk is...
Страница 16: ...e navullingsdeksel te verwijderen 1 Vul de container halfvol met warm water en voeg een paar druppels afwasmiddel toe 2 Zorg ervoor dat de deksel stevig op de schenkkan is geklikt en voer een van de v...
Страница 17: ...bijbehorende deksel a Was de reisfles de deksel en de messen in warm zeepsop Spoel schoon onder stromend water en droog goed af Het centreerkussen kan worden verwijderd voor een grondigere reiniging L...
Страница 18: ...hinefout Neem contact op met de klantenservice voor onderhoud Het scherm is aan en het product werkt niet Na het selecteren van de functie wordt de startknop niet geactiveerd Controleer het netsnoer e...
Страница 19: ...afdichtring correct De afdichtring van de bijbehorende bekerhouder is niet correct ge nstalleerd Monteer de afdichtring correct Controleer of het deksel van de bijbehorende bekerdeksel strak is ingedr...
Страница 20: ...ing te voorkomen moet u het op verantwoorde wijze recyclen om duurzaam hergebruik van materi le hulpbronnen te bevorderen Gebruik voor het retourneren van uw gebruikte apparaat de retour en ophaalsyst...
Страница 21: ...ce setup This appliance contains sharp blades that can cause injury if mishandled 4 Take inventory of all contents to ensure that you have all parts needed to properly and safely operate your applianc...
Страница 22: ...may come into contact with food Follow washing instructions covered in this instruction manual 14 ALWAYS use the appliance on a dry and level and firm surface Never operate the appliance on soft surf...
Страница 23: ...e MAX fill line 34 When making nut butters or oil based foods do not process for more than one minute after the mixture starts to circulate in the container Processing for longer periods can cause dan...
Страница 24: ...ruction concerning use of the appliance in a safe way and if they understand the hazards involved Cleaning and user maintenance shall not be made by children unless they are aged from 8 years and abov...
Страница 25: ...here is abnormal situation please contact customer service which contact information is printed on the manual It must be repaired by manufacturer or special technician of after sale service center app...
Страница 26: ...to remove the retainer nut or blades from the jar Centering pad The jar must be aligned over the centering pad Never attempt to operate with the centering pad removed Controlpanel The motor is designe...
Страница 27: ...STOP to enter the running state After starting work the LED counts down PULSE In the standby mode click the START STOP button to enter the selection interface directly press the PULSE button the prod...
Страница 28: ...s Mix on medium speed 8 HIGH 180s Mix on high speed for blending hard fruits and vegetables and dry grinding Example carrots grated dry soybeans 9 START STOP Starts and stops the currently selected fu...
Страница 29: ...and tendon removed 2 Use lid plug or electronic scale and measure out the right amount of ingredients according to personal taste 3 Pour the weighed ingredients into the jar 4 Add an appropriate amou...
Страница 30: ...e backlight lights flash once the buzzer sounds once and the START STOP button flashes if the mixing jar is not in place it will not be powered on 8 Select the corresponding function key eg BLEND etc...
Страница 31: ...ty when pouring the juice to prevent the juice from splashing 12 Clean the inside of the jar in time and clean the outside of the jar with a wrung damp cloth 13 After wiping the water stains on the su...
Страница 32: ...speed Plug the power cord into the wall outlet and when the power is on all the backlights will flash once the buzzer will sound once and the START STOP button will flash 16 Select the corresponding f...
Страница 33: ...ase refer to all instructions included in this book IMPORTANT To ensure continued and effective performance do not put the container lid or lid plug in the dishwasher Clean the appliance after every u...
Страница 34: ...e travel bottle half full with warm water and add a few drops of dishwashing liquid 2 Tightly screw the blade holder onto the travel bottle and do one of the following a Run the device for 30 to 60 se...
Страница 35: ...on The jar is not installed correctly and the safety switch cannot be activated Put the jar upright Machine failure Contact customer service for maintenance The screen is on and the product does not...
Страница 36: ...tall the sealing ring correctly The sealing ring of the matching cup holder is not installed correctly Install the sealing ring correctly Check that the lid of the corresponding cup lid is pressed in...
Страница 37: ...olled waste disposal recycle it responsibly to promote the sustainable reuse of material resources To return your used device please use the return and collection systems or contact the retailer where...
Страница 38: ...e votre m langeur ce qui peut cr er un risque de blessure grave et annuler votre garantie 1 Lisez toutes les instructions 2 Observez attentivement et suivez tous les avertissements et instructions 3 P...
Страница 39: ...ctionne pas d branchez le R initialisez la prise murale ou le disjoncteur Si le disjoncteur continue de se d clencher d branchez le m langeur de la prise Laissez le m langeur reposer pendant 24 heures...
Страница 40: ...angers tels que des cuill res des fourchettes des couteaux ou le bouchon du couvercle dans le r cipient car cela endommagerait les lames et d autres composants lors du d marrage de la machine et pourr...
Страница 41: ...ser le contenant des changements extr mes de temp rature 44 Les accessoires de l appareil ne sont pas destin s tre utilis s au micro ondes Ne placez pas le r cipient ou le couvercle au micro ondes car...
Страница 42: ...isser les enfants utiliser le produit Veuillez cesser d utiliser le produit lorsque la ligne lectrique ou la prise est endommag e ou si d autres fonctions chouent Veuillez ne pas laisser la ligne lect...
Страница 43: ...bouchon du couvercle N utilisez jamais le mixeur sans que le couvercle ne soit bien verrouill pendant l utilisation Pot Les onces millilitres tasses sont clairement indiqu es Porte lame Les lames son...
Страница 44: ...ts styles types et tailles de conteneurs Cordon d alimentation Le m langeur est quip d un long cordon d alimentation Rangez soigneusement la partie inutilis e en dessous Pieds antid rapants emp chent...
Страница 45: ...et pas plus de 13 gla ons sont plac s dans le verre m lange 3 PUREE 120s crasez les fruits et l gumes hach s en pur e 4 BLEND 180s Mettez les fruits et l gumes hach s et ajoutez la bonne quantit d eau...
Страница 46: ...remuer les jus de fruits et de l gumes il est recommand d utiliser n importe quelle fonction 3 fois au total Si vous devez continuer l utiliser utilisez le apr s un intervalle de 10 minutes Pendant le...
Страница 47: ...ocal sur le corps principal dans la bonne position et le corps principal doit tre plac sur une surface plane 7 Connectez le cordon d alimentation la prise lorsque l alimentation est allum e tous les v...
Страница 48: ...que le travail est termin le buzzer sonne 3 fois et revient l tat de veille 10 Lorsque vous utilisez de la glace pil e ou des ingr dients broy s sec retirez le couvercle de la petite tasse et ajoutez...
Страница 49: ...lame fourni avec l embouchure du gobelet puis serrez le porte gobelet vers la droite 15 Placez la tasse de voyage avec le porte lame sur le corps principal dans la bonne position Le corps principal do...
Страница 50: ...nt v rifiez que le couvercle est bien serr si le couvercle n est pas serr il y a des probl mes d infiltration d eau et tirez la tige vers le haut pour l emporter avec vous SECTION 6 NETTOYAHE ET ENTRE...
Страница 51: ...Pulse plusieurs fois b Rincez l eau courante et s chez soigneusement Lavage des mains retirez le bocal le couvercle et le bouchon du couvercle un Lavez le bocal le couvercle et les lames dans de l ea...
Страница 52: ...voyage le couvercle et les lames dans de l eau chaude savonneuse Rincer sous l eau courante et bien s cher Le patin de centrage peut tre retir pour un nettoyage plus approfondi MISE EN GARDE Nettoyez...
Страница 53: ...ectionn la fonction le bouton de d marrage n est pas activ Check the power cord and make sure the power is on L intervalle d arr t est court et le syst me ne se r initialise pas Power on for 3 minutes...
Страница 54: ...rectement la bague d tanch it V rifiez que le couvercle du couvercle de tasse correspondant est bien enfonc Couvrir nouveau le couvercle Jus renvers Quantit excessive d ingr dients ou d eau Utiliser s...
Страница 55: ...clez les de mani re responsable afin de promouvoir la r utilisation durable des ressources mat rielles Pour retourner votre appareil usag veuillez utiliser les syst mes de retour et de collecte ou con...
Страница 56: ...54 The Brand Center Dieselstraat 5 7903AR Hoogeveen Netherlands 09 2022 V1...