background image

Browser-Based Configuration Pages

41

NXA-WAP1000 Smart Wireless Access Point

Rate Limiting

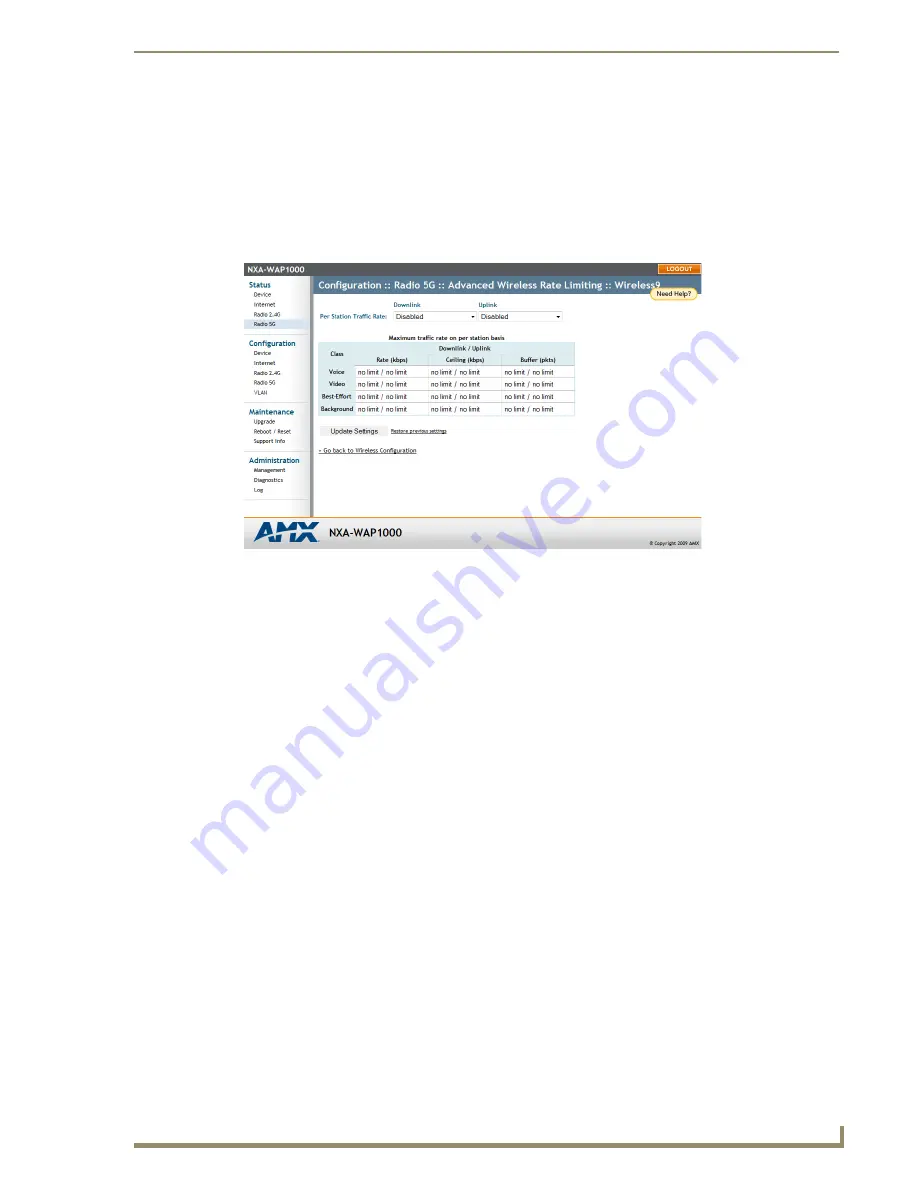
Rate Limiting allows you to cap the data transfer rates per client for a specific WLAN.

To enable per station rate limits:

1.

Go to 

Configuration > 2.4G

 or 

Configuration > 5G

.

2.

Select the WLAN that you want to configure from the tabs at the top of the page.

3.

Click the 

Edit Settings

 button next to 

Rate Limiting

.

4.

The 

Rate Limiting

 page appears (FIG. 25).

5.

Set the maximum Downlink and Uplink rate per station, or leave disabled if you do not want to limit 
traffic rate per station in that direction.

6.

The table below updates to show the maximum transfer rates for each traffic type.

7.

Click 

Update Settings

 to save your changes.

FIG. 25  

Rate Limiting

Содержание NXA-WAP1000

Страница 1: ...Operation Reference Guide Network Communication NXA WAP1000 Smart Wireless Access Point Initial Release 2 18 2011 ...

Страница 2: ...rked on the outside of each box The RMA is valid for a 30 day period After the 30 day period the RMA will be cancelled Any shipments received not consistent with the RMA or after the RMA is cancelled will be refused AMX is not responsible for products returned without a valid RMA number AMX is not liable for any damages caused by its products or for the failure of its products to perform This incl...

Страница 3: ...MPLIED WARRANTIES OF MERCHANTABILITY AND FITNESS FOR A PARTICULAR PURPOSE WITH REGARD TO THE AMX SOFTWARE THIS LIM ITED WARRANTY GIVES LICENSEE SPECIFIC LEGAL RIGHTS Any supplements or updates to the AMX SOFTWARE including without limitation any if any service packs or hot fixes provided to Licensee after the expiration of the ninety 90 day Limited Warranty period are not covered by any warranty o...

Страница 4: ......

Страница 5: ...on 10 What You Will Need 10 1 Prepare the Administrative Computer 10 2 Connect the NXA WAP1000 to the Administrative Computer 11 3 Log Into the AP s Web Interface 11 4 Configure the Wireless Settings 12 Configure Common Wireless Settings 13 Configure Wireless Settings 13 5 Disconnect the AP from the Administrative Computer 13 6 Restore the Administrative Computer s Network Settings 14 Verify NXA W...

Страница 6: ... Access to the Wireless Network 42 Changing the Access Controls for a WLAN 42 Disabling WLAN Access Restrictions 44 Allowing Only Stations Explicitly Listed in the Access Controls Table 44 Denying Only Stations Explicitly Listed in the Access Controls Table 44 Removing MAC Addresses from the List 44 Maintenance 45 Upgrade 45 Upgrading Manually via the Web 46 Upgrading Manually via FTP or TFTP 47 S...

Страница 7: ...n be deployed as a standalone access point or as part of a centrally controlled Smart Wireless LAN when combined with the AMX NXA WAPZD1000 Wireless LAN Zone Director With a sleek modern design small form factor and Power over Ethernet PoE the NXA WAP1000 can be mounted on the ceiling to maximize performance without disturbing aesthetics The NXA WAP1000 may be powered via PoE or via the optional N...

Страница 8: ...48 36 24 18 12 9 and 6Mbps 802 11b 11 5 5 2 and 1 Mbps 802 11g 54 48 36 24 18 12 9 and 6 Mbps Power Source None device uses Power Over Ethernet PoE via POE Injector or PoE Switch for necessary power Front LED Indicators PWR Off Off Red Boot up in process Green On OPT Not active at this time DIR Off The NXA WAP1000 is not being managed by an NXA WAPZD1000 standalone mode Green The NXA WAP1000 is be...

Страница 9: ...nnected Fast flashing green two flashes every second The WLAN service or mesh network is up but no wireless clients or downlink MAPs are currently associated Slow flashing green one flash every two seconds The WLAN service is up no wireless clients are currently associated mesh networking is enabled and at least one downlink MAP is connected Rear Components OPT Not active at this time Hard Reset P...

Страница 10: ...tory default configuration If you hold down the button for less than 10 seconds the AP will perform a hardware reset If you hold down the button for 10 seconds or more any configuration changes you may have made are removed and the factory default configuration is restored to the AP Resetting the NXA WAP1000 to factory default settings will erase all previously configured settings ...

Страница 11: ...configuration is a critical factor in maximizing radio range As a general rule radio range is increased by mounting the antennas higher off of the ground Physical environment Clear or open areas provide better radio range than closed or filled areas The less cluttered the operating environment the greater the wireless range Obstructions building materials and sources of interference Physical obstr...

Страница 12: ...P1000 Smart Wireless Access Point Care should be taken to consider vertical placement as well as horizontal placement to maximize coverage FIG 2 FIG 1 Recommended ceiling mounting installation FIG 2 Recommended wall mounting installation ...

Страница 13: ...NXA WAPZD1000 Installation 7 NXA WAP1000 Smart Wireless Access Point FIG 3 Recommended wall mounting in a corridor top view ...

Страница 14: ...ative computer One Ethernet cable The NXA WAP1000 The optional power supply if needed 1 Connect the AP to a Power Source The NXA WAP1000 is designed to be powered via Power Over Ethernet PoE thus removing the need for a standard power connection However certain circumstances may require use of the optional power supply To supply the NXA WAP1000 with power via the power supply 1 Connect the jack on...

Страница 15: ...r between the AP and the ZoneDirector 3 Log into the NXA WAPZD1000 s Browser Based Configuration Pages and then go to the Monitor Access Points page 4 Look for the MAC address of the AP and then check its Status column If automatic approval is enabled the Status column should show Connected If automatic approval is disabled click the Allow link that is on the same row as the AP s MAC address This ...

Страница 16: ...onnections On Windows 2000 click Start Settings Network Connections 2 When the Network Connections window appears right click the icon for Local Area Connection and then click Properties 3 When the Local Area Connection Properties dialog box appears select Internet Protocol TCP IP from the scrolling list and then click Properties The Internet Protocol TCP IP Properties dialog box appears 4 Write d...

Страница 17: ...ive computer s Ethernet port After a minute the power LED on the AP will turn solid green You have completed connecting the AP to the administrative computer 3 Log Into the AP s Web Interface 1 On the administrative computer open a Web browser window 2 In the address or location bar type the following address https 192 168 0 1 3 Press Enter on the keyboard to connect to the NXA WAP1000 s Browser B...

Страница 18: ...g the Device page 4 Configure the Wireless Settings To complete this step you will need to configure the settings on the Common tab and at least one Wireless tab These are the essential wireless settings that will enable wireless devices on the network to associate with the AP FIG 5 Browser Based Configuration Pages Login Default Wireless Settings SSID network name Wireless 1 to Wireless 8 8 WLANs...

Страница 19: ... 1 Disconnect the AP from the power source 2 Verify that the power LED on the AP is off 3 Disconnect the Ethernet cable from the administrative computer s Ethernet port The two radio frequencies 2 4GHz and 5GHz need to be configured separately in the Browser Based Configuration Pages To configure the common wireless settings click Configuration Radio 2 4G or Radio 5G Common Wireless Configuration ...

Страница 20: ...k Start Settings Network Connections 2 When the Network Connections window appears right click the icon for Local Area Connection and then click Properties 3 When the Local Area Connection Properties dialog box appears select Internet Protocol TCP IP from the scrolling list and then click Properties The TCP IP Properties dialog box appears 4 Restore the computer s network settings by typing the or...

Страница 21: ...If a ZoneDirector is on the network the DIR LED is green Associate a Wireless Client with the AP On the administrative computer verify that the wireless interface is enabled In Windows XP click All Programs Connect To Wireless Network Connection to enable the wireless interface 1 In the system tray right click the Wireless Network Connection icon and then click View Available Wireless Networks 2 I...

Страница 22: ... stations Water or moisture cannot enter the case of the device Air flow around the unit and through the vents in the side of the case is not restricted Review the recommendations in Determine the Optimal Mounting Location and Orientation section on page 5 for help in choosing a suitable location for the AP 2 Connect the AP to a Power Source and the Network Once you have placed the AP at its insta...

Страница 23: ...ect it and then wait 60 seconds before attempting a reconnection Disconnect and reconnect the AP and the PC Replace the Ethernet cable with a new one if the relevant LAN port LED is not illuminated LEDs in each port light up during a successful connection If all else fails you can reset the AP to the factory defaults and start over Press and hold the Hard Reset button FIG 2 for at least eight 8 se...

Страница 24: ...Preconfiguring the NXA WAP1000 18 NXA WAP1000 Smart Wireless Access Point ...

Страница 25: ...ration Pages 1 On your PC open a Web browser window 2 In the address or location bar type the IP address of the AP Be sure to enter it in the correct format https ip_address 3 Press Enter to connect 4 If a Windows security alert dialog box appears click OK Yes to proceed The login page appears FIG 6 In Username type admin In Password type 1988 Click Login The following procedure assumes that you k...

Страница 26: ...he right Logout Button Click this button to log out of the NXA WAP1000 Help button Click this button to open a help window with information related specifically to the options currently displayed in the workspace Workspace This large area displays features options and indicators relevant to your menu bar choices Menu Logout button Help button Workspace If the NXA WAP1000 is connected to an NXA WAP...

Страница 27: ...loyed GPS Coordinates The latitudinal and longitudinal coordinates of the device location MAC Address The MAC address for the NXA WAP1000 Serial Number The serial number for the NXA WAP1000 Software Version The current software version being used by the NXA WAP1000 Uptime The current amount of time in days hours minutes and seconds in which the NXA WAP1000 has been online Current Time The current ...

Страница 28: ...d below 4 If the IP address is 192 168 0 1 the AP is not receiving an IP address from the DHCP server To force the DHCP server to renew the IP address assigned to this AP click Renew DHCP If the AP is listed in the DHCP server s address table it will attempt to reassign the previous address to the AP unless the address is already in use To force the DHCP server to assign a new IP address click Rel...

Страница 29: ...o SmartSelect this field will show the value Channel SmartSelect Channel Width Displays whether the channel width is set to 20MHz or 40MHz Country Code Shows the country code that the AP has been set to use CAUTION Verify that the AP is using the correct country code to make sure it uses only the allowed radio channels in your region Selecting the incorrect country code may result in violation of ...

Страница 30: ...etwork and within individual WLANs SSID The name of the accessed network BSSID The broadcast SSID name Wireless Status The current wireless connection status This may be Up or Down Broadcast SSID This option controls whether or not the WLAN SSID is visible to anyone looking for wireless networks Disabling hiding the SSID requires that the user be told the correct SSID before they can connect to yo...

Страница 31: ...e tabs access pages for common status settings within a network and within individual WLANs Channel Shows the wireless channel that the AP is currently using If you set the wireless channel to SmartSelect this field will show the value Channel SmartSelect Channel Width Displays whether the channel width is set to 20MHz or 40MHz Country Code Shows the country code that the AP has been set to use CA...

Страница 32: ...Disable Auto update Click this button to allow or disable the ability for the NXA WAP1000 to automatically update its settings and firmware Tabs These tabs access pages for common status settings within a network and within individual WLANs SSID The name of the accessed network BSSID The broadcast SSID name Wireless Status The current wireless connection status This may be Up or Down Broadcast SSI...

Страница 33: ...anaged by an NXA WAPZD1000 ZoneDirector this section will not be visible in the Browser Based Configuration Pages This section will be accessible again only if the device is reset to its factory defaults FIG 14 Configuration Device page Configuration Device Device Name Type a new name for the device or leave as is to accept the default device name amxAP The device name identifies the AP among othe...

Страница 34: ...Click Update Settings The message Your parameters were saved appears Internet The Internet page allows you to review and modify the network configuration FIG 15 Configuration Internet page Configuration Internet Primary DNS Server The IP address of the primary Domain Name System DNS server Secondary DNS Server The IP address of the secondary Domain Name System DNS server NTP Server Hostname of the...

Страница 35: ... can choose SmartSelect or choose one of a specific number of channels If you choose SmartSelect the AP automatically selects the best channel encountering the least interference to transmit the signal Channel Width On 802 11n APs the option to choose 40MHz channel width provides theoret ically double the data capacity of the channel However wider channel width means fewer channels available and m...

Страница 36: ...nsmission is initiated Use this option for compliance with the Wi Fi Alliance certification RTS CTS Choose this option to force both sending and receiving devices to confirm a data exchange on both ends before proceeding AeroScout RFID Tag Detection Click the Enable option to enable the AP to relay AeroScout RFID tag data AeroScout Engine communication daemon Click the Up option to enable the AP t...

Страница 37: ...ifies the WLAN in the user s wireless connection software The SSID can be up to 32 characters in length contain letters and numbers and is case sensitive Dynamic VLAN Dynamic VLAN can be used to assign VLAN IDs to wireless clients based on RADIUS attributes when a RADIUS authentication server is used Enable this feature to allow RADIUS to designate VLAN IDs for each wireless client Threshold Setti...

Страница 38: ...y of the channel However wider channel width means fewer channels available and more interference with other wireless signals Country Code This option if enabled lets you select your country or region code Advanced Settings Transmit Power The default setting is Full Select the level of transmit power from the drop down menu This option sets the maximum transmit power level relative to the predefin...

Страница 39: ...ID is present which you ideally replaced in the installation process If the default SSID is still active it is strongly recommended that you change it The SSID identifies the WLAN in the user s wireless connection software The SSID can be up to 32 characters in length contain letters and numbers and is case sensitive Threshold Settings This button opens a page where you can configure the Protectio...

Страница 40: ...t is tagged When the icon contains a white tag that port is tagged otherwise it is un tagged Clicking on the icon switches between tagged and un tagged modes RJ45 Port State Images The AP may be connected to the same or different Ethernet uplinks using the RJ45 type connectors on the back of the AP The images of RJ45 connectors represent those RJ45 connectors on the AP Each image includes the labe...

Страница 41: ...to save and apply the changes A confirmation message appears at the top of the page 5 To reopen the previous page click the Go back to Wireless Configuration link Configuration VLAN Cont Update Settings When you click Update Settings if any configuration settings have changed a connectivity test will be run If the browser and the AP Router can communicate using the new VLAN settings then they will...

Страница 42: ... 2 4G or Configuration 5G The Configuration xx Common page appears 2 Click one of the eight Wireless tabs The Configuration 2 4G Wireless page appears FIG 17 You can configure up to 8 SSIDs per radio 16 on dual radio APs 3 Review the WLAN options and then make changes as required 4 When you are finished click Update Settings to save and apply the changes A confirmation message appears at the top o...

Страница 43: ...cally selected authentication mode Encryption Strength 64 bit Specify the key with 10 hexadecimal digits or 5 ASCII characters 128 bit Specify the key with 26 hexadecimal digits or 13 ASCII characters The 128 bit cryptography is stronger privacy protection for your network and is recommended if you use WEP Key Entry Method Hexadecimal The encryption key only accepts hexadecimal characters 0 9 A F ...

Страница 44: ...tings and then make changes as required 5 Click Update Settings to save and apply the changes A confirmation message appears at the top of the page 6 Click Go back to Wireless Configuration to reopen the previous page WEP Encryption Options Update Settings Click this button to save and apply your changes ...

Страница 45: ...and other devices are usually limited to WPA TKIP WPA2 is an advanced option that provides enhanced security but may not be compatible with older wireless devices WPA2 support on Windows XP requires a Microsoft patch and is only available on recent operating systems including Windows XP Service Pack 2 and later WPA Auto allows the client to decide whether to use WPA or WPA2 based on the client s c...

Страница 46: ... from the Encryption Method drop down menu The basic set of WPA specific encryption options appear on the page 4 Select 802 1X as the WPA Authentication mode Additional options appear FIG 24 5 Configure the following settings to customize your 802 1X authentication RADIUS NAS ID Enter the network ID assigned to your RADIUS server Authentication Server Required Enter the information needed to estab...

Страница 47: ...lect the WLAN that you want to configure from the tabs at the top of the page 3 Click the Edit Settings button next to Rate Limiting 4 The Rate Limiting page appears FIG 25 5 Set the maximum Downlink and Uplink rate per station or leave disabled if you do not want to limit traffic rate per station in that direction 6 The table below updates to show the maximum transfer rates for each traffic type ...

Страница 48: ...tworks There are tab entries for each available WLAN Changing the Access Controls for a WLAN 1 Go to Configuration Radio 2 4G or Configuration Radio 5G 2 Click the Wireless tab for the device for which you want to configure the access control settings 3 Click the Edit Settings button after Access Control The Configuration Wireless Access Control Wireless page appears FIG 26 FIG 26 Configuration Ra...

Страница 49: ...m two characters in each box You can specify a full 12 hex digit MAC address or enter wildcard characters for don t care digits Allowable hex digit characters are 0 9 a f and A F Most address tags and software where you find MAC addresses listed include colons or dashes to separate the address pairs that is provided for you on the web page so do not enter the colons or dashes Supported wildcard ch...

Страница 50: ...licitly Listed in the Access Controls Table If you select Allow only stations listed in the Access Controls Table then stations entered into the Access Controls Table are allowed but all others are disallowed Denying Only Stations Explicitly Listed in the Access Controls Table If you select Deny only stations listed in the Access Controls Table then stations entered into the Access Controls Table ...

Страница 51: ...pdates to the device in one of two ways 1 manual updating on an as needed basis or 2 automating a regularly scheduled update Before starting decide which option you want to take Automate a regularly scheduled update Run a one time manual update right now By default the automatic upgrade option is active and will check the Ruckus Wireless update server every 12 hours To get started with upgrading t...

Страница 52: ...RL of the download Web site Remember to start the URL with http 3 Change the Image Control File filename extension as noted here Replace any file names ending in rcks with the html extension Replace any file names ending in fI7 with the html extension 4 Click Perform Upgrade A status bar appears during the upgrade process 5 After the upgrade is completed you must manually reboot the NXA WAP1000 FI...

Страница 53: ... address of the server Remember to start the URL with ftp 3 Click Perform Upgrade A status bar appears during the upgrade process 4 After the upgrade is completed you must manually reboot the AP Scheduling an Automatic Upgrade 1 In the Upgrade Method options click the button for your preferred choice 2 Enter the appropriate information in the Host name field or IP address field FIG 30 Maintenance ...

Страница 54: ... point Click Perform Upgrade which will start the process and the clock The next upgrade will occur at the selected interval Click Save parameters only The clock starts right away and the actual upgrade will occur at the first effective interval 6 After you click one of these two options a status bar appears during the upgrade process 7 When the upgrade is complete the AP will reboot automatically...

Страница 55: ...the configuration currently active in the device Note too that this will disrupt all wireless network communications through this device To reset the AP to factory defaults 1 Go to Maintenance Reboot Reset The Maintenance Reboot Reset page appears 2 Click Reset Now next to Restore to factory settings 3 After a brief pause you will be automatically logged out of the AP You must now disconnect the A...

Страница 56: ...ortinfo txt and tr069info txt 4 Click the supportinfo txt link A new window or tab opens with the content of the log file displayed 5 Choose Save As or Save Page As from your browser s File menu 6 When the Save as dialog box appears find a convenient location on your local computer to save the file and change the file extension from html to txt 7 Click Save to save the file to your computer FIG 33...

Страница 57: ...change this port number if required SSH access By default this option is enabled active SSH port This field lists the default SSH port of 22 only if SSH is active You can manually change this port number if required HTTP access This option is disabled by default HTTP port This field lists the default HTTP port of 80 if HTTP has been activated You can manually change this port number if required HT...

Страница 58: ... value only if you want the AP to connect to another access control server ACS Contact FlexMaster every Interval at which the device should attempt to contact FlexMaster Associated Clients Monitoring Mode When enabled the AP monitors the association and disassociation activities of wireless clients and sends this information to FlexMaster Available options include Disable default Select to turn of...

Страница 59: ...rs Two options are available Ping Traceroute 2 Click the text field by the option you want to activate and type the network address of a site to which you wish to connect 3 Click Run Test The results appear in the text field below each option FIG 35 Administration Diagnostics page Diagnostics Ping Type the network address of a site to which you wish to connect Ping Results This field displays a te...

Страница 60: ...g page appears 2 Look for Log Status and then click Enabled 3 After enabling logging configure the appropriate options 4 Click Update Settings to save and apply your changes FIG 36 Administration Log page Log Log Status By default this status is disabled Syslog Server Address To enable the AP to send messages to a syslog server as they appear enter the IP address of the syslog server Syslog Server...

Страница 61: ...Browser Based Configuration Pages 55 NXA WAP1000 Smart Wireless Access Point ...

Страница 62: ...ation knowledge In the ever changing AV industry continual education is key to success AMX University is dedicated to ensuring that you have the opportunity to gather the information and experience you need to deliver strong AMX solutions Plus AMX courses also help you earn CEDIA NSCA InfoComm and AMX continuing education units CEUs Visit AMX University online for 24 7 365 access to Schedules and ...

Отзывы: