background image

Page 4

Page 5

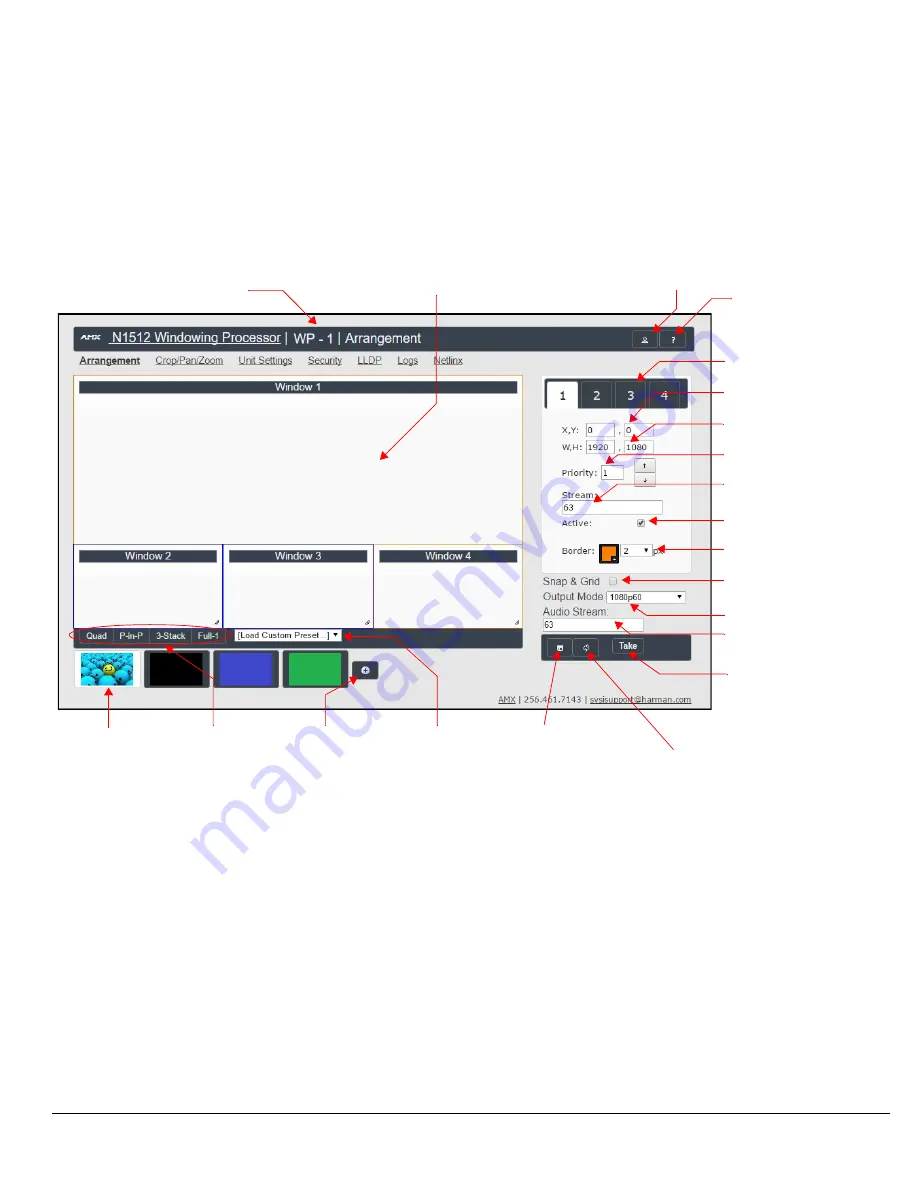
Arrangement Page

The 

Arrangement

 page (shown in FIG. 4) is the main control area. It is a combination of arrange, stretch, and skew options. The view in the 

top portion of the page represents the overall screen setup you are creating. From there, position and stretch windows by dragging-and-

dropping, resizing, or directly inputing values.

This area is also used to manipulate other settings such as borders, backgrounds, presets, mode, and input streams.Select from any number 

of default or user-defined presets. Slide windows around on command for attention-getting displays while seamlessly switching AV streams in 

and out as needed. 

FIG.4 ARRANGEMENT PAGE

Presets

Using either pre-configured (factory) presets or custom presets that 

you create yourself, quickly manipulate the arrangement/stretch/

skew of the windows. 

Create your own presets by clicking the 

button (pointed out 

previously in FIG. 4) and making choices in the 

Save


Preset

 dialog 

box (shown in FIG. 5). 

FIG.5 SAVE PRESET DIALOG BOX

Preset Examples

Two examples of common factory presets are shown in FIG. 6.

FIG.6 PRESET EXAMPLES

Device name

Snap adjustments 

to grid

Factory preset 

buttons

Click to create 

custom presets

Saved presets

Cancel any arrangement 

changes made since last time 

the 

Take

 button was clicked

Click 

Take

 to apply 

setting changes.

Input Audio 

Stream

Resolution

Border styling

Window is active 

(when checked)

Window input stream

Display priority

Window width, height

Window coordinates

Window selection

Help

Logout

Background 

selection

Replace 

background

Windows are movable 

and resizable.

Stored presets Picture in Picture example

Stored presets Quad example

Содержание NMX-WP-N1512

Страница 1: ...ed presets such as quad picture in picture etc or in any user defined configuration The combined output AV stream is then routed as a single N1000 stream to one or more displays via a single output network port any of the ports P0 P2 NOTE For proper operation all four U ports must be connected to active streams IMPORTANT To avoid creating a network loop never connect more than one P port to the sa...

Страница 2: ...TIC IP ADDRESS NOTE If the computer does not need Internet access you can simply enter a unique 169 254 xxx xxx IP address with a 255 255 0 0 subnet mask Please contact your network administrator if you are unsure of how to configure the existing interface If the computer has a statically assigned IP address click on the Advanced button Then click Add to enter a unique 169 254 xxx xxx address with...

Страница 3: ...or listed in their Type fields as shown in FIG 2 FIG 2 FINDING UNIT ON THE UNIT MANAGEMENT TAB Double click any device to view its control page If prompted enter admin and password as the default username and password This brings up the page shown in FIG 3 FIG 3 ACCESSING CONFIGURATION PAGES Click links at top of page to access the other configuration pages ...

Страница 4: ...y number of default or user defined presets Slide windows around on command for attention getting displays while seamlessly switching AV streams in and out as needed FIG 4 ARRANGEMENT PAGE Device name Snap adjustments to grid Factory preset buttons Click to create custom presets Saved presets Cancel any arrangement changes made since last time the Take button was clicked Click Take to apply settin...

Страница 5: ...of the windows Create your own presets by clicking the button pointed out previously in FIG 4 and making choices in the Save Preset dialog box shown in FIG 5 FIG 5 SAVE PRESET DIALOG BOX Preset Examples Two examples of common factory presets are shown in FIG 6 FIG 6 PRESET EXAMPLES Stored presets Picture in Picture example Stored presets Quad example ...

Страница 6: ...allows finer control of the individual windows See FIG 7 FIG 7 CROP PAN ZOOM PAGE Enable Aspect Ratio to crop to the window s current resolution Selected crop area Window selection Crop coordinates Window resolution Click Take to apply setting changes ...

Страница 7: ...irst discovered In the Network Setup section on the Unit Settings page IP address is required and will be used as the control IP address Configure the Netmask and default Gateway address as needed or directed by IT personnel Assign four static IP addresses to the four U ports see screen shot below for more details NOTE If you do need to make changes to the Network Setup section click Trial Save on...

Страница 8: ...s the N1512 Is the Decoder properly assigned to the output of the N1512 Is the network configured appropriately for N1000 AV traffic The N1512 is routed to a Decoder but the Decoder only shows four black screens Are the source Encoders enabled Do you have valid sources connected to all four U ports Are the AV sources properly routed to windows of the N1512 Is the network configured appropriately f...

Отзывы: