


Programming The Mio R-3
12
Mio Modero R-3 Remote
Updating Mio R-3 Firmware
Updating firmware in the Mio R-3 is also done through the programming jack. To update the main
firmware for the Mio R-3:
1.
Connect the Mio R-3 to your computer via the programming jack (FIG. 4).
2.
Put the device into
Download
mode, as shown on page 8.
3.
Open NetLinx Studio.
4.
Set the
Master Communication Settings
to
Axcess Master
and set the baud rate to 115200.
5.
Go to
Tools > Firmware Transfers > Send to Axcess Device...
This opens the
Send to Axcess
Dialog Window(FIG. 5)..
6.
Browse to the location of the firmware file.
7.
Select the file within the
Files
frame.
8.
Click
Query for Devices
.
9.
The Query For Devices field will display a complete list of all devices currently connnected to
NetLinx Studio capable of accepting the firmware file selected. Select the
Mio R-3
.
10.
Click
Send
.
11.
After device firmware download, check one more time to verify the firmware version change.
12.
Click
Close
.
13.
Upon confirmation of a successful send, you can exit NetLinx Studio and disconnect the
programming jack.
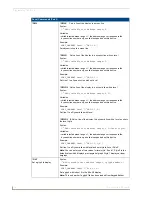
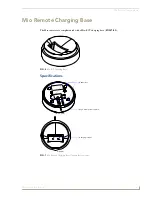
FIG. 5
Send to Axcess Dialog Window
You must download two .tsk files for the Mio R-3: one main firmware file, and one for
the ZigBee module.
If you are using the Mio R-3 in conjunction with other ZigBee-enabled devices, such
as the Mio R-4 and the NXA-ZGW wireless gateway, you should update the firmware
to all of the ZigBee devices at the same time.
Содержание Mio Modero R-3
Страница 4: ...ii Mio Modero R 3 Remote Table of Contents ...
Страница 8: ...Overview 4 Mio Modero R 3 Remote ...
Страница 14: ...Setup Mode 10 Mio Modero R 3 Remote ...
Страница 30: ...Programming The Mio R 3 26 Mio Modero R 3 Remote ...
Страница 33: ...Mio Remote Charging Base 29 Mio Modero R 3 Remote ...