background image

28

 - 


Ribbon and Gap/Black Mark sensor calibration 


Gap/black mark sensor sensitivity should be calibrated at the following 
conditions: 
 

1. 

A brand new printer 

2. 

Change label stock 

3. 

Printer initialization 

 
Please follow the steps below to calibrate the ribbon and gap/black mark sensor: 
 

1. 

Turn OFF the power switch 

2. 

Hold on the button then turn on the power switch 

3. 

Release the button when the LED becomes 

red

 and blinking. (Any red will 

do during the 5 blinks) 

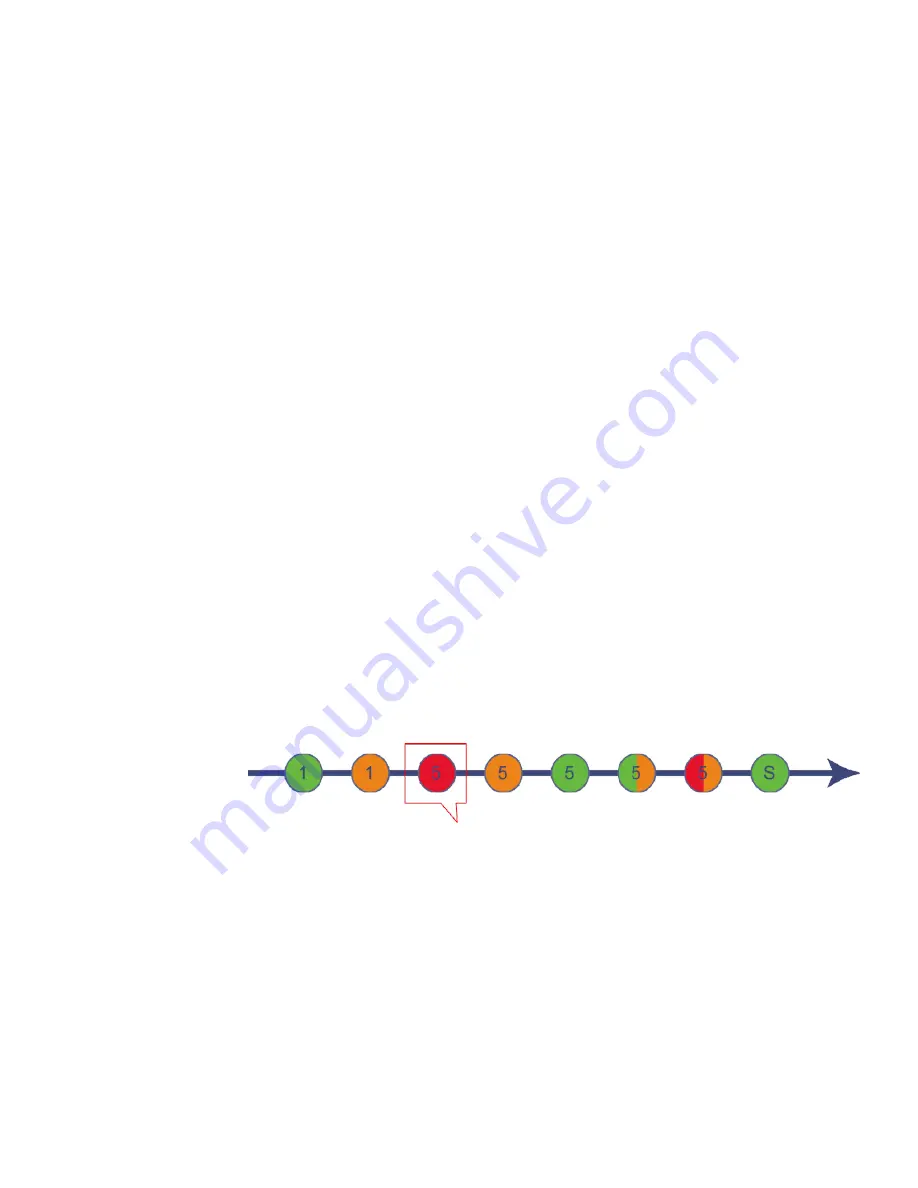
  The ribbon sensor and gap/black mark sensor sensitivity will be 

calibrated. 

  The LED color will change in the following order: 


Green 

  amber 


red  (5  blinks)


  amber  (5  blinks) 

  green  (5  blinks) 

  green/amber 

(5 blinks) 

 red/amber (5 blinks) 

 solid green 


Release button 

Note:


Please select gap or black mark sensor using Diagnostic Tool or by 
GAP or BLINE command prior to calibrate the sensor.


Содержание Fastmark M5e

Страница 1: ... March 2016 AMT Datasouth Corp Fastmark M5e Thermal Barcode Printer Direct Transfer User s Guide Document 121038 ...

Страница 2: ...Gerätes ist auf sicheren Stand zu achten Ein Kippen oder Fallen könnte Beschädigungen hervorrufen 7 Beachten Sie beim Anschluß ans Stromnetz die Anschlußwerte 8 Dieses Gerät kann bis zu einer Außentemperatur von maximal 40 betrieben werden FCC STATEMENT This equipment has been tested and found to comply with the limits for a Class B digital device pursuant to part 15 of the FCC Rules These limits ...

Страница 3: ...dia 17 Loading path for media 19 External label roll installation 20 Loading media in Peel off mode option 22 Loading media with cutter option 23 PALTM Print and Program overview 23 Traditional printing 24 Legacy data stream interpretation 24 Standalone Downtime applications 25 Power on Utilities 27 Ribbon and Gap Black Mark sensor calibration 28 Gap Black Mark calibration Self test and Dump mode ...

Страница 4: ... by diagnostic utility 53 Using USB interface to setup Ethernet interface 54 Using RS 232 interface to setup Ethernet interface 55 Using Ethernet interface to setup Ethernet interface 56 Troubleshooting 58 Common problems 58 Maintenance 62 Tools and methods 62 Product Specifications 63 Standard features 63 Bar code symbologies graphics 64 Printer optional features 65 General specifications 66 Prin...

Страница 5: ...d by qualified service personnel Refer to the product label bottom of printer and verify your power source exactly meets those requirements Do not use this product near heat or water Unplug this product from the power outlet before cleaning The main circuit board includes real time clock feature and has lithium battery CR2032 installed Risk of explosion if battery is replaced by an incorrect type ...

Страница 6: ...am block from printhead assembly Remove paper between printhead and platen 2 If any parts are missing please contact the Customer Service Department of your purchased reseller or distributor 3 It is recommended to keep packaging materials for future use if needed CD ROM M5e Printer USB Cable AC Power Cord Power Adapter Quick Start Guide ...

Страница 7: ...ide labels tags or receipts at up to 6 ips 203dpi 4 ips 300dpi offering a price performance combination that is unmatched by other desktop thermal barcode printers on the market The moveable sensor design can accept a wide range of label media All of the most frequently used bar code formats are included Fonts and bar codes can be printed in any one of the four directions Applications Healthcare p...

Страница 8: ...r 3 Feed button 8 SD card socket 4 LED indicator 9 Paper exit chute 5 Navigation button SD card spec SD card capacity Approved SD card manufacturer V2 0 SDHC CLASS 4 2 GB Transcend V2 0 SDHC CLASS 4 8 GB SanDisk V3 0 CLASS 10 UHS 16 GB SanDisk V3 0 CLASS 10 UHS 32 MB Transcend V2 0 SDHC CLASS 4 microSD 4GB Transcend ...

Страница 9: ...ind hub 8 Ribbon supply hub 2 Ribbon rewind gear 9 Top cover support 3 Gap sensor receiver 10 Media guide adjustment button 4 Media holder 11 Media guides 5 Media holder locking switch 12 Black mark sensor 6 Gap sensor transmitter 13 Platen roller 7 Print head ...

Страница 10: ...e 2 USB interface 3 USB host interface 4 RS 232C interface 5 Power jack socket 6 Power switch 7 External label entrance chute The interface picture here is for reference only Please refer to the product specification for the interfaces availability ...

Страница 11: ... Flash This illuminates a print error such as head open paper empty paper jam or memory error etc Feed button When the printer is ready press the button to feed one label to the beginning of next label When the printer is printing press the button to pause a print job When the printer is paused the power LED will blink green Press the button again to continue the print job When the printer enters ...

Страница 12: ...cable 4 Plug the AC power cord female connector into the power supply socket Then plug the DC power supply plug into the rear of the printer Then plug the power cord into a properly grounded power outlet Verify the printer power switch is in the OFF position before installing the power cord Power switch Power cord plug Power supply Power cord female connector DC power supply plug ...

Страница 13: ...of the printer and lifting the top cover to the maximum open angle 2 A top cover support at the rear of the printer will engage with lower inner cover to hold the printer top cover open 3 Hold the top cover and press the top cover support to disengage the top cover support with lower inner cover Gently close the top cover ...

Страница 14: ...aximum open angle 2 Open the ribbon access cover and the media cover Note 1 In normal print mode the ribbon access cover can be opened or closed 2 In peeler and cutter mode please open the top cover then the ribbon access cover can be opened or closed 3 Insert the ribbon right side onto the supply hub Align the notches on the left side and mount onto the spokes ...

Страница 15: ...nal tape may be required 6 Turn the ribbon rewind gear until the ribbon plastic leader is thoroughly wound and the black section of the ribbon covers the print head TIP Apply a small piece of tape to the black ribbon surface Remove the piece of tape if the black ribbon material is removed you have the correct surface facing outward If not turn the ribbon over to the opposite side ...

Страница 16: ... 16 Loading path for ribbon 7 Close the ribbon access cover and the top cover Ribbon supply roll Ribbon rewind roll ...

Страница 17: ...top cover by pulling the tabs located on each side towards the front of the printer then lift the top cover to the maximum open angle 2 Separate and hold open the media holders 3 Place the roll between the holders and close them onto the core ...

Страница 18: ...rmly 5 Place the paper print side face up through the media sensor and place the label leading edge onto the platen roller Move the media guides to fit the label width by turning the guide adjuster knob 6 Disengage the top cover support and close the top cover gently PUSH ...

Страница 19: ...e and calibrate the selected sensor Note Please calibrate the gap black mark sensor when changing media Please refer to the diagnostic utility quick start guide for more information Start the Diagnostic tool select the Printer Configuration tab then click on the Calibrate Sensor button Media holder ...

Страница 20: ...on the bottom of the printer 2 Insert a 3 label spindle into a paper roll And install it onto the external paper roll mount 3 Open the printer s top cover and separate the media holders to fit the media width Press down the media holder lock switch to fix the media holder PUSH ...

Страница 21: ... guide adjuster knob 5 Disengage the top cover support and close the top cover gently 6 Use Diagnostic Tool or LCD menu function to set the media sensor type and calibrate the selected sensor Note Please calibrate the gap black mark sensor when changing media Please refer to the diagnostic utility quick start guide for more information Start the Diagnostic tool select the Printer Configuration tab...

Страница 22: ...ensor when changing media Please refer to the diagnostic utility quick start guide for more information Start the Diagnostic tool select the Printer Configuration tab then click on the Calibrate Sensor button 2 Open the printer cover Pull the label through the front of the printer and remove a few labels leaving a 6 inch liner 3 Open the peel off module cover Feed the liner into peel off cover slo...

Страница 23: ... supported for the thermal plain label only 1 Lead the media through the cutter paper opening 2 Close the printer cover 3 Use Diagnostic Tool or LCD menu function to set the media sensor type and calibrate the selected sensor 4 Use the DiagTool or LCD menu function to enable the cutter mode 5 Press the FEED button to test Note Please calibrate the gap black mark sensor when changing media ...

Страница 24: ... label tag or ticket Using a Windows driver in conjunction with a Windows application program is a typical way to print in this environment Alternatively PALTM print sequences may also be generated by any host application written to take advantage of this powerful language When a PALTM capable printer is used this way no special PALTM program must be loaded on the printer Print sequences generated...

Страница 25: ...eformatted into any size font in any rotation or even printed as bar code This example demonstrates how PALTM Print and Program capable printers can replace a legacy print device with no host software changes required Standalone Downtime applications PALTM Print and Program capable printers may be programmed to operate independent of a PC host connection This standalone ability may be used in case...

Страница 26: ...alone PALTM application and database is stored in the printer Operator input combined with internal database information is used to create a label For example this application could request a part number and physical dimensions of a particular part by prompting for this information on the printer LCD After the operator inputs the requested information on the PS 2 or USB Host keyboard the printer c...

Страница 27: ...button when LED indicates with different status color for different functions Power on utilities The LED color will be changed as following pattern LED color Functions Green Amber Red 5 blinks Amber 5 blinks Green 5 blinks Green Amber 5 blinks Red Amber 5 blinks Solid green Ribbon sensor calibration and gap black mark sensor calibration Release Gap black mark sensor calibration Self test and enter...

Страница 28: ...Hold on the button then turn on the power switch 3 Release the button when the LED becomes red and blinking Any red will do during the 5 blinks The ribbon sensor and gap black mark sensor sensitivity will be calibrated The LED color will change in the following order Green amber red 5 blinks amber 5 blinks green 5 blinks green amber 5 blinks red amber 5 blinks solid green Release button Note Pleas...

Страница 29: ...n turn on the power switch 3 Release the button when the LED becomes amber and blinking Any amber will do during the 5 blinks The LED color will change in the following order 4 The sensor will calibrate the label length is measured and then the unit prints the internal settings Afterwards the unit enters the dump mode Green amber red 5 blinks amber 5 blinks green 5 blinks green amber 5 blinks red ...

Страница 30: ...Printed mileage meter Cutting counter Print speed inch sec Print darkness Label size inch Gap distance inch Gap black mark sensitivity Code page Country code ZPL setting information Print darkness Print speed inch sec Label size Control prefix Format prefix Delimiter prefix Printer power up motion Printer head close motion RS232 serial port configuration Continued on next page ...

Страница 31: ... characters are received from your system and right side data are the corresponding hexadecimal value of the characters It allows users or engineers to verify and debug the program ASCII Data Hex Decimal Data Note Dump printing requires 4 wide paper Turn printer OFF and back ON to resume normal printing Number of download files available memory space Print head check pattern ...

Страница 32: ...n the following order Printer initialization will restore setting accordingly Green amber red 5 blinks amber 5 blinks green 5 blinks green amber 5 blinks red amber 5 blinks solid green Release button Parameter Default setting Speed 3ips 76 mm sec 300DPI Density 8 Label Width 4 101 5 mm Label Height 4 101 5 mm Sensor Type Gap sensor Gap Setting 0 12 3 0 mm Print Direction 0 Reference Point 0 0 uppe...

Страница 33: ...ensing calibration 1 Turn OFF the power switch 2 Hold on the button then turn ON the power switch 3 Release the button when the LED becomes red amber and blinking Any red amber will do during the 5 blinks The LED color will change in the following order Green amber red 5 blinks amber 5 blinks green 5 blinks green amber 5 blinks red amber 5 blinks solid green Release button Green amber red 5 blinks...

Страница 34: ... be interrupted without running the program by the power on utility 1 Turn OFF the power switch 2 Hold on the button then turn ON the power switch 3 Release the button when the LED becomes green and blinking Any green will do during the 5 blinks The LED color will change in the following order Green amber red 5 blinks amber 5 blinks green 5 blinks green amber 5 blinks red amber 5 blinks solid gree...

Страница 35: ...unction Entering the menu Press the Menu button to enter the main menu Use the Cross button to select the item on main menu The selected item will turn red Press the Feed button to enter the setting list Fastmark M5e ...

Страница 36: ... 36 Main menu overview There are 8 categories for the main menu You can easily set the settings of printer without connecting the computer Please refer to following sections for more details CARD ...

Страница 37: ...lable setting is from 4 to 12 6 Density Use this option to setup print darkness The available setting is from 0 to 15 and the step is 1 You may need to adjust your density based on selected media 8 Direction The direction setting value is either 1 or 0 Use this item to setup the printout direction DIRECTION 0 DIRECTION 1 0 FEED ...

Страница 38: ...rint job Batch Mode Offset This item is used to fine tune media stop location Available setting value is from to or 0 to 9 000 Shift X This item is used to fine tune print position Available setting value is from to or 0 to 9 000 Shift Y 000 Reference X This item is used to set the origin of printer coordinate system horizontally and vertically Available setting value is from 0 to 9 000 Reference ...

Страница 39: ... 39 ZPL2 ...

Страница 40: ...bel cutter mode Tear Off Print Width This item is used to set print width The available value is from 0 to 832 dots 812 dots List Fonts This feature is used to print current printer available font lists The fonts stored in the printer s DRAM Flash or optional memory card N A List Images This feature is used to print current printer available image lists The images stored in the printer s DRAM Flas...

Страница 41: ...eed label Length Printer will determine print length and feed label No Motion Printer will not move media No Motion Label Top This option is used to adjust print position vertically on the label The range is 120 to 120 dots 0 Left Position This option is used to adjust print position horizontally on the label The range is 9999 to 9999 dots 0000 Reprint Mode When reprint mode is enabled you can rep...

Страница 42: ...r sensitivity automatically N A Manual setup In case Automatic does not apply to the media type use Manual function to set the media length and gap b line size Then scan the backing mark to calibrate the sensor sensitivity N A Threshold Detect This option is used to set sensor sensitivity in fixed or auto mode Auto Maximum Length This option is used to set the maximum length for label calibration ...

Страница 43: ...ings Item Description Default Baud Rate This item is used to set the RS 232 baud rate 9600 Parity This item is used to set the RS 232 parity None Data Bits This item is used to set the RS 232 Data Bits 8 Stop Bit s This item is used to set the RS 232 Stop Bits 1 Serial ...

Страница 44: ...odule Item Description Default Status Use this menu to check the Ethernet IP address and MAC setting status N A DHCP This item is used to turn ON or OFF the DHCP Dynamic Host Configuration Protocol network protocol N A Static IP Use this menu to set the printer s IP address subnet mask and gateway N A ...

Страница 45: ...ting mode of wireless local area networks to connect devices to the networks Note Infrastructure mode requires the use of an access point for this communication to take place Ad hoc mode involves connecting a computer directly to another computer Infrastructure Scan AP This item is used to scan the access point devise N A DHCP This item is used to ON or OFF the DHCP Dynamic Host Configuration Prot...

Страница 46: ...o check the printer s available memory and file list Item Description DRAM Use this menu to show delete and run BAS files saved in the printer DRAM memory FLASH Use this menu to show delete and run BAS files saved in the printer Flash memory ...

Страница 47: ...tion Self test printout Model name F W version Firmware checksum Printer S N TSC configuration file System date System time Printed mileage meter Cutting counter Print speed inch sec Print darkness Label size inch Gap distance inch Gap black mark sensor intension Code page Country code ...

Страница 48: ... Format prefix Delimiter prefix Printer power up motion Printer head close motion Note ZPL is a Zebra language emulation RS232 serial port configuration Numbers of download files Total available memory space Print head check pattern Note Printing the configuration page requires 4 wide media ...

Страница 49: ...in 2 columns The left side characters are received from your system and right side data are the corresponding hexadecimal value of the characters It allows users or engineers to verify and debug the program Note Printing a dump requires 4 wide media Print Head This feature verifies the head temperature resistance and missing dots ASCII Data Hexadecimal Data ...

Страница 50: ... setting Advanced This feature is used to set the printer advanced settings Item Description Display Brightness This item is used to adjust the brightness for display Date Time This item is used to setup the display date and time Language This item is used to setup the display language ...

Страница 51: ...rinter settings to factory defaults Item Description Initialization This feature is used to restore printer default settings Printer Information This feature is used verify the printer serial number printed mileage m labels pcs and cutting counter ...

Страница 52: ...rinter bitmap fonts and to send additional commands to the printer Using this convenient tool you can explore the printer status and settings and troubleshoot the printer Starting Diagnostic Tool 1 Double click on the Diagnostic tool icon to start the software 2 There are four features Printer Configuration File Manager Bitmap Font Manager Command Tool included in the Diagnostic utility ...

Страница 53: ...Diagnostic Tool please refer to the diagnostic utility quick start guide in the CD disk Diagnostic Utilities directory Function Description Calibrate Sensor Calibrate the sensor specified in the Printer Setup group media sensor field Ethernet Setup Setup the IP address subnet mask gateway for the on board Ethernet RTC Setup Synchronize printer Real Time Clock with PC Factory Default Initialize the...

Страница 54: ...lity by double clicking on the icon 4 The Diagnostic Utility default interface setting is USB If the USB interface is connected to the printer no other settings need to be changed in the interface field 5 Click on the Printer Function Ethernet Setup button DHCP is the default Select Static IP to assign the IP address subnet mask and gateway for the on board Ethernet ...

Страница 55: ...stic Utility by double clicking on the icon 4 Select COM as interface then click on the Setup button to select the serial port baud rate parity check data bits stop bit and flow control parameters 5 Click on the Printer Function Ethernet Setup button DHCP is the default Select Static IP to assign the IP address subnet mask and gateway for the on board Ethernet ...

Страница 56: ...terface then click on the Setup button to setup the IP address subnet mask and gateway for the on board Ethernet 5 Click the Discover Device button to explore the printers that exist on the network 6 Select the printer in the left side of listed printers the correspondent IP address will be shown in the right side IP address Printer Name field 7 Click Change IP Address to configure the IP address ...

Страница 57: ...ters obtained by DHCP and reset the printer name Web setup button While using the Diagnostic Utility to setup the printer you can also explore and configure the printer settings and status or update the firmware within the IE or Firefox web browser This feature provides a user friendly setup interface and the capability of managing the printer remotely over a network ...

Страница 58: ... is not correctly connected between host and printer The port specified in the Windows driver is not correct Re connect interface cable or replace cable Please reset the wireless device setting Select the correct printer port in the driver Clean the printhead Print head s harness connector s are not properly connected Turn off the printer and reconnect Check your program if there is a command PRIN...

Страница 59: ...nload a file to memory FLASH DRAM CARD The space in memory is full Delete unused files in the memory Cannot access SD card SD card is damaged SD card doesn t insert correctly Use the non approved SD card manufacturer Use the supported capacity SD card Insert the SD card again The supported SD card spec and the approved SD card manufacturer Poor Print Quality Ribbon and media is loaded incorrectly ...

Страница 60: ...is not specified properly Sensor sensitivity is not set properly The media sensor is covered with dust Check if label size is setup correctly Calibrate the sensor by Auto Gap or Manual Gap options Clean the GAP Black mark sensor with air Wrinkle Problem Printhead pressure is incorrect Ribbon installation is incorrect Media installation is incorrect Print density is incorrect Media feeding is incor...

Страница 61: ...meter Shift Y in the LCD menu is incorrect The vertical offset setting in the driver is incorrect Calibrate the sensor sensitivity Set the correct label size and gap size Press MENU SELECT x3 DOWN x6 SELECT to fine tune the parameter of Shift Y If using the label printing software set the vertical offset in the driver ...

Страница 62: ... with 99 alcohol and a cotton swab or lint free cloth Clean the platen roller when Changing a new label roll Tear Bar Peel Bar Use the lint free cloth with 99 alcohol to wipe it As needed Sensor Compressed air or vacuum Monthly Exterior Wipe it with water dampened cloth As needed Interior Brush or vacuum As needed Note Do not touch print head by hand If you touch it accidentally please use alcohol...

Страница 63: ...or Automatic media ribbon sensor selecting 128 MB Flash memory 64 MB DDR2 DRAM SD card reader for memory expansion up to 32 GB RS 232 interface Max 115 200 bps USB 2 0 interface Hi speed mode Internal Ethernet print server 10 100 Mbps interface USB host Standard industry emulations right out of the box including Eltron and Zebra language support Internal 8 alpha numeric bitmap fonts Fonts and bar ...

Страница 64: ...CODABLOCK subsets A B C F mode Code128UCC DataMatrix EAN128 Maxicode Interleave 2 of PDF 417 5 Code 39 Aztec Code 93 EAN MicroPDF417 13 EAN 8 QR code Codabar RSS Barcode POSTNET GS1 Databar UPC A UPC E EAN and UPC 2 5 digits MSI PLESSEY China Post ITF14 EAN14 Code 11 TELPEN PLANET Code 49 Deutsche Post Identcode Deutsche Post Leitcode LOGMARS ...

Страница 65: ... mm Paper length 1 max length Max width 110 mm Note Except for the linerless cutter all regular heavy duty care label cutters DO NOT cut on media with glue Plus keyboard display unit Plus programmable smart keyboard External roll mount with 3 core label spindle Sleeve adapter External Bluetooth module serial interface External 802 11 b g n wireless module serial interface Parallel port replace USB...

Страница 66: ...24V 3 75A 90W Environmental condition Operation 5 40 C 41 104 F 25 85 non condensing Storage 40 60 C 40 140 F 10 90 non condensing Environmental concern Comply with RoHS WEEE REACH Print specifications Print head resolution dots per inch mm 300 dots inch Print method Direct Transfer Dot size width x length 0 084 x 0 084mm 1mm 12 dots Print speed inches per second Up to 4 ips Max print width 4 15 M...

Страница 67: ...e Ink coated outside wound Media specifications Media roll capacity Max 5 OD Media core diameter 1 1 5 ID core Media type Continuous die cut black mark external fan fold notch Media wound type Outside wound Media width 78 4 4 Media thickness 002 007 Label length 39 max print length Label length peeler mode 1 0 6 Label length cutter mode 1 0 max print length Black mark Min 31 W x 078 H Gap height M...

Страница 68: ...ers Manufacturing Service 803 Camarillo Springs Road Suite D 5033 Sirona Drive Suite 800 Camarillo CA 93012 Charlotte NC 28273 TEL 800 215 9192 TEL 800 476 2120 FAX 805 484 5282 FAX 704 525 6104 Web site www AMTDatasouth com ...

Отзывы: