HD408N, HD428N User Guide
9
amscope.com
Using on a Network
These camera models can be used in a network, allowing them to be accessed by network users. Each camera has an
Ethernet port which can be used on a local-area network (LAN) by connecting to a network switch or other device using
an Ethernet cable. Each camera also includes a wi-fi dongle which attaches to the camera’s USB 2.0 port to provide
connectivity over a wireless local-area network (WLAN). Either connection method requires configuration which must
be performed while the camera is connected to a video display using HDMI. Once the configuration is performed, the
camera can be used without the display.
LAN
When connecting to a LAN, the camera is treated as a client device or peer using IPv4 protocol. The camera must be
connected to a network interface such as a switch using an Ethernet cable. Prior to connection, the camera will need to
be configured. With the camera connected to a video display, use the mouse to move the cursor over the bottom of the
screen to display the Camera Control Toolbar. Click on the
icon to open the Settings menu. Select Network from the
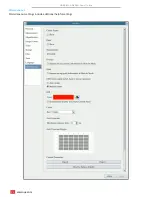
settings list, then click on the LAN tab. There is a check box labeled “DHCP” which designates whether the camera’s net-
work address will be managed by the network’s DHCP server, or manually. In most cases, DHCP is the preferred option,
allowing the camera to be accessed by computers on the network which are using the provided AmScope software. In
some cases, it may be necessary to define the camera’s address manually. To do so, uncheck the DHCP box, then enter
the IP address, subnet mask, and default gateway in their respective fields. When all settings are set, click on the apply
button on the bottom right of the screen.


