


6
Safety instructions
Ampler – Stout, Stellar, Curt
2 Safety instructions
Read and carefully follow the instruction manual.
Keep the instruction manual in a safe place.
Read, follow and save all supplied instruction manuals for
components and accessories.
Please pass on the instruction manual and all user manuals
when handing over the Pedelec.
2.1 Pedelec
2.1.1 Intended use
The Pedelec is intended for private use as an electric motor-
assisted bicycle in urban and countryside areas on publicly
accessible, paved paths.
Only use the Pedelec, components and accessories in
accordance with the information in this instruction manual.
y
Please adhere to the manufacturer's instruction manuals for
the Pedelec's components and accessories.
Do not modify the Pedelec, its components or accessories in
an unauthorized manner.
Only use approved original spare parts for replacement,
exchange, maintenance or repair.
Replace, service or repair of components only as specified in
this manual and, if necessary, after contacting Ampler Customer
Service.
2.1.2 Non-intended use
The Pedelec is
not
intended for use as a mountain bike or racing
bike.
Avoid non-intended uses:
The following are considered as non-intended use:
y
Renting the Pedelec at unattended rental stations
y
Exceeding the permissible total weight of the Pedelec
y
To use the Pedelec without reflectors fitted in accordance
with locally applicable regulations
y
Adjusting the seat post beyond the minimum insertion
depth in the seat tube
y
Using the Pedelec with inadequately tightened,
under-tightened or over-tightened stem clamping bolts
y
To use the Pedelec with incorrectly mounted pedals
y
Using the Pedelec with underinflated or overinflated tyres
y
Disregarding the required inspection and maintenance
schedules
y
Overtightening of fasteners during assembly, adjustment
or maintenance
y
Use of non-original spare parts
y
Connecting the charger to a damp or wet charging port
y
Charging the battery outdoors
y
Inappropriate disposal of the Pedelec, its components and
accessories
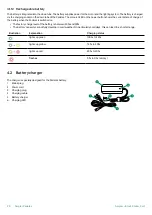
2.2 Battery charger
The battery charger is not intended for use by persons
(including children) with reduced physical, sensory or mental
capabilities, or lack of experience and knowledge, unless they
have been given supervision or instruction concerning use of
the charger by a person responsible for their safety.
Do not let children play with the battery charger.
Use only the charger intended for the corresponding Ampler
bike when charging the battery in the Pedelec with the
charging connection.
2.3 Other hazards
Riding without a bike helmet
Serious injuries and fatalities induced by accidents!
Riding without a bicycle helmet can lead to serious head
injuries in the event of a crash or fall.
Always wear a correctly adjusted and fitting bicycle helmet
when riding.
Follow the manufacturer's manual.
Loose components of the Pedelec
Loose components that can lead to hazards include:
y
Saddle and seat post
y
Handlebars
y
Pedals
y
Wheels
y
Rear carrier
Falls and very serious injuries can be caused by parts of the
Pedelec coming loose!
Lose oder zu gering angezogene Schrauben, Mutter und
Loose or under-tightened screws, bolts, nuts and fastenings lead
to loose, slipping components (loose
handlebars, slipping seat
posts, loose saddles, wheels slipping out of the fork, loose
pedals) and can
lead to loss of stability and balance when riding.
Always comply with the torque specifications or instructions
for the correct tightening of bolts and nuts on the headset,
stem, handlebars, saddle and seat post, wheels and axles.
Follow the instructions for the correct installation of the
pedals.
Note the information on the minimum insertion depth of the
seat post.
Содержание Curt 2021
Страница 1: ...Manual English Model year 2021 Ampler Manual Stout Stellar Curt...
Страница 2: ......
Страница 56: ...54 Ampler Stout Stellar Curt Notes Notes...
Страница 57: ...Ampler Stout Stellar Curt 55 Notes...
Страница 58: ...56 Ampler Stout Stellar Curt Notes...
Страница 59: ......
Страница 60: ...Ampler Bikes O Telliskivi tn 60 2Tallinn 10412 Estonia hello amplerbikes com www amplerbikes com...


