background image

- 22 -

Using the Device

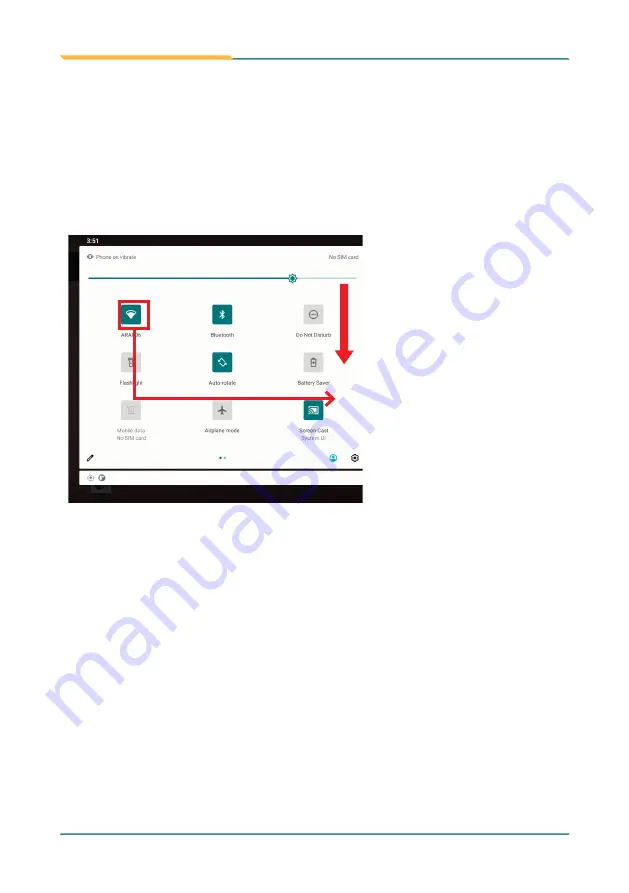
3.2.1 Using the Quick Settings Panel

Swiping down the 

Status Bar

 will bring up a 

Quick Settings

 panel 

where you 

can quickly access some most commonly used settings and features. To enable/disable 

a feature or switch between available options , simply tap the intended tile. It appears 

dimmed when disabled and brightened when enabled. 

For some features such as Wi-Fi, Bluetooth, Location, Audio Profiles, you can also tap 

and hold the tile to directly access the settings page. 

For some feature tiles, you can 


Tap to enable/disable a feature


Tap and hold to quickly access 

its settings page

Swipe down the 

Status 

Bar

 to access the 

Quick Settings 

panel.

3.2.2 Enabling/Disabling Screen Rotation

The GT78-VN automatically rotates the display when tilted sideways. You may 

enable or disable the auto rotation function as needed. To do so, swipe down the 

Status bar

 and tap the 

AUTO ROTATE

 tile to enable or disable the auto rotation 

function.

Содержание GT78-VN

Страница 1: ...I 2022 05 GT78 VN 10 Rugged Android Tablet Device User s Manual Version 1 0...

Страница 2: ...II This page is intentionally left blank...

Страница 3: ...i Revision History Version Release Time Description 1 0 2022 05 Initial release...

Страница 4: ...cumstances will the manufacturer be liable for any direct indirect special incidental or consequential damages arising from the use or inability to use the product or documentation even if advised of...

Страница 5: ...Technical Support 2 Warranty 2 Chapter 1 Introduction 3 1 1 Product Highlights 4 1 2 Package Contents 5 1 3 Parts of the Device 6 1 4 Dimension 7 1 5 Specifications 8 Chapter 2 Installation 11 2 1 In...

Страница 6: ...4 3 Forgetting Modifying a Wi Fi Network 29 3 4 4 Making Your Device a Wi Fi Hotspot 30 3 5 Enabling Bluetooth and Pairing with Bluetooth Device 31 3 5 1 Configuring Bluetooth Features to Use 32 3 5 2...

Страница 7: ...expressly approved by the guarantee of this device could void the user s authority to operate the equipment This equipment has been tested and found to comply with the limits for a Class B digital de...

Страница 8: ...states of the EU are to enforce by 7 1 2006 AMobile Intelligent Corporation hereby states that the listed products do not contain unintentional additions of lead mercury hex chrome PBB or PBDB that ex...

Страница 9: ...not occur in a particular installation If this equipment does cause harmful interference to radio or television reception which can be determined by turning the equipment off and on the user is encour...

Страница 10: ...Read all cautions and warnings on the equipment 2 Place this equipment on a reliable surface when installing Dropping it or letting it fall may cause damage 3 Make sure the correct voltage is connecte...

Страница 11: ...r safety reasons the equipment should be opened only by qualified service personnel 16 If one of the following situations arises get the equipment checked by service personnel a The power cord or plug...

Страница 12: ...eyes when the barcode scanner is inoperation Rechargeable Battery Pack Safety With very little care you can optimize the battery life and maximize the lifespan of the battery Most importantly use only...

Страница 13: ...at it has no memory effect so users needn t worry about that issue Users can charge the battery anytime whether it is fully drained or not However it s recommended that users drain the batteryuntil th...

Страница 14: ...uum cleaner to absorb the dirt on the floor 4 Never drop the components inside the device or get circuit board damp or wet 5 Be cautious of all kinds of cleaning solvents or chemicals when you use it...

Страница 15: ...s foam swabs Recommended Cleaning Procedures 1 Close all application programs 2 Close operating software 3 Turn off the equipment 4 Remove all peripherals 5 Disconnect the power cable 6 Proceed to cle...

Страница 16: ...following terms This warranty does not apply to products damaged by misuse modifications accident or disaster Vendor assumes no liability for any damages lost profits lost savings or any other incide...

Страница 17: ...3 1 Chapter 1 Introduction Chapter 1 Introduction...

Страница 18: ...0x1280 resolution Projected capacitive multi touch panel with anti reflection Corning Gorilla glass High mobility with multiple connectivity including WLAN Bluetooth and WWAN Optional built in 2D barc...

Страница 19: ...nspect the contents If any items are missing or appear damaged contact your local dealer or distributor The package should contain the following items GT78 VN 8 Tablet PC Lithium Battery 1 x Rechargea...

Страница 20: ...5 16 12 3 4 5 6 8 7 9 10 11 1 Power button 9 Scan key 2 Barcode scanner 10 Speaker 3 Pogo pin 11 Battery 4 USB connector 12 Camera flash light 5 Front Camera 13 Rear Camera 6 Light sensor 14 NFC 7 Tou...

Страница 21: ...7 Introduction 1 4 Dimension 147mm 20 9mm 220mm...

Страница 22: ...Sensor Accelerometer G sensor Magnetometer M Sensor E Compass Gyroscope Barometer Ambient light sensor Audio Vibrator 1 x built in microphone 1 x built in speaker 1 5W 1 x vibrator Navigation Support...

Страница 23: ...ype Lithium ion rechargeable battery field replaceable Battery Capacity Typical 3 8V 6200mAh Adapter Input AC 100 240V 50 60 Hz Adapter Output 9V 2A 5V 2A Mechanical Environmental Dimensions W x H x D...

Страница 24: ...10 This page is intentionally left blank...

Страница 25: ...11 Installation 2 Chapter 2 Getting Started Chapter 2 Installation...

Страница 26: ...e Figure 2 1 Screw off and remove the cover Figure 2 3 Follow the direction of red arrow to open the lid of mSD slot Figure 2 6 Follow the di rection of red arrow to un lock the card slot cover s and...

Страница 27: ...small end of the cable to the USB port on the device 2 Then connect the other end of the USB cable to the power adapter 3 Connect the power adapter to an electrical outlet Step 1 Con nect the same en...

Страница 28: ...ed 2 3 Installing Replacing the Battery In case you need to install or replace the battery follow the steps as below to access the battery chamber and replace the battery 2 3 1 Accessing Battery Chamb...

Страница 29: ...covered by a protective lid Insert the tip of your finger on to the top of the cover and remove it 4 Then you can remove the battery from the chamber 2 3 2 Installing Battery 1 To install the battery...

Страница 30: ...the protective lid make sure the lid is oriented as shown in the photo to the right 4 Align the top edge of the lid with the top of the opening 5 Press the lid firmly into place to ensure it is secur...

Страница 31: ...17 Using the Device 3 Chapter 3 Using the Rugged Handheld Device Chapter 3 Using the Device...

Страница 32: ...Tap and hold on an item such as an image or an icon then move it to the target position While dragging do not release until you have reached the target position Swipe Move your finger horizontally or...

Страница 33: ...still capable of receiving messages and calls and processing tasks like downloading To switch to sleep mode press and hold the Power key until the screen is turned off To wake up the device from slee...

Страница 34: ...and you can launch the associated application You can also add desired items to the Home screen extend the Home screen or personalize the wallpaper to tailor it to your personal needs When you power...

Страница 35: ...such as the system time Wi Fi signal strength Ethernet connection status and Bluetooth connection status You can access the Quick Settings panel by swiping up the status bar Widget The miniature of an...

Страница 36: ...h as Wi Fi Bluetooth Location Audio Profiles you can also tap and hold the tile to directly access the settings page For some feature tiles you can Tap to enable disable a feature Tap and hold to quic...

Страница 37: ...ets to the extended Home screen 1 Tap theApp Launcher icon on the Home screen to locate the target application icon or widget 2 Tap and hold the target icon or widget until the extended Home Screen ap...

Страница 38: ...constant and seamless Internet connection Two cellular network icons will be displayed in the Status Bar to indicate the connectivity and signal strength Icon Descriptions No signal or no SIM card in...

Страница 39: ...ooth device see 3 5 Enabling Bluetooth and Pairing with Bluetooth Device on page 31 3 3 3 Data Connection Connecting to a cellular network enables you to use voice service as well as data connection s...

Страница 40: ...tantially increase as the costs for accessing the internet are particularly high Under such situation you may want to disable the data roaming function of the SIM card To enable or disable data roamin...

Страница 41: ...y to authenticate your connection The GT78 VN needs to be configured including such key to connect to a hotspot Follow the guide below to connect the GT78 VN to your wireless local area network Note T...

Страница 42: ...eed to manually add a Wi Fi network When a Wi Fi network doesn t broadcast its name SSID Using the Rugged Handheld Device When a Wi Fi network is out of range and you want the GT78 VN to remember it a...

Страница 43: ...to auto connect to a Wi Fi network or when it is a network that you no longer use remove the Wi Fi network by the steps below 1 Swipe down the Status bar and tap the WI FI tile to enable Wi Fi if it...

Страница 44: ...spot slider to enable the hot spot function 3 Tap Setup Wi Fi hot spot to configure the settings as needed Network SSID Enter a name to identify the wireless networkcreated by the GT78 VN Security pas...

Страница 45: ...ooth device in range Then it displays the names of the device s found If the GT78 VN stops scanning before the other device becomes discoverable tap SEARCH FOR DEVICES again Note If the device to pair...

Страница 46: ...to both support the right profile Some Bluetooth devices have multiple profiles A profile can provide the ability to transmit phone conversations to play music in stereo or to transfer files or other...

Страница 47: ...to be visible by default the visibility will be turned off after 2 minutes If you want to extend the visibility time or make it discoverable at all times you have to configure the timeout value as ne...

Страница 48: ...sed Apps to collect and use your location information to provide location related service For example a third party App might want to pinpoint a vehicle s location so as to provide a more efficient ro...

Страница 49: ...achieved compared to the other two modes Select this mode if precise location matters to you Battery saving This mode uses Wi Fi and cellular networks to determine your location Select this mode if yo...

Страница 50: ...frame your subject on the screen the camera will Auto Focuson the center of the screen with a focus indicator To manually make a focus tap the target or area that you want to focus on To take a photo...

Страница 51: ...rt distance less than 4 centimeters The NFC detection area is at the back side of the GT78 VN When you tap other NFC devices tags or readers the NFC areas of both devices should be close to one anothe...

Страница 52: ...when the barcode scanner is in operation 3 9 1 Scanning the Barcode Generally a third party barcode application will be used to process the data read by the scanner This user manual will not cover the...

Отзывы: