background image

9

Product Operation

Battery Charging

1. Charging station placement.

Place charging station against the wall 

and remove obstacles about 1 meter at 

two sides and about 2 meters in front 

of  The  station,  as  show  in  the  right 

right side of the robot for more than 3 seconds.

a. Plug the adapter into the robot and the other end to the power socket as show in 

b. Press

   on robot or “HOME” on remote control to operate the robot to go 

Note :

b. Once charging is completed, LED panel will show “FULL”.

In order to extend battery’s usage life :

e.  If the  robot  is  not  used  for  more  than  3  months,  charge  the  robot  for  12 hours 

before use it for cleaning.

Содержание Pulse

Страница 1: ...Robotic Vacuum Cleaner AMIBOT Pulse AMIBOT Pulse H2O User Manual ...

Страница 2: ...8 Product Operation 9 Battery Charging 9 Scheduling 11 Cleaning Modes 12 Water Tank Installation 13 Product Maintenance 14 Cleaning Side Brushes 14 Cleaning Dust Bin and Filters 14 Cleaning Sensors and Wheels 15 Cleaning Charging Poles 15 Cleaning Suction Passage and Dust Sensor 15 Troubleshooting 16 Error code for Sensors 16 Error code for Motors 18 Battery Removal ...

Страница 3: ...ing Using 3 Do not touch the power cord plug or adaptor with wet hands 4 Do not make clothes or part of body drawn into the product wheels 5 Make sure this product is not close to cigarette ends lighters matches or any 6 If the product needs cleaning clean it after it s fully charged 8 Only use the product indoors do not use it outdoors children or pets while the product is in operation mode 10 Do...

Страница 4: ...arning When the appliance is to be used by a child the child must be of 8 years old and above For persons with reduced physical sensory or mental capabilities or lack of experience and knowledge proper supervision or instruction should be given concerning use of the appliance in a safe way to help them understand the hazards involved Children should not play with appliance Cleaning and user mainte...

Страница 5: ...lowing in the air to cause a second pollution Various Cleaning Modes Four cleaning modes are provided to meet your needs Auto Cleaning automatically and adjust its cleaning modes according to the environment Notes Press ON OFF on remote control or on robot to start auto cleaning Spot Cleaning will activate spot cleaning a When it detects a very dirty area b Pressing SPOT on remote control or on ro...

Страница 6: ...Edge Cleaning In cleaning mode press MODE button to select edge cleaning The robot will clean along the obstacles Scheduling Mode After scheduled the robot will leave charging station and start working at scheduled time ...

Страница 7: ...ssories Description Main Body Charging Station Adapter Remote Control battery not included Water Tank and Mopping Cloth each one piece HEPA Cleaning Brush Side Brushes User Manual No 1 2 3 4 5 6 7 8 9 Qty 1 1 1 1 1 1 1 4 1 1 4 7 2 3 6 5 8 9 ...

Страница 8: ... strip LED display Touch key Cover Power switch Button battery cover Bottom cover UV light Left wheel Charging socket Right wheel Right side brush Suction passage Battery cover Universal wheel Auto charge pole Left side brush Cover Dust bin Dust bin ...

Страница 9: ...remote control before use b The big round button in the middle of the 4 direction buttons is a blank button without any function c Remove the batteries if the remote control will be left unused for a long period d If you use the remote control near the charging station the robot may not recognize the command and may not work Top cover Power light Charging poles Charging socket ...

Страница 10: ...ean button a Press this button on change from sleeping mode to standby mode b In standby mode keep pressing this button for more than 3 seconds to go into sleep mode d Start cleaning in standby mode 5 Auto charging Number increment button a Press this button to increase number in scheduling mode b In other mode press this button to start auto charging and charging mode 6 Spot cleaning Number decre...

Страница 11: ... right right side of the robot for more than 3 seconds a Plug the adapter into the robot and the other end to the power socket as show in b Press on robot or HOME on remote control to operate the robot to go Note b Once charging is completed LED panel will show FULL In order to extend battery s usage life e If the robot is not used for more than 3 months charge the robot for 12 hours before use it...

Страница 12: ... will start cleaning automatically Standby Standby means the robot be with power switch on wait for users operation It can be changed to standby mode by below methods a During robot cleaning press on main body to enter standby mode robot Sleeping In sleeping mode the robot can only be waken up from button on main body or ON OFF on remote control in order to save power To turn robot into sleeping m...

Страница 13: ...he left two numbers on LED panel will to increase hour or to decrease it c Press again to enter the minute setting mode the right two numbers on LED to increase it or to decrease it d Press 2 Setting the scheduling time a In standby or charging status press for two times to start scheduling LED panel will show previous scheduled time or 00 00 if there is no schedule settled before b Press Press to...

Страница 14: ...and will turn direction randomly when meet obstacles just in Spiral Cleaning In spiral cleaning mode robot will clean in a Edge Cleaning In edge cleaning mode press MODE button Zig Zag Cleaning Robot will automatically goes into Zig Zag cleaning when it detected it s in an open area or the environment with less Note Press MODE button on remote control to select cleaning mode Note ª ...

Страница 15: ...ion Water Tank and Mopping Cloth Usage Attaching mopping cloth sticking side and mopping cloth face the appropriate side and then stick the mopping Fill water tank with water Fit water tank on the robot Note water tank ...

Страница 16: ... is 12 months Before replacing side brushes check and make L R mark on side brush match the L R mark on bottom base of the robot Cleaning Dust Bin and Filters below Note months ª a Press PUSH to open the cover c Take out the HEPA HEPA with brush µ back into the dust bin d Open dust bin over e Take out the dust bin b Take out the dust bin Press ...

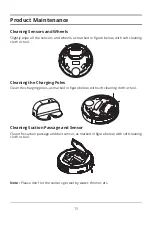
Страница 17: ...OHDQLQJ FORWK RU WRRO Cleaning the Charging Poles OHDQ WKH FKDUJLQJ SROHV DV PDUNHG LQ ȴJXUH EHORZ ZLWK VRIW FOHDQLQJ FORWK RU WRRO Cleaning Suction Passage and Sensor OHDQ WKH VXFWLRQ SDVVDJH DQG GXVW VHQVRU DV PDUNHG LQ ȴJXUH EHORZ ZLWK VRIW FOHDQLQJ FORWK RU WRRO Note 3OHDVH GRQȇW OHW WKH VHQVRUV JHW ZHW E ZDWHU WKLQQHU HWF ...

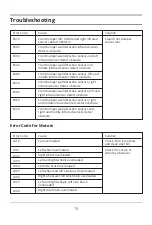
Страница 18: ...ault collision switches fault collision switch fault collision switch fault right collision switch fault Solution Clean suction passage Put back dust bin and place it in position Check sensitivity of the front bumper Put robot on solid ground Put robot on solid ground and check sensitivity of the front bumper Put robot on solid ground Put robot on solid ground and check sensitivity of the front bu...

Страница 19: ...bstacle front bumper right infrared sensors detect obstacle Front left and right anti drop sensors detect detects obstacle Front bumper left infrared sensor detects obstacle Front bumper middle infrared sensor detects obstacle Front bumper left and middle infrared sensors detect obstacle Front bumper right infrared sensor detects obstacle Front bumper left and right infrared sensors detect obstacl...

Страница 20: ...detection sensors left and right infrared sensor detect obstacle Front bumper wall detection sensors right and middle infrared sensors detect obstacle Front bumper wall detection sensors left right and middle infrared sensors detect obstacle Solution Clean front bumper sensor lens Error Code for Motors Error Code L01X L0X1 L0X2 L0X3 L0X4 L0X5 L0X6 L0X7 L0X8 Cause Fan overloaded Left wheel overload...

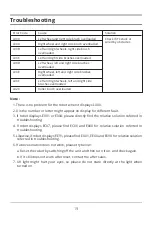
Страница 21: ...heel left and right side brushes overloaded Left and right wheels left and right side brushes overloaded Roller brush overloaded Solution Check if it s stuck or wired by obstacles Note 1 There is no problem for the robot when it displays L000 troubleshooting ª troubleshooting referred in troubleshooting 6 If above solution does not work please try below b If it still does not work after reset cont...

Страница 22: ...therwise it may cause product damage Mechanical Electrical Cleaning Main Body Button Type Item Diameter Height Weight Power Rating Dust Bin Capacity Charging Type Cleaning Mode Charging Time Cleaning Time Detail 340mm 85mm 3 4Kg 24V 600mA Ni MH 2000mAH 14 4V 0 5L Auto Charging Manual Charging Auto Spot Edge Zig zag Schedule 200 300 mins 90 mins at max Touch LED display µ º The warranty does not co...

Страница 23: ...Robot Aspirateur AMIBOT Pulse AMIBOT Pulse H2O Manuel d utilisation ...

Страница 24: ...la batterie 9 Départ Pause Veille Extinction 10 Programmation 11 Modes de nettoyage 12 Réservoir à eau et mop 13 Maintenance 14 Entretien des brosses latérales 14 Entretien des capteurs et des moteurs 15 Entretien des pôles de chargement 15 Entretien de la bouche d aspiration et du capteur de bac plein 15 Dépannage 16 Codes erreurs des capteurs 16 Codes erreurs des moteurs 18 Remplacement de la ba...

Страница 25: ...s peine d annulation de la garantie 2 Utilisez uniquement l adaptateur secteur d origine du produit pour le chargement incendie ou endommager le produit mouillées une salle de bains corps sur le sol pour éviter les accidents potentiels 11 Ne pas lier ou appuyer sur le cordon d alimentation avec des objets lourds ou tranchants 14 Éteignez l interrupteur d alimentation pendant le transport du produi...

Страница 26: ...2 Consigne de Sécurité Attention ...

Страница 27: ...autres petits débris Ajustement intelligent de la puissance d aspiration L Amibot Pulse est capable d ajuster automatiquement sa puissance d aspiration en Convivial Bac à poussières lavable déplacements disponibles pour permettre au robot de mieux s adapter aux caractéristiques de Mode automatique automatiquement son comportement de Mode SPOT une forme de spirale quand il détecte une zone très sal...

Страница 28: ...ues du robot Mode long des murs Le robot va nettoyer les longs des murs et des obstacles Mode programmation Après avoir été programmé le robot va quitter la station de charge et commencer à travailler à l heure prévue ...

Страница 29: ...essoires Description Amibot Pulse Base de chargement Adaptateur secteur Télécommande piles non incluses Filtre HEPA Brosse de nettoyage Brosses latérales Manuel d utilisation No 1 2 3 4 5 6 7 8 9 Qté 1 1 1 1 1 1 1 4 1 1 4 7 2 3 6 5 8 9 ...

Страница 30: ...ran Touche tactile Capot ON OFF Cache batterie Coque inférieure Lampe UV Roue droite Prise d alimentation Roue gauche Brosse gauche Bouche d aspiration Cache batterie Roue centrale Pôle de chargement Brosse droite Couvercle Bac à poussières Bac à poussières Filtre HEPA ...

Страница 31: ...e AUTO Note a Installer deux piles de type AA dans la télécommande avant utilisation Le gros comporte pas de fonction b Il est conseillé de retirer les piles de la télécommande si elle n est pas utilisée pendant une longue période ne détecte pas les commandes demandées Face avant Témoin d alimentation Prise d alimentation ...

Страница 32: ...8 Composants du robot Ecran de contrôle Ecran de contrôle Boutons 1 3 ...

Страница 33: ...eur sur le côté du robot puis branchez l autre partie à une prise b Pressez sur le robot ou HOME sur la télécommande pour faire Note a Quand le robot débute sa charge son écran indique 1111 de la gauche vers la droite b Quand la charge est terminée l écran de contrôle indique Full Pour accroître la durée de vie de la batterie a Avant toute première utilisation rechargez au moins 12h votre robot b ...

Страница 34: ... la télécommande pour démarrer le nettoyage Note Si le robot est en veille pressez sur ou sur le bouton ON OFF ou encore sur un cycle de nettoyage Pause Le mode Pause met le robot en attente d instruction a Durant le nettoyage appuyez sur pour mettre en pause le robot Veille veille b Le robot passe automatiquement en veille si aucune commande n est activée dans les 60 secondes ...

Страница 35: ...11 Mise en marche Programmation Programmation par les touches tactiles du capot 1 Réglage de l horloge 2 Réglage de la programmation 3 Annulation de la programmation Note ...

Страница 36: ...ne zone très sale b Appuyez sur SPOT sur la télécommande ou sur le robot Mode long des murs En cours de nettoyage appuyez sur MODE pour sélectionner le mode pour le nettoyage le long des murs Mode Zig Zag Le robot va réaliser des Zig Zag quand il détecte une pièce espacée avec peu d obstacles Note Pour sélectionner un mode de nettoyage appuyez sur MODE a Le mode No 1111 indique que le mode SPOT es...

Страница 37: ...13 Mise en marche Utilisation du réservoir d eau et de la mop Fixation de la mop Remplir le réservoir d eau Mise en place du réservoir d eau Note MOP Bouchon ...

Страница 38: ...ent les brosses latérales du robot remplacez les si celles ci sont endommagées La durée de vide des brosses est d environ 12 mois Lors du remplacement veillez à bien mettre la brosse R sur le moteur R et la L sur le moteur L Note mois ª ª bac à poussières e Videz le bac ...

Страница 39: ...me indiqué ci dessous à l aide d un Nettoyage des pôles de chargement Nettoyez régulièrement les pôles de chargement de la base et du robot comme indiqué Nettoyage bouche d aspiration et capteur de bac plein Nettoyez régulièrement la bouche d aspiration et le capteur du bac comme indiqué Note ...

Страница 40: ...sol La roue droite n est pas au sol problème sur le capteur gauche La roue droite n est pas au sol problème sur le capteur droit Problème sur la roue et le capteur droit Les roues droite et gauche ne sont pas au sol Les roues droite et gauche ne sont pas au sol problème capteur gauche Les roues droite et gauche ne sont pas au sol problème capteur droit Les roues droite et gauche ne sont pas au sol...

Страница 41: ...pteur infra rouge avant droit du pare choc détecte un obstacle Les capteurs de vide droit et gauche détectent du vide Le capteur infra rouge avant droit du pare choc détecte un obstacle Les capteurs de vide droit et central détectent du vide Le capteur infra rouge avant droit du pare choc détecte un obstacle Les capteurs de vide droit central et gauche détectent du vide Le capteur infra rouge avan...

Страница 42: ... Les capteurs de mur avant du pare choc et infra rouge droit et gauche détectent un obstacle Les capteurs de mur avant du pare choc et infra rouge droit et central détectent un obstacle Les capteurs de mur avant du pare choc et infra rouge droit central et gauche détectent un obstacle Solution Merci de procéder au nettoyage de tous les capteurs de vide et d obstacle à l aide d un coton tige ou d u...

Страница 43: ...struées Roues droite et gauche et brosses droite obstruées Brosses latérales droite et gauche obstruées Roue gauche et brosses gauche et droite obstruées Roue droite et brosses gauche et droite obstruées Roues droite et gauche et brosses gauche et droite obstruées Solution Merci de nettoyer les moteurs de brosses latérales en déclipsant celles ci Merci de nettoyer les blocs roues Note résoudre le ...

Страница 44: ...Diamètre Hauteur Poids Type de Batterie Puissance Batterie Bac à poussière Type de chargement Mode de nettoyage Temps de chargement Temps de nettoyage Détails 340mm 85mm 3 4Kg 24V 600mA Ni MH 2000mAH 14 4V 0 5L Chargement AUTO ou manuel Par touche tactile ou télécommande Environ 200 300 mins 90 minutes maximum Touches tactiles ª ª ª Tout robot démonté ou mal entretenu ne pourra pas être pris sous ...

Страница 45: ...Staubsaugerroboter AMIBOT Pulse AMIBOT Pulse H2O Benutzerhandbuch ...

Страница 46: ... Inbetriebnahme 9 Betrieb Pause Standby Stopp 10 Programmierung 11 Reinigungsmodi 12 Verwendung des Wasserbehälters und des Reinigungstuchs 13 Reinigung 14 Hauptbürsten reinigen 14 Staubbehälter und Filter reinigen 14 Sensoren und Räder reinigen 15 Ladekontakte reinigen 15 ª Fehlerbehandlung 16 Fehlercodes der Sensoren 16 Fehlercodes der Motoren 18 Akku entnehmen 20 Eigenschaften des Roboters 20 ...

Страница 47: ...m Beispiel im Badezimmer verwenden 5 Darauf achten dass sich der Roboter nicht im Kabel in einem Vorhang oder in einem Teil des Körpers verfängt µ Kleidung Papiere und Kabel entfernen und sicherstellen dass keine Vorhänge und 7 Sicherstellen dass sich keine Zigarettenstummel Feuerzeuge Streichhölzer oder µ Flüssigkeiten wie ätherische Öle verwenden 9 Den Roboter nur im Innenbereich und nicht im Fr...

Страница 48: ...r dem Recycling des Roboters den Akku entfernen 21 Bei Defekt muss der Akku recycelt werden 22 Vor der Reinigung oder der Wartung des Geräts oder vor dem Entfernen des Akkus den Stecker aus der Steckdose ziehen Achtung Dieser Roboter ist kein Spielzeug Zu ihrer Sicherheit Kinder nicht mit dem Gerät oder dem Zubehör spielen lassen Die Verwendung des Geräts durch Kinder ältere Personen oder durch Pe...

Страница 49: ...h Akkuleistung bis zu 30 Benutzerfreundlich Vereinfachte Verwendung Auf drücken und der Roboter beginnt mit der Reinigung Auswaschbarer Staubbehälter mit Wasser gereinigt werden vor der Verwendung gut trocknen Verschiedene Bewegungsmodi Es sind vier Reinigungsmodi verfügbar mit denen sich der Roboter genau an die Eigenschaften Ihrer Räume anpassen kann Automatikmodus Der Roboter reinigt Ihre Räume...

Страница 50: ... des Roboters Wand Modus Der Roboter reinigt entlang von Wänden und Hindernissen Programmiermodus Nach dem Programmieren verlässt der Roboter seine Ladestation und beginnt um die vorgesehene Uhrzeit mit der Reinigung ...

Страница 51: ... Beschreibung Amibot Pulse Ladestation Netzstecker Fernbedienung Batterien nicht enthalten Wasserbehälter und Mikrofaser Tuch HEPA Filter Reinigungsbürste Seitenbürsten Benutzerhandbuch Nr 1 2 3 4 5 6 7 8 9 Menge 1 1 1 1 1 1 1 4 1 1 4 7 2 3 6 5 8 9 ...

Страница 52: ...ste Display Touchscreen Feld Deckel ON OFF Akkuabdeckung Untere Gehäuseseite UV Lampe Rechtes Rad Steckdose für Stromversorgung Linkes Rad Linke Bürste Akkuabdeckung Hauptrad Ladekontakt Rechte Bürste Abdeckklappe Staubbehälter Staubbehälter HEPA Filter Filterhalterung ...

Страница 53: ... einsetzen Die große schwarze Taste der Fernbedienung in der Mitte der Pfeiltasten hat keine Funktion b Wenn die Fernbedienung über einen längeren Zeitraum nicht verwendet wird die Batterien entnehmen c Bei der Verwendung der Fernbedienung in der Nähe der Ladestation kann es sein dass der Roboter die erforderlichen Befehle nicht erkennt Vorderseite Versorgungsanzeige Ladekontakte Steckdose für Str...

Страница 54: ...ür automatische Reinigung a Diese Taste drücken um den Roboter in den Standby Modus oder in den Pause Modus zu versetzen b Im Pause Modus diese Taste länger als 3 Sekunden drücken um den Roboter in den Standby Modus zu versetzen c Danach die Programmierung im Programmiermodus bestätigen d Die Reinigung mit dem Roboter im Pause Modus starten 5 Rückkehr zur Ladestation Stunden der Programmierung erh...

Страница 55: ...Taste auf ON a Den Stecker an der Seite des Roboters einstecken und dann den anderen Teil an das Stromnetz anschließen siehe Abb a b Auf dem Roboter auf oder auf der Fernbedienung auf HOME drücken Hinweis a Wird der Roboter aufgeladen zeigt das Display 1111 von links nach rechts an b Ist der Akku aufgeladen zeigt das Display Full an c Der Roboter kehrt zu seiner Ladestation zurück sobald der Akku ...

Страница 56: ...Taste der Fernbedienung drücken um den Roboter aufzuwecken Erneut auf drücken um den Reinigungszyklus zu starten Pause ª a Während der Reinigung auf drücken um den Roboter auf Pause zu setzen b Während der Reinigung die ON OFF Taste der Fernbedienung drücken um den Roboter auszustellen Standby a auf dem Roboter 3 Sekunden lang drücken um den Roboter aus dem b Der Roboter versetzt sich automatisch ...

Страница 57: ...n um die Stunden zu erhöhen oder auf um diese zu verringern um diese zu verringern 2 Programmierung ª wird 00 00 angezeigt was bedeutet dass keine aktuelle Programmierung vorhanden ist blinken Auf drücken um die Stunden zu erhöhen oder auf um diese zu verringern um diese zu verringern 3 Programmierung löschen Programmierzeit auf 00h00 stellen Hinweis a Vor dem Programmieren des Roboters sicherstel...

Страница 58: ...besonders schmutziger Bereich erkannt wird b Auf SPOT auf der Fernbedienung oder auf auf dem Roboter drücken Wand Modus Während der Reinigung auf MODE drücken um den Modus für die Wand Reinigung auszuwählen Zickzack Modus Der Roboter reinigt große Räume mit wenigen Hindernissen im Zickzack Hinweis Zum Auswählen eines Reinigungsmodus auf MODE drücken a Modus Nr 1111 zeigt an dass der SPOT Modus akt...

Страница 59: ...Behälters abnehmen diesen entweder nur mit Wasser oder mit Reiniger füllen Sicherstellen dass der Deckel wieder richtig verschlossen ist damit kein Wasser austritt Einsetzen des Wasserbehälters Den Roboter umdrehen und den Wasserbehälter an dessen Unterseite festklipsen Hinweis a Wird der Wasserbehälter bei der Reinigung verwendet bitte die unten stehenden Hinweise beachten d Bei der Verwendung de...

Страница 60: ...uf dem Staubbehälter und Filter reinigen Den Behälter und die Filter regelmäßig wie folgt entleeren und reinigen Hinweis a Den HEPA Filter ca alle zwei Wochen reinigen Die Lebensdauer beträgt ca 24 Monate c Die Filter ersetzen wenn sie abgenutzt sind ª c HEPA Filter entnehmen f Behälter mit Wasser ausspülen und den HEPA Filter mit einem Pinsel abbürsten g Zuerst die Filter und dann den Staubbehält...

Страница 61: ...olgend gezeigt regelmäßig mit einem weichen Tuch reinigen Ladekontakte reinigen Die Ladekontakte der Ladestation und des Roboters wie nachfolgend gezeigt regelmäßig mit einem weichen Tuch reinigen mit einem weichen Tuch reinigen Hinweis Die Sensoren dürfen nicht nass werden ...

Страница 62: ...16 Fehlerbehandlung Fehlercodes der Sensoren Fehlercode AUBF AUBN E1XX E2XX E3XX E4XX E5XX E6XX E7XX E8XX E9XX EAXX EBXX ECXX EDXX EEXX EFXX EXX1 EXX2 EXX3 EXX4 EXX5 Ursache ...

Страница 63: ...nd erkannt Infrarot Sensor vorn rechts am Stoßdämpfer hat ein Hindernis erkannt Linker und rechter Abgrundsensor haben einen Abgrund erkannt Infrarot Sensor vorn rechts am Stoßdämpfer hat ein Hindernis erkannt Rechter und mittlerer Abgrundsensor haben einen Abgrund erkannt Infrarot Sensor vorn rechts am Stoßdämpfer hat ein Hindernis erkannt Linker rechter und mittlerer Abgrundsensor haben einen Ab...

Страница 64: ... Sensor des Stoßdämpfers und linker und rechter Infrarot Sensor haben ein Hindernis erkannt Vorderer Wand Sensor des Stoßdämpfers und rechter und mittlerer Infrarot Sensor haben ein Hindernis erkannt Vorderer Wand Sensor des Stoßdämpfers und mittlerer rechter und linker Infrarot Sensor haben ein Hindernis erkannt Lösung Alle Abgrundsensoren mit einem weichen Tuch reinigen und Hindernisse entfernen...

Страница 65: ...s blockiert wird Hinweis 1 Wenn der Roboter L000 anzeigt liegt kein Problem vor 2 X steht für eine Zahl oder einen Buchstaben auf dem Display der einen Fehler anzeigt 3 Wenn der Roboter E001 oder E004 anzeigt bitte die verschiedenen Lösungen bei den Fehlercodes zu Rate ziehen 4 Wenn der Roboter EC07 anzeigt zum Lösen des Problems bitte die Fehlercodes ECXX und EXXX zu Rate ziehen 5 Wenn der Robote...

Страница 66: ...der Tasten Eigenschaften Durchmesser Höhe Gewicht Art des Akkus Akkuleistung Staubbehälter Reinigungsmodi Reinigungszeit Angaben 340mm 85mm 3 4Kg 24V 600mA Ni MH 2000mAH 14 4V 0 5L ª Per Touchscreen Feld oder Fernbedienung Ca 200 300 min maximal 90 Minuten Touchscreen Felder µ º Auseinandergebaute Roboter oder Roboter im schlechten Zustand fallen nicht unter die Garantie Sämtliche Defekte durch Ox...

Страница 67: ...Aspirador Robot AMIBOT Pulse AMIBOT Pulse H2O Manual de Usuario ...

Страница 68: ... Arranque Espera Dormido 10 Programación 11 Modos de limpieza 12 Uso del Water Tank y de la Mopa 13 Mantenimiento del Producto 14 Limpieza de los Cepillos Laterales 14 Limpieza del Depósito de Polvo y los Filtros 14 Limpieza de los Sensores y las Ruedas 15 Limpieza de los Polos de Carga 15 Limpieza del Bus de Aspiración y el Sensor de Polvo 15 Averías 16 Códigos de Error de los Sensores 16 Códigos...

Страница 69: ...ra evitar posibles accidentes 7 Asegúrese que el producto no se acerque a colillas mecheros ceniceros o cualquier 8 Nunca utilice el producto para limpiar combustible o líquidos altamente volátiles como la gasolina 9 Utilice el producto en interior no lo utilice en exterior 10 Si el producto necesita limpiarse límpielo después de una carga completa 12 No se siente sobre el producto o coloque ningú...

Страница 70: ...ría Precaución Cuando el aparato vaya a ser usado por niños el niño debe tener al menos 8 años Las personas con alguna reducción física sensorial o mental de sus capacidades o falta de experiencia y conocimiento deben ser supervisadas e instruidas en el uso seguro del aparato para que entiendan los riesgos que entraña Los niños no deben jugar con el aparato La limpieza y mantenimiento no debe ser ...

Страница 71: ...Gran poder de Aspiración y Ajuste de Aspiración Inteligente Gran poder de Aspiración Ajuste de Aspiración Inteligente Diseño cómodo Depósito de polvo lavable Varios Modos de Limpieza Modo de limpieza automática Modo de limpieza Spot ...

Страница 72: ...de limpieza de muros Con este modo el robot limpiará siguiendo el largo de los muros y rodeando los obstáculos Mode programación Después de ser programado el robot saldrá de la base de carga y comenzará a trabajar en el momento programado ...

Страница 73: ...Accesorios Descripción Cuerpo Principal Base de Carga Adaptador Mando a distancia pila no incluída Water Tank y Mopa Filtro HEPA Cepillo de limpieza Cepillos laterales Manual de Usuario No 1 2 3 4 5 6 7 8 9 Cant 1 1 1 1 1 1 1 4 1 1 4 7 2 3 6 5 8 9 ...

Страница 74: ...ED Botón Tapa Botón de encendido Tapa pila de botón Tapa inferior Lámpara UV Rueda izquierda Conector de adaptador Rueda derecha Cepillo derecho Bus de aspiración Tapa de batería Rueda direccional Polo de carga Cepillo izquierdo Tapa Depósito de polvo Filtro primario Depósito de polvo Filtro HEPA ...

Страница 75: ...eza Nota a Instale dos pilas AAA en el mando a distancia antes de usarlo El gran botón redondo b Quite las baterías si el mando a distancia no va a ser utilizado durante un largo periodo de tiempo c Si usa el mando a distancia cerca de la base de carga el robot puede no reconocer Cubierta Luz indicadora Polos de carga Toma de adaptador ...

Страница 76: ...4 Botón Clean a Presione este botón para pasar de modo en dormido a modo en espera b En modo en espera presione este botón y manténgalo presionado más de 3 segundos para pasar al modo dormido d Comienza a limpiar en el modo en espera 5 Botón Retorno a la base incremento de números a Presione este botón para aumentar los números en el modo programación b En otro modo presione este botón para inicia...

Страница 77: ...ndo el panel LED mostrará gradualmente 1111 de izquierda a derecha b Cuando la carga se haya completado el panel LED mostrará FULL c En modo de trabajo el robot volverá automáticamente a la base de carga cuando la batería esté baja Para prolongar la vida de la batería a Antes del primer uso cargue el robot durante 12 horas b Cargue el robot en cuanto la batería esté baja c El robot retornará a la ...

Страница 78: ...evo y el robot comenzará la limpieza automáticamente En espera alguna operación Puede pasar al modo en espera de estas maneras en el cuerpo principal para pasar al modo en espera para apagar el robot Dormido En el modo dormido el robot solamente puede despertarse mediante el botón del cuerpo principal u ON OFF en el mando a distancia Para ahorrar energía puede pasar del modo en espera al modo dorm...

Страница 79: ...ertar al robot Si el robot está en modo Limpieza párelo antes de programarlo Programar a través del panel LED del robot a En modo en espera o de carga presione reloj El panel LED mostrará el tiempo actual del sistema b Presione del panel LED parpadearán Presione o para aumentar o parpadearán Presione o Presione a En modo en espera o carga presione dos veces para iniciar la programación el panel LE...

Страница 80: ... muros En el modo de limpieza presione el botón MODE y seleccione el modo 3 para la limpieza de muros El robot limpiará a lo largo de los muros rodeando los obstáculos Modo Zig Zag El robot automáticamente pasará al modo de limpieza en Zig Zag cuando detecte un espacio abierto en su entorno libre de obstáculos Nota Presione el botón MODE demando a distancia para seleccionar los modos a El modo No ...

Страница 81: ...ión de la mopa Asegúrese de que el lado de enganche de la mopa coincide bien con los bordes y Relleno del Water Tank con agua Saque el tapón del water tank y rellénelo con agua y luego vuelva a colocar el tapón Colocar el Water Tank en el robot Nota water tank tapón ...

Страница 82: ...un cepillo lateral es de 12 meses Antes de remplazar los cepillos laterales compruebe que la marca L R en el lado del cepillo coincide con la marca L R de la base inferior del robot Limpieza del Depósito de polvo y los Filtros Vacíe y limpie el depósito de polvo después de cada uso siguiendo estos pasos Nota ª nuevo al depósito d Abra la tapa del primario e Vacíe el depósito ...

Страница 83: ...FRQ XQ SD R VXDYH SDUD QR GD DU ODV VXSHUȴFLHV Limpieza de los Polos de Carga LPSLH ORV SRORV GH FDUJD FRPR VH LQGLFD HQ OD ȴJXUD VLJXLHQWH FRQ XQ SD R VXDYH Limpieza del Bus de Aspiración y del Sensor de Polvo LPSLH HO EXV GH DVSLUDFLµQ HO VHQVRU GH SROYR FRPR VH LQGLFD HQ OD ȴJXUD VLJXLHQWH FRQ XQ SD R VXDYH Nota YLWH TXH ORV VHQVRUHV VH PRMHQ ...

Страница 84: ...el suelo problema en el sensor izquierdo La rueda derecha no toca el suelo problema en el sensor derecho Problema en la rueda y sensor derecho Las ruedas dcha e izquierda no tocan el suelo Las ruedas derecha e izquierda no tocan el suelo problema sensor izquierdo Las ruedas derecha e izquierda no tocan el suelo problema sensor derecho Las ruedas derecha e izquierda no tocan el suelo problema senso...

Страница 85: ...hoques detecta obstáculo Sensores izquierdo y derecha de caída detectan caída sensor derecho del parachoques detecta obstáculo Sensores de caída derecho y frontal detecta caída sensor derecho del parachoques detecta obstáculo Sensores frontal izquierdo y derecho de caída detectan caída sensor derecho del parachoques detecta obstáculo Sensor izquierdo del parachoques detecta obstáculo Sensor medio ...

Страница 86: ...y sensor derecho detectan obstáculo Sensor frontal de detección de pared sensores izquierdo y derecho detectan obstáculo Sensor frontal de detección de pared sensores derecho y medio detectan obstáculo Sensor frontal de detección de pared sensores izquierdo derecho y medio detectan obstáculo Solución Limpie el sensor frontal del parachoques Códigos de Error de los Motores Código Error L01X L0X1 L0...

Страница 87: ...ruebe si algún cable o pelo bloquea las piezas Nota 1 No hay ningún problema si el robot muestra L000 2 X es el número o letra que aparecen en el panel para los diferentes fallos 3 Si el robot muestra E001 o E004 por favor mire directamente la referencia en la sección averías 4 Si el robot indica EC07 por favor mire ECXX y EXXX para la solución relativa en la sección averías 5 También si el robot ...

Страница 88: ...icas Diámetro Altura Peso Tipo de Batería Batería Tipo de carga Modo de limpieza Tiempo de carga Tiempo de limpieza Detalles 340mm 85mm 3 4Kg 24V 600mA Ni MH 2000mAH 14 4V 0 5L Auto Carga Carga Manual ª a distancia Entorno a 200 300 mins 90 minutos como máximo Táctil Panel LED ªµ Todo robot desmontado o mal mantenido no podrá hacer uso de la garantía Quedan excluidas de la garantía todas las averí...

Страница 89: ...Robot aspirapolvere AMIBOT Pulse AMIBOT Pulse H2O Manuale d uso ...

Страница 90: ...mazione 11 Modalità di pulizia 12 Utilizzo del serbatoio dell acqua e del panno pulente 13 Manutenzione 14 Pulizia delle spazzole principali 14 Pulizia dei sensori e delle ruote 15 Pulizia dei poli di caricamento 15 Pulizia della bocchetta di aspirazione e del sensore di rilevamento del cassetto della polvere pieno 15 Riparazione 16 Codice errore per i sensori 16 Codice errore per i motori 18 Rimo...

Страница 91: ... cavi tende o parti del corpo non rimangano incastrati nel robot 6 Prima di utilizzare il robot sul pavimento rimuovere eventuali oggetti cordoni fragili indumenti fogli di carta e cavi sfusi e assicurarsi di sollevare tende e articoli di tappezzeria per evitare il rischio di incidenti volatili ad es benzina 9 Utilizzare il robot esclusivamente in ambienti interni 10 Se necessario pulire il robot ...

Страница 92: ...2 Norme di sicurezza Attenzione ...

Страница 93: ...re automaticamente la potenza di aspirazione in base 30 in più Facilità d uso Il prodotto è facile da utilizzare premere su per avviare il funzionamento del robot Cassetto della polvere lavabile completamente prima dell uso Varie modalità di spostamento per consentire al robot di adattarsi al abitazione Modalità automatica Pulizia automatica degli ambienti durante la quale il robot adatta gli spos...

Страница 94: ...istiche del robot Modalità Pareti Pulizia delle pareti e degli ostacoli Modalità Programmazione In seguito alla programmazione il robot abbandona la stazione di caricamento e avvia la pulizia all orario previsto ...

Страница 95: ...ot e accessori Descrizione Amibot Pulse Base di caricamento Adattatore di rete Telecomando pile non incluse Filtro HEPA Spazzola pulente Spazzole laterali Manuale d uso N 1 2 3 4 5 6 7 8 9 Qtà 1 1 1 1 1 1 1 4 1 1 4 7 2 3 6 5 8 9 ...

Страница 96: ...ccensione spegnimento Coperchio di protezione batteria Scocca inferiore Lampada UV Ruota destra Presa di alimentazione Ruota sinistra Spazzola sinistra Bocchetta di aspirazione Coperchio di protezione batteria Ruota centrale Polo di caricamento Spazzola destra Coperchio Cassetto della polvere Cassetto della polvere Filtro HEPA ...

Страница 97: ...AA nel telecomando Il pulsante nero grande sul telecomando al centro delle frecce direzionali non corrisponde ad b In caso di inutilizzo prolungato si consiglia di rimuovere le pile dal telecomando c In caso di utilizzo del telecomando nelle vicinanze della base di caricamento il robot potrebbe non rispondere ai comandi Facciata anteriore Spia di alimentazione Poli di caricamento Presa di alimenta...

Страница 98: ...a lampada UV robot per accendere o spegnere questo componente a Premere questo pulsante per far passare il robot dalla modalità stand by alla modalità pausa b In modalità pausa tenere premuto per più di 3 secondi questo pulsante per reimpostare il robot in modalità stand by 5 Ritorno alla base di caricamento Aumento del valore dell ora di b Premerlo anche per consentire al robot di ritornare alla ...

Страница 99: ...ale del robot quindi collegare l altra parte a b Premere sul robot oppure HOME sul telecomando per far ritornare N B a all inizio del caricamento del robot sullo schermo compare il simbolo 1111 da sinistra a destra b Al termine del processo sullo schermo di controllo compare il simbolo Full Prolungamento della durata della batteria a in caso di primo utilizzo ricaricare il robot per almeno 12 ore ...

Страница 100: ...ivare il robot Premere di nuovo per avviare un ciclo di pulizia Pausa In modalità Pausa il robot è in attesa di istruzioni a Durante il ciclo di pulizia premere per mettere il robot in pausa b Durante il ciclo di pulizia premere il pulsante ON OFF del telecomando per spegnere il robot Stand by a Premere sul robot e attendere 3 secondi per consentire all apparecchio di uscire dalla modalità stand b...

Страница 101: ...ere nuovamente per regolare i minuti A questo punto le due cifre di destra iniziano a lampeggiare Premere per aumentare i minuti o per diminuirli d Premere per confermare la registrazione 2 Regolazione della programmazione a Premere due volte per avviare la programmazione Sullo schermo compare 00 00 per indicare che non sono in corso programmazioni b Premere per regolare l ora A questo punto le du...

Страница 102: ...ente sporca b Premere SPOT sul telecomando o sul robot Modalità Pareti Durante un ciclo di pulizia premere MODE per selezionare la modalità per la pulizia delle pareti Modalità Zig Zag Il robot compie un movimento a zig zag in caso di rilevamento di un ambiente spazioso con un livello di ingombro limitato N B per selezionare una modalità di pulizia premere MODE a Il n 1111 indica l attivazione del...

Страница 103: ...13 Avvio Utilizzo del serbatoio dell acqua e del panno pulente Fissaggio del panno pulente Riempire il serbatoio di acqua Posizionamento del serbatoio dell acqua N B Tappo ...

Страница 104: ... regolarmente le spazzole laterali del robot e sostituirle in caso di danneggiamento La durata delle spazzole è di circa 12 mesi Durante la sostituzione N B f Sciacquare il serbatoio dell acqua e pennello cassetto della polvere e Svuotare il cassetto Premere ...

Страница 105: ...to Pulire regolarmente i poli di caricamento della base e del robot come indicato di seguito utilizzando un panno morbido Pulizia della bocchetta di aspirazione e del sensore di rilevamento del cassetto della polvere pieno Pulire regolarmente la bocchetta di aspirazione e il sensore del cassetto come indicato di seguito utilizzando un panno morbido N B non bagnare i sensori ...

Страница 106: ... a livello della ruota e del sensore destro Le ruote destra e sinistra non toccano il pavimento Le ruote destra e sinistra non toccano il pavimento problema a livello del sensore sinistro Le ruote destra e sinistra non toccano il pavimento problema a livello del sensore destro Le ruote destra e sinistra non toccano il pavimento problema a livello dei sensori destro e sinistro Il sensore di rilevam...

Страница 107: ...spazio vuoto Il sensore a infrarossi anteriore destro del paraurti rileva un ostacolo I sensori di rilevamento degli spazi vuoti destro e sinistro rilevano uno spazio vuoto Il sensore a infrarossi anteriore destro del paraurti rileva un ostacolo I sensori di rilevamento degli spazi vuoti destro e centrale rilevano uno spazio vuoto Il sensore a infrarossi anteriore destro del paraurti rileva un ost...

Страница 108: ...e pareti del paraurti e il sensore a infrarossi destro e sinistro rilevano un ostacolo I sensori di rilevamento delle pareti del paraurti e il sensore a infrarossi destro e centrale rilevano un ostacolo I sensori di rilevamento delle pareti del paraurti e il sensore a infrarossi destro centrale e sinistro rilevano un ostacolo Soluzione Pulire tutti i sensori di rilevamento degli spazi vuoti e degl...

Страница 109: ...ra e destra ostruite Soluzione Pulire i motori delle spazzole laterali sganciandole Pulire gli alloggiamenti delle ruote siano bloccate N B 3 Se sul robot compare il codice E001 o E004 fare riferimento alle varie soluzioni proposte nel paragrafo dei codici di errore 4 Se sul robot compare il codice EC07 fare riferimento ai codici ECXX e EXXX per risolvere il problema riscontrato 5 Se sul robot com...

Страница 110: ...ti Caratteristiche Diametro Peso Tipo di batteria Cassetto della polvere Tipo di caricamento Durata caricamento Dettagli 340mm 85mm ª ª Caricamento AUTO o manuale Pulsante touch o telecomando Circa 200 300 min Massimo 90 minuti Pulsanti touch µ Lo smontaggio o una manutenzione non corretta del robot causa la decadenza della garanzia La garanzia non copre guasti causati da ossidazione urti o utiliz...

Страница 111: ......

Страница 112: ......

Отзывы: