background image

- 24 -

R. Tighten all the oil hose connectors, fill with Hydraulic oil into the tank.
In consideration of Hydraulic Power Unit’s durability and keep the equipment
running in perfect condition, please use Hydraulic Oil 46#.

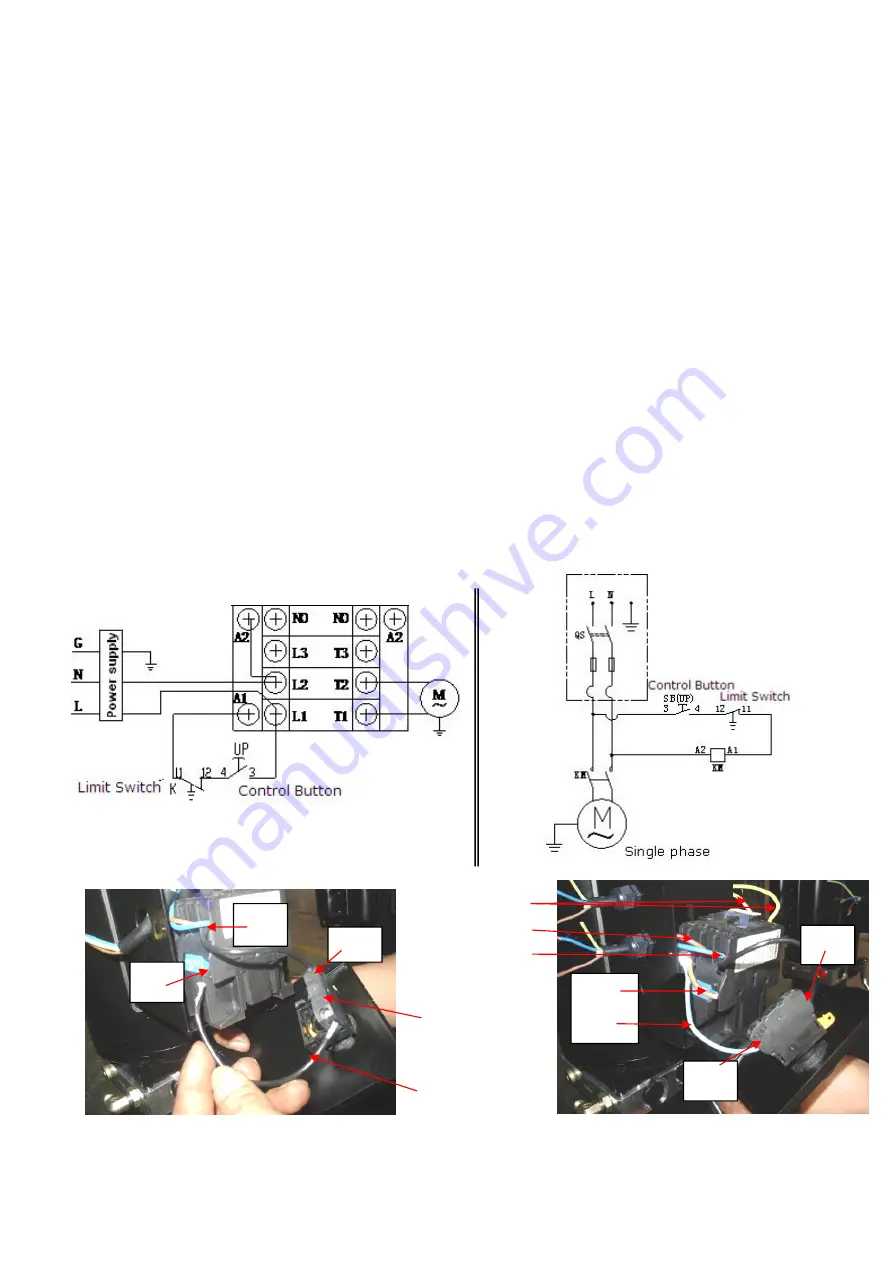
S. Install electrical system

220V Single phase motor

1. Connecting the two power supply lines (fire wire

L

and zero wire

N

) to terminals of AC

contactor marked

L1, L2

respectively.

2. Connecting the two power wire of Power unit to terminals of AC contactor marked T1, T2
respectively.
3. Connecting A2 terminal of AC contactor to L2 terminal with a single power supply line.
4. Connecting Limit switch: Remove the line of connecting terminal 4# of control button
and A1 of AC contactor (see Fig.41). Connecting wire 12# (brow wire) of limit switch with
terminal 4# of control button; Connect wire 11# (blue wire) with terminal A1# of AC
contactor. Connecting the yellow and green wire to the terminal earth wire of limit switch
and terminal earth wire of power unit. (see Fig.42)
5. Terminal #3 of the control button is connected with the terminal L1 of the AC contactor.

6.

7.

8.

9.

10.

L1

Motor wire

3#

4#

3#

4#

A1

Remove this wire

before connecting

the Limit Switch

Fig. 42

Fig. 41

N

L

11#

12#

Fig. 40

Содержание OH-15

Страница 1: ...TWO POST LIFT MODEL OH 15 Original ...

Страница 2: ...ONTENTS Product Features and Specifications 1 Installation Requirement 3 Steps of Installation 5 Exploded View 25 Test Run 33 Operation Instruction 357 Maintenance 36 Trouble Shooting 37 Lift Disposal 37 ...

Страница 3: ...liders and bronze bush Single point safety release with dual safety design Clear floor design provide unobstructed floor use Overhead safety shut off device prevents vehicle damage Standard adjustable heights accommodate varying ceiling heights MODEL OH 15 SPECIFICATION Model Style Lifting Capacity Lifting Time Lifting Height Overall Height Overall Width Minimum Pad Height Motor OH 15 Clear floor ...

Страница 4: ... 2 Arm Swings View Fig 2 3829mm 2787mm 109 3 4 150 3 4 ...

Страница 5: ...LS REQUIRED Rotary Hammer Drill Φ19 Carpenter s Chalk Hammer Screw Sets Level Bar Tape Measure 7 5m English Spanner 12 Pliers Wrench set 10 13 14 15 17 Lock Wrench 19 24 27 30 Ratchet Spanner With Socket 28 Fig 3 Socket Head Wrench 3 5 8 ...

Страница 6: ...ure to do so may result in lift and or vehicle falling 1 Concrete must be thickness 7 7 8 200mm minimum and without reinforcing steel bars and must be totally dry before lift installation 2 Concrete must be in good condition and must be of test strength 3 500psi 245kg cm minimum 3 Floors must be level with no cracks or holes E POWER SUPPLY The electrical source must be 3KW minimum The source cable...

Страница 7: ...ish installation layout of baseplate See Fig 6 C Check the parts before assembly 1 Packaged lift hydraulic power unit and parts box Remark Outer column is not packed into the machine See Fig 7 2 Move the lift aside with a fork lift or hoist and open the outer packing carefully See Fig 8 Shipment Parts list Fig 7 Fig 8 Top beam assy Aluminum Name Plate Fig 6 Parts box Chalk a line outer column 150 ...

Страница 8: ...of the upper package stand take off the upper outer column then take out the parts in the inner column See Fig 10 5 Lift the lower column with a fork lift or hoist take down the package stand than take off the lower outer column take out the parts in the inner column See Fig 11 Fig 9 Fig 10 Fig 11 Open the package ...

Страница 9: ...cording to the shipment parts list See Fig 12 Fig 13 7 Check the parts of the parts bag 1 according to parts bag list See Fig 14 8 Check the parts of the parts bag 2 according to parts bag list See Fig 15 103 Fig 15 Fig 14 Fig 12 Fig 13 Parts of 103 ...

Страница 10: ...g 16 E Install hydraulic cylinder Wind enough seal tape on the extended straight fitting and 90 fitting and connecting the fittings a then install the cylinder into the carriages See Fig 17 Fig 18 Fig 16 20 37 25 24 26 41 42 1 61 32 91 92 59 Fig 17 ...

Страница 11: ...d outer columns If the ceiling height is over 198 1 4 5035mm it can be installed in a high setting if the ceiling height between174 3 8 4430mm 198 1 4 5035mm it can be installed in the low setting it is not allowed to install if the ceiling height less than 174 3 8 4430mm 1 High Setting connecting the outer columns with the lower hole See Fig 19 2 Low Setting connecting the extension columns with ...

Страница 12: ... level bar and adjusting with the shim if the columns are not vertical Do not tighten the anchor bolts at this time See Fig 21 Fig 22 Fig 22 Adjusting with the shim Drilling Cleaning Bolting 5 7 8 Note Minimum embedment of anchors is 5 7 8 150mm 57 Fig 21 56 Width between columns 123 1 2 Overall width 150 3 4 ...

Страница 13: ... top beam put one side of top beam on top of the extension column and connecting the top beam to extension column by bolts tighten the bolts Then assemble the connecting bracket See Fig 23 Fig 23 Hook on to the extension columns Tighten the bolts 23 22 21 27 1 ...

Страница 14: ... 12 2 Assemble overhead top beam tighten the columns anchor bolts See Fig 24 Tighten the anchor bolts with ratchet spanner with socket Fig 24 Note Torque of Anchors is 150N m 27 28 23 22 21 a 1 52 ...

Страница 15: ...nt Limit Switch is connected with cable Connect the yellow and green wire to the terminal earth wire of limit switch and terminal earth wire of power unit Connect the brown wire to terminal 12 of limit switch and terminal L1 of control button Connect the blue wire to terminal 11 of limit switch and terminal A1 of AC contactor of power unit 65 97 96 23 99 21 22 61 59 98 52 ...

Страница 16: ...stall safety device See Fig 26 Fig 27 Fig 26 Power side safety device Fig 27 Off side safety device 12 13 14 15 16 17 1 8 7 10 11 100 24 18 19 9 22 6 12 13 14 44 45 17 52 19 18 40 50 24 51 24 100 46 47 43 38 39 ...

Страница 17: ... 15 K Lift the carriages up by hand and make them be locked at the same level See Fig 28 Fig 28 ...

Страница 18: ...ion 1 1 Take out the carriages plastic cover cable pass through from the bottom of the carriages and be pulled out from the open of carriages then screw the two cable nuts See Fig 29 Fig 29 Cable connecting direction Cable connecting direction Tighten ...

Страница 19: ... 17 1 2 Connecting cable for high setting See Fig 30 Fig 30 High setting Cable 1 Cable 2 Cable 1 ...

Страница 20: ... 18 2 Low setting cable connection See Fig 31 107 Cable 1 Cable 2 Fig 31 Low Setting Cable 2 108 ...

Страница 21: ... 19 M Install power unit See Fig 32 Fig 32 ...

Страница 22: ... Fig 33 Oil hose connected with 90 fitting When connect the fitting rotate the cylinder fitting to the left to fit into the wire protective cover Oil hose pass through the wire tube on top beam 105 49 105 48 106 104 Oil hose and wire pass the support bracket 104 105 94 94 93 107 106 105 ...

Страница 23: ... side safety assy to power side safety assy pass through the top beam Safety cable pass through small pulley bracket Install safety cable from off side safety device Safety cable is connected with the power side safety device Safety cable Fig 34 110 102 101 103 103 101 ...

Страница 24: ...all wire protective cover See Fig 35 1 Tighten M6 40 Cup Head Bolt slightly 2 Install wire protective cover then tighten the cup head bolt Install wire protective cover to fix the oil hose Fig 35 M6 35 bolt 24 30 112 91A ...

Страница 25: ... loosen the socket bolt See Fig 37 3 Adjust arm lock as direction of arrow See Fig 38 4 Adjust moon gear and arm locks to make it to be meshed then tighten the socket bolts of arm lock See Fig 39 Fig 36 Fig 37 Fig 38 Adjust moon gear Tighten socket bolt with wrench Fig 39 Locking the bolts after moon gear and arm lock engage well Loosen the Socket Bolt Moon Gear Snap ring ...

Страница 26: ...vely 3 Connecting A2 terminal of AC contactor to L2 terminal with a single power supply line 4 Connecting Limit switch Remove the line of connecting terminal 4 of control button and A1 of AC contactor see Fig 41 Connecting wire 12 brow wire of limit switch with terminal 4 of control button Connect wire 11 blue wire with terminal A1 of AC contactor Connecting the yellow and green wire to the termin...

Страница 27: ... 25 IV EXPLODED VIEW Model OH 15 Fig 43 ...

Страница 28: ...ety pin 2 20 10420018 Nylok nut 8 21 11217069 Hex Bolt 34 22 10206006 Washer 35 23 10206023 Nylok nut 34 24 10420045 Washer 38 25 1061K074 Protective ring 2 26 10217013 Hex bolt 8 27 11217016B Top Beam Assy Left 1 28 11217015B Top Beam Assy Right 1 29 11420044 Limit plate 2 30 10209149 Lock washer 12 31 10420138 Socket bolt 4 32 11217019 Top pulley 4 33 10217020 Bronze bush for pulley 6 34 1121702...

Страница 29: ...8 Wire Protective cover 2230mm 2 64 10206110 M6 35 cup head bolt 6 10206079 M6 40 cup head bolt 10 65 11217473 Wire Protective cover L 1143 high setting 2 11217477 Wire Protective cover L 531 low setting 2 66 11217880 Wire Protective cover 1320mm 1 11217895 Wire Protective cover 1320mm 1 67 10217056A Cylinder 2 68 10217188 Slider block 16 69 11217480 Carriage 2 70 11217054 Carriage Plastic Cover 2...

Страница 30: ...217061A 90 Fitting 2 95 11217068 Column Reinforce Plate 2 96 10217454 Wire Cable 1 97 10206011 Cup Head Bolt 2 98 10206013 Limit switch 1 99 11206042 Limit Bar Bracket 2 100 10209009 Cup Head Bolt 8 101 10209066 Cable nut M16 8 102 10217452 Cable Assy 2 103 10420029 Cable shim 4 104 10217195 T Fitting 1 105 10217455 Oil hose Assy 2 106 10217456 Oil hose Assy 1 107 10217189 90 fitting for power uni...

Страница 31: ...217052D Item Part Description Qty Note 1 10206048 Socket bolt 12 2 10209039 Lock washer 12 3 10209022 Washer 12 4 11206049 Moon gear 4 5 11217122 Outer rear arm 4 6 10201149 Flat head screw 4 7 11217123A Inner arm 4 1 2 3 4 5 7 6 Fig 44 ...

Страница 32: ...eeding Plug 2 67 3 10201029 Support Ring 2 67 4 10201030 Y Ring 2 67 5 10201031 O Ring 2 67 6 11217074A Piston 2 67 7 10217075 O Ring 2 67 8 11217089 Piston rod 2 67 9 11217077 Piston rod fitting 2 67 10 10217078 Dust ring 2 67 11 11217079 Head cap 2 67 12 10217080 O Ring 2 67 13 11217091 Bore weldment 2 Fig 45 ...

Страница 33: ... 31 4 3Manual power unit Explode View 071102 220V 60Hz Single Phase Fig 46 ...

Страница 34: ...365 O ring 1 15 16 10209152 Ties 1 16 17 85090167 Magnet 1 17 18 81400290 Filter 1 18 19 81400413 Steel Motor 1 19 20 10420070 Push button 1 20 21 41030055 AC connector 1 21 22 81400287 Motor terminal box cover 1 22 23 71111216 AMGO power unit label 1 23 24 81400560 Throttle valve 1 24 25 81400266 Relief valve 1 25 26 81400284 Inner hex iron plug 1 26 27 10720118 Hair pin 1 27 28 81400451 Release ...

Страница 35: ...Lifting the carriages and lock at the same height strain the safety cable and then release a little and then tighten the cable nuts Make sure the safety device can always be worked properly 3 Exhaust air This hydraulic system is designed to bleeding air by loosing the bleeding plug Lifting the carriages to about 1 meter height and loose the bleeding plug the air would be bled automatically then ti...

Страница 36: ...es first make sure the lift can rise and lower synchronously the safety device can lock and release synchronously And then test run the lift to the top completely If there are anything improper repeat the above adjustment NOTE It may be vibrated when lifting at start lifting it with load for several times the air would be bled and the vibration would be disappeared automatically Fig 51 Hydraulic S...

Страница 37: ...Press button UP until the lift pads contact underside of vehicle totally Recheck to make sure vehicle is secure 8 Continue to raise the lift slowly to the desired working height ensuring the balance of vehicle 9 Push lowering handle to lower lift onto the nearest safety The vehicle is ready to repair To lower vehicle 1 Be sure clear of around and under the lift only leaving operator in lift area 2...

Страница 38: ...ll rollers and pins with 90wt Gear oil or equivalent Note All anchor bolts should take full torque If any of the bolts does not function for any reason DO NOT use the lift until the bolt has been replaced Every six months 1 Make a visual inspection of all moving parts for possible wear interference or damage 2 Check and adjust as necessary equalizer tension of the cables to insure level lifting 3 ...

Страница 39: ...r replace 3 Repair or replace 4 Repair or replace 5 Fill tank Lift does not stay up 1 Release valve out of work 2 Relief valve or check valve leakage 3 Cylinder or fittings leaks Repair or replace Lift raises slowly 1 Oil line is jammed 2 Motor running on low voltage 3 Oil mixed with air 4 Gear pump leaks 5 Overload lifting 1 Clean the oil line 2 Check electrical system 3 Fill tank 4 Replace pump ...

Страница 40: ... 38 AMGO HYDRAULIC CORPORATION Tel 803 505 6410 Fax 803 505 6410 Manual Part No 72227903 Revision Date 2020 09 1931 Jo Rogers Blvd Manning South Carolina USA ...

Отзывы: