ICM4 Ice Cream Maker Instructions
2
ICM4 Ice Cream Maker Assembly & Instructions
CAUTION:
This product is equipped with a polarized plug (one blade is wider than the other blade) as a
safety feature to reduce the risk of electrical shock. This plug will fit into a polarized outlet only one way.
Never use the plug with an extension cord unless the plug can be fully inserted into the extension cord.
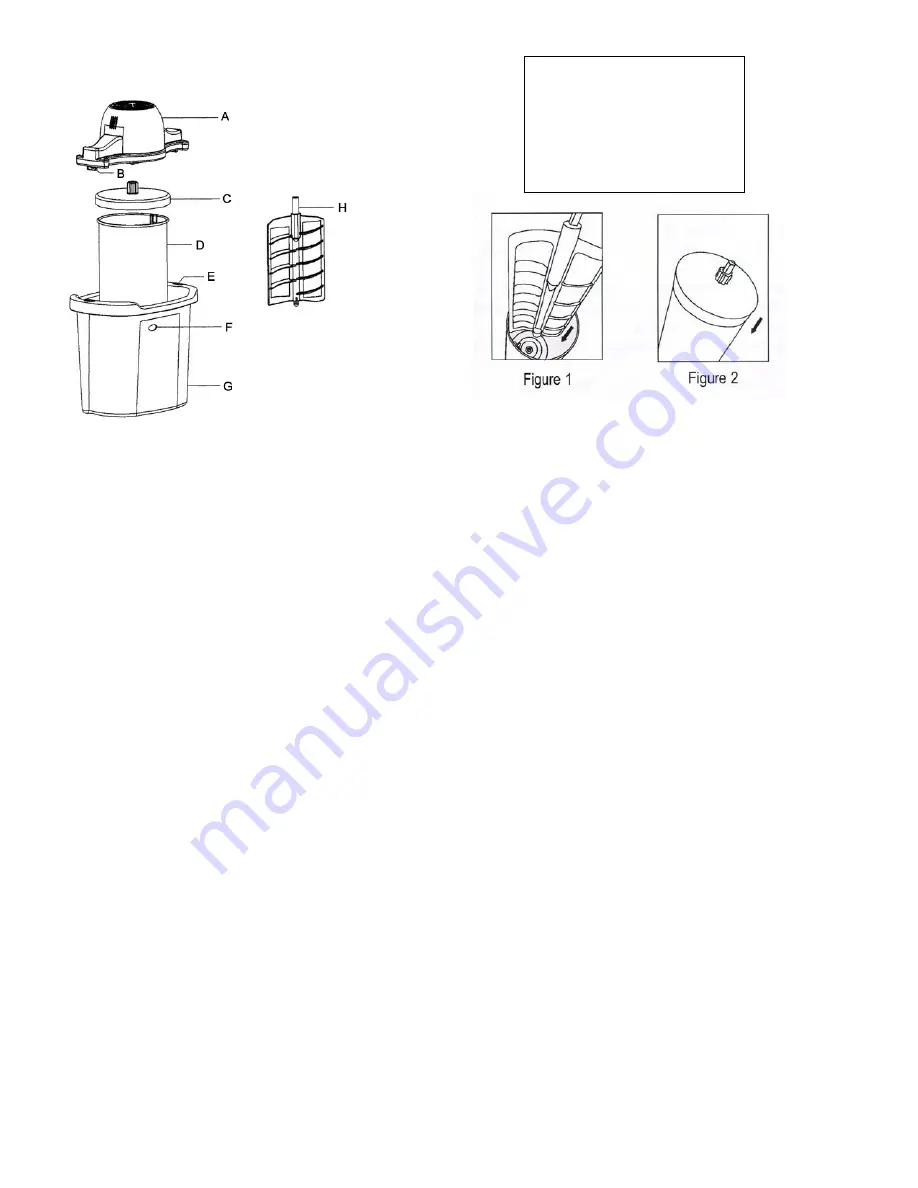
A. Place the Blending Spatula into the canister.
B. Insert Canister into Bucket. Position it over the center hole.
C. Pour the ice cream mixture into the canister. Put the Canister lid on top.
D. Position the Electric Motor and press into
Bucket Locking Slots
.
E. Prepare the bucket by filling it with ice to the top of the canister. Melting ice may drain from the bucket.
Place bucket in an area that won’t be damaged from water.
F. Add approx. 1-2 cups of rock salt to the top of the ice inside the bucket.
G. Plug the power cord into an electrical outlet.
H. As the ice begins to melt down by 2-3 inches, add more ice and more cups of rock salt into the bucket.
I. Allow the machine to churn for 30-45 minutes.
J. Once the churning is complete (the motor will automatically shut off when the contents inside become
too thick for the blending spatula), unplug and remove the motor. Clear the ice and salt away from the lid to
prevent it from falling into the canister of ice cream.
K. Remove the cover and carefully lift out the Blending Spatula and scrape off any excess ice cream.
L. The ice cream consistency is very fresh, and may be a soft-serve texture
.
M.
If a harder consistency is desired, transfer the contents to a freezable container and freeze for 3-4 hours
or longer. It is recommended to store the ice cream inside the freezing canister.
A) Electric Motor
B) Power Cord
C) Canister Lid
D) Freezing Canister
E) Bucket Locking Slots
F) Drainage Hole
G) Plastic Bucket
H) Blending Spatula
Follow the diagram to locate and assemble the individual pieces.
Insert Blending Spatula (1) into Canister (2)


