background image

4

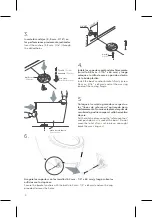
4.

Instale los soportes apretándolos firmemente

(tornillo 4,8 mm - 3/16” x 60 mm) y luego

coloque el anillo de cera en posición dentro

de la brida plástica.

Install the bowl’s anchor brackets firmly (screw

4,8 mm - 3/16” x 60 mm) and set the wax ring

inside of the sealing flange.

Tornillo

 / Screw

Arandela 

/ Washer

Soportes 

Anchor brackets

Anillo cera

Wax ring

6.

Asegure los soportes con los tornillos (6,3 mm - 1/4” x 65 mm) y luego cubra los 
orificios con los tapones.

Secure the bracket anchors with the bolts (6,3 mm - 1/4” x 65 mm) and use the cap 
provided to cover the holes.

”8 

m

m3

02

102mm - 4”

3/8”NPT

Anclaje

Anchor

Inserte los anclajes ( 4,8 mm - 3/16”) en 
las perforaciones previamente realizadas.

Insert the anchors (4,8 mm - 3/16”) through 
the drilled holes.

3.

Línea de referencia

Reference line

Coloque el sanitario guiándose respecto a

las “líneas de referencia” aplicando peso

uniformemente. No mueva la pieza después de

ser ubicada, podría romper el sello hermético

de cera.

5.

Set the toilet in place using the “reference lines”

and push down all around the bowl. Do not

move the toilet after is set in place; you might

break the wax´s ring seal.

Содержание ELEMENTO Series

Страница 1: ...INSTRUCTIVO DE INSTALACI N Installation Instructions ELEMENTO SERIE ELEMENTO Sanitario de dos piezas Two pieces toilet 1 0 1 6 Gpf 4 1 6 0 Lpf Ref 19 00541...

Страница 2: ...cciones antes de comenzar Adem s observe las herramientas recomendadas y los componentes requeridos Cuidadosamente desempaque y examine su producto verificando que se encuentre en buen estado Thanks t...

Страница 3: ...named Center point Remember to mark on the floor the Reference lines Punto centro Center point 305m m 12 L neas de referencia Reference lines V lvula de entrada Supply valve 10mm 3 8 Manguera de sumi...

Страница 4: ...the bracket anchors with the bolts 6 3 mm 1 4 x 65 mm and use the cap provided to cover the holes 8 m m 3 0 2 102mm 4 3 8 NPT Anclaje Anchor Inserte los anclajes 4 8 mm 3 16 en las perforaciones prev...

Страница 5: ...nsamble la arandela y la tuerca verificando la posici n de la manguera de suministro Assembly the washer and nut checking the suitable position of supply line Conecte la manguera de suministro Connect...

Страница 6: ...a o hacia la izquierda para elevarlo Important Setting water line This toilet has been designed to function efficiently using a predetermined amount of water A WATER LINE is marked in the back of the...

Страница 7: ...ncione Slow flush or require to keep pressed the button for working Barras v stagos del bot n no est n bajando completamente para accionar el sistema adecuadamente Bars stems button do not go down com...

Страница 8: ...te al titular de la cuenta tenga presente o Persona Natural Debe presentar carta autoriz ndolo y fotocopia de cedula o Persona Jur dica Carta de la empresa membretada y con antig edad menor a 30 d as...

Страница 9: ...r a 5 a os Componentes electr nicos si aplica 2 a os En ning n caso aplican garant as por mal uso impacto golpe o rayado o por uso y o adaptaci n de piezas no originales de f brica En ning n caso apli...

Отзывы: