


Installation and Operation Guide
79
Clip and System log. Select one of the media types.
Snapshot:
Select to send snapshots when a trigger is activated.
(a) Source: Select to take snapshots from the video profile.
(b) Send pre-event image(s) [0~4]: The IP camera has a buffer area; it temporarily
holds data up to a certain limit. Enter a number to decide how many images to
capture before a trigger is activated. Up to 4 images can be generated.
(c) Send post-event image(s) [0~7]: Enter a number to decide how many images
to capture after a trigger is activated. Up to 7 images can be generated.
NOTE: For example, if both the Send pre-event images and Send
post-event images are set to 4, a total of 8 images are generated
after a trigger is activated.
(d) File Name Prefix: Enter the text that will be appended to the front of the file
name.
For example, the file name will be in this form:
Snap_20090101_122030
The prefix file name
Date and time suffix
The format is: YYYYMMDD_HHMMSS
(e) Add date and time suffix to file name: Select the option to add the date/ time
suffix to the file name.
(f)
Click Submit to activate the setting.
Video Clip:
Select to send video clips when a trigger is activated.
(a)
Source: Select to record video clips from the video profile.
(b)
Pre-event recording: The IP camera has a buffer area; it temporarily holds data
up to a certain limit. Enter a number to decide the duration of recording before
a trigger is activated. Up to 4 seconds can be set.
(c)
Maximum duration: Specify the maximum recording duration in seconds. Up to
100 seconds can be set.
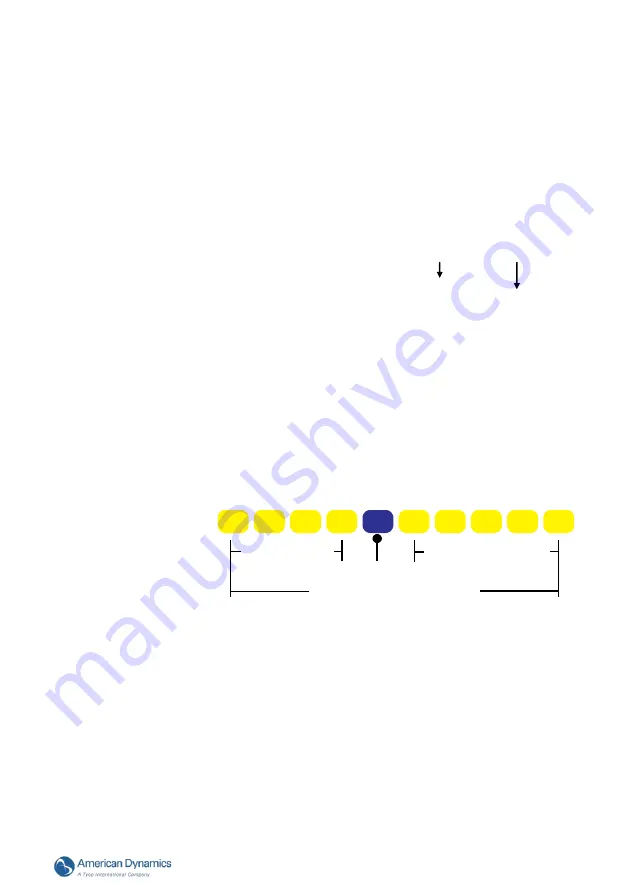
NOTE: For example, if pre-event recording is set to 4 seconds and the
maximum duration is set to 10 seconds, the IP camera continues
to record for another 5 seconds after a trigger is activated.
1 sec.
2 sec.
3 sec.
4 sec.
6 sec.
7 sec.
8 sec.
9 sec.
10sec.
5 sec.
Pre-event Recording
Continues to record
Trigger Activation
Maximum recording duration
(d)
Maximum file size: Specify the maximum file size allowed.
(e)
File Name Prefix: Enter the text that will be appended to the front of the file
name.
(f)
Click Submit to activate the setting.
System log:
Select to send a system log when a trigger is activated. Click Submit to
activate the setting.
(4) When completed, click Submit to enable the settings to exit this page. The new media
settings will appear on the Event Settings page.
NOTE: To remove a media setting from the list (Application> Event>), select a media name
from the drop-down list and click Delete.
Note that only when the media setting is not being applied to an event setting
(Application> Event> Event> The “Attached media” item) can it be deleted or you
can’t get the images/ logs when a trigger is activated.


