Amcrest IP8M-2454EB Скачать руководство пользователя страница 57


57 


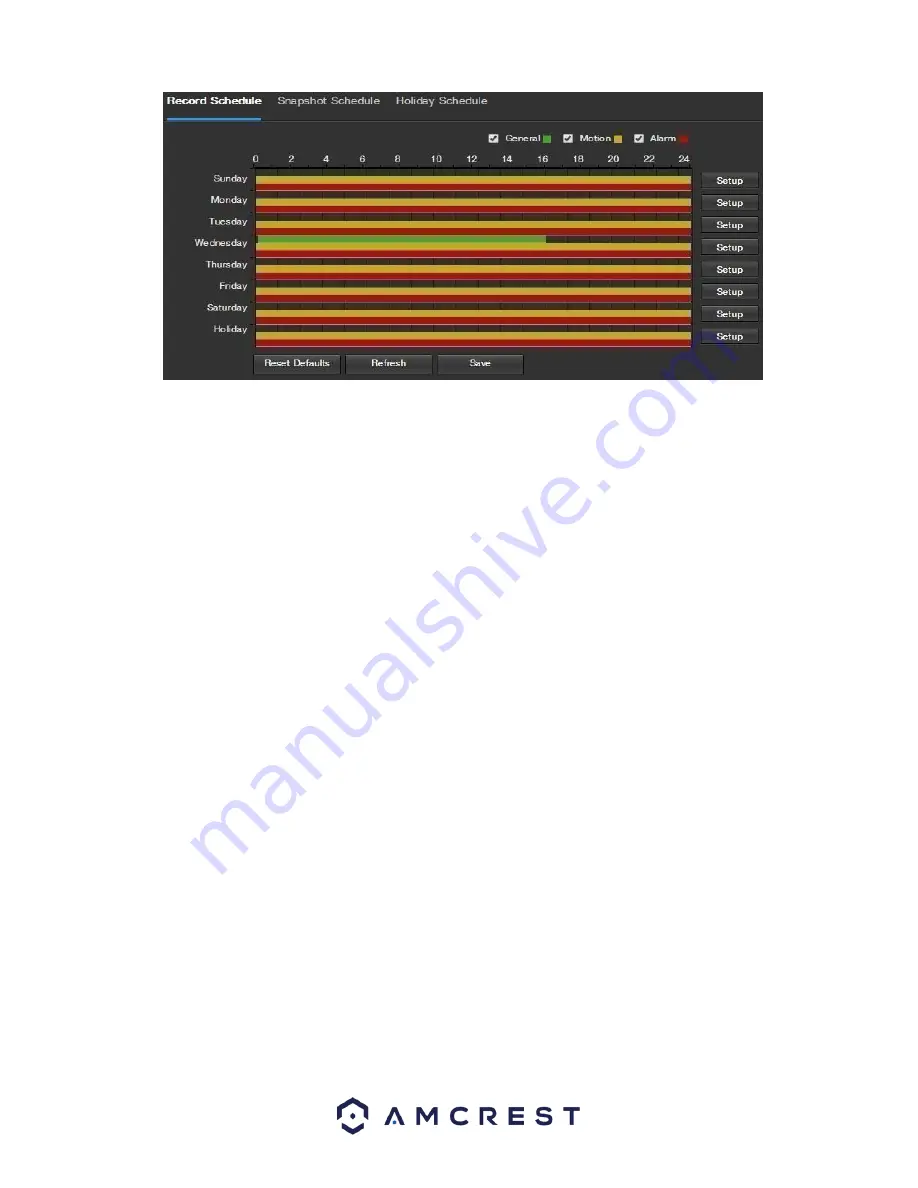
Below is an explanation of the fields on the Record Schedule settings tab:         

Record Type

: These checkboxes allow the user to select which recording type they want to configure on the schedule. 

There are 3 types of recordings:         

o


General

: General recording means that the camera captures all footage for the specified time period. General 

recording is represented by the color green.         

o


Motion

: Motion Detection recording means that the camera captures only footage when the motion detection alarm 

is activated. Motion recording is represented by the color yellow.         

o


Alarm

: Alarm recording means that the camera captures only footage when an alarm is activated. Alarm recording is 

represented by the color red.         

•   

Video Recording Schedule

: To specify a video recording range, first select the type of recording desired, then click and 

drag on time bar for the desired date. To edit multiple days at once, drag the cursor further up or down to cover the 
other days.         

o


Setup

: Clicking this button opens a screen that allows for recording periods to be set for each day and for each 

recording type. There are a total of 6 periods that can be set.         

To reset to default settings, click the Reset Defaults button. To refresh the page, click the Refresh button. To save the 

settings, click the Save button.       


5.4.4.1.2 Snapshot Schedule 


This tab is where snapshot recording settings are configured. Below is a screenshot of the Snapshot Schedule settings 

screen:      


Содержание IP8M-2454EB

Страница 1: ...Amcrest IP8M 2454EW IP8M 2454EB 8MP UltraHD 4K Motorized Lens Camera User Manual Version 1 0 4 Revised December 20th 2018...

Страница 2: ...3 4 Basic Wiring Overview 8 4 Camera Access Setup 9 4 1 Default Username and Password 9 4 2 How to Setup the Camera 9 4 3 App Setup 10 4 4 Desktop Access Setup 15 4 5 Amcrest Cloud Desktop Setup 16 4...

Страница 3: ...Support support amcrest com Important Security Warning To keep your Amcrest camera secure and prevent unauthorized access please make sure to follow the steps below Always make sure that your camera...

Страница 4: ...n air blower or a microfiber cloth 7 Accessories Be sure to use only the accessories recommended by manufacturer Before installation please open the package and check to ensure that all the components...

Страница 5: ...e information on these features please refer to section 3 4 Basic Wiring Overview Advanced Network Protocol Support This camera is UPnP compatible and includes functionality for use with PPPoE DDNS an...

Страница 6: ...f the Amcrest IP4M 1028E camera 3 1 Connection Guide The camera initially should be connected via the following method Once connected to a PC or mobile device you will be able to configure the device...

Страница 7: ...uded expansion bolts 4 If the camera s cable will be exiting through the wall or ceiling surface please be sure to drill an exit hole and pull the cable through 5 If the camera s cable will be exiting...

Страница 8: ...onnection an Ethernet connection audio wires I O and alarm wiring This device comes equipped with audio capabilities the audio wiring is featured in the wire pigtail attached to this device There are...

Страница 9: ...our camera depending on your needs Please follow the instructions on this page to set up your camera in the way that works best for you 4 2 1 Setting up Your Camera for the First Time If you are setti...

Страница 10: ...ou ll find instructions on how to set up your camera up on the Amcrest cloud app as well as the Amcrest View Pro app 4 3 1 Amcrest Cloud App Setup Amcrest Cloud allows you to access your device from a...

Страница 11: ...the QR code on the back side bottom of the camera or manually enter the camera s serial number into the Enter camera S N serial number field Press Next to continue 6 If you are adding a new camera tha...

Страница 12: ...camera When all settings have been confirmed tap Finish For more information about the Amcrest Cloud app and its features visit amcrest com support 4 3 2 Amcrest View Pro Setup To add your PoE camera...

Страница 13: ...e of the screen to begin adding your PoE device 3 Tap on Add Device to add a new device to your app 4 Tap on PoE Camera 5 Next select a connection type Since we will be setting up a basic P2P connecti...

Страница 14: ...e View to continue Note You can tap on the icon to verify the password Note Android users tap on Scan QR Code to access the QR code reader 8 The app will prompt you to change the password Enter a pass...

Страница 15: ...one of the following web browsers Safari Internet Explorer or Google Chrome extension To easily connect to the camera s interface install and run the Amcrest IP Config tool You can download the IP Con...

Страница 16: ...a to power and wait 30 seconds for the camera to start up and initialize 2 Using a web browser on your PC or Mac visit www amcrest com cloud and register for a cloud account Once registered click the...

Страница 17: ...your camera open the main menu then go to Setup Network 6 Click the Connections menu item on the left hand menu and ensure that the HTTP port has changed 7 Click the DDNS menu item on the left hand me...

Страница 18: ...y in the IP address field 9 Click the Save button 10 Using the left hand menu go to the Connection menu and write down the TCP UDP and HTTP port number It is recommended to ensure that these port numb...

Страница 19: ...of the following options Visit http amcrest com contacts and use the email form Call Amcrest Support using one of the following numbers Toll Free 888 212 7538 International Callers Outside of US 1 71...

Страница 20: ...user to listen in on the audio the camera s microphone is picking up Talk Click this button to activate the talk feature on the camera Used primarily to activate microphone feature on the camera Note...

Страница 21: ...panel on the live view screen THIS CAMERA ONLY PROVIDES OPTICAL ZOOM FOCUS AND IRIS CONTROL FUNCTIONALITY It does not have the capability of providing pan tilt Section 4 This section of the Live tab...

Страница 22: ...ecifying time stamps the user can trim down 6 Recorded Video Panel This panel allows the user to specify what type of video they would like to playback and it also allows the user to select where to s...

Страница 23: ...egister for new accounts as well as view or modify existing accounts For more information on Amcrest Cloud visit amcrest com support 5 4 Setup The Setup tab allows the user to change different camera...

Страница 24: ...he user to configure image profiles for normal day and night usage Below is a screenshot that shows the Configuration tab in the Configuration menu item Below is an explanation for each of the fields...

Страница 25: ...er is used to adjust the sharpness of the video The value ranges from 0 to 100 The larger the value is the clearer the edges are and vice versa Note The higher the value the higher likelihood of pictu...

Страница 26: ...setting without sacrificing exposure timing Shutter Priority This setting will maximize the fastest shutter speed and will sacrifice the gain in return Manual This setting lets you select your shutte...

Страница 27: ...eature that came out of necessity due to overexposure from strong light sources like headlights or spotlights To reset to default settings click the Reset Defaults button To refresh the screen click o...

Страница 28: ...s click the Save button 5 4 1 5 Day Night Used to determine when black and white mode is turned on in a dark environment Below is a screenshot of this menu Color always represents picture in color doe...

Страница 29: ...efresh To save the settings click the Save button 5 4 1 6 IR Light This menu allows the user to select whether the IR lights for night vision are on or off for the selected profile Below is a screensh...

Страница 30: ...cation light on or off To reset to default settings click the Reset Defaults button To refresh the screen click on Refresh To save the settings click the Save button 5 4 1 8 Profile Management Below i...

Страница 31: ...tings click the Save button 5 4 1 9 Zoom and Focus This section allows the user to access zoom and focus settings pertaining to the motorized lens feature of the camera Below is a screenshot of this m...

Страница 32: ...ideo tab in the Video menu item Below is an explanation for each of the fields on the Video tab in the Video menu item Encode Mode This dropdown box allows the user to select a compression protocol Th...

Страница 33: ...lts button To refresh the page click the Refresh button To save the settings click the Save button 5 4 1 2 2 Snapshot Below is a screenshot that shows the Snapshot tab in the Video menu item Below is...

Страница 34: ...ter boxes click the remove all button For Channel Title the radio button enables or disables the feature The Input Channel Title field allows the channel title to be modified For Time the radio button...

Страница 35: ...llows the user to select where to save playback snapshots to Click the Browse button to select a different destination folder The Playback Download field allows the user to select where to save playba...

Страница 36: ...r to select what source to get audio from There are no built in microphones for this device All audio will be produced by an external RCA microphone that can be plugged into the audio In wire attached...

Страница 37: ...host device name for the camera This field supports a maximum of 15 characters Ethernet Card This dropdown box allows the user to select which internet access device to use If the device is connected...

Страница 38: ...gateway Preferred DNS Server This field allows the user to enter the preferred DNS server IP address Alternate DNS Server This field allows the user to enter the alternate DNS server IP address Enabl...

Страница 39: ...QR code By scanning this image using the Amcrest View app this camera can establish a connection with the app To reset to default settings click the Reset Defaults button To refresh the page click the...

Страница 40: ...ton To refresh the page click the Refresh button To save the settings click the Save button 5 4 2 3 DDNS DDNS stands for Dynamic Domain Name Server This technology is used to automatically update name...

Страница 41: ...er screen Below is an explanation of fields on the IP Filter settings screen Trusted Sites This checkbox allows the user to enable the IP Filter feature for trusted sites Add IP MAC This button opens...

Страница 42: ...t that corresponds to the selected SMTP server Login Anonymously This checkbox allows the user to anonymously login to the server Username This field allows the user to enter the SMTP username Passwor...

Страница 43: ...n To reset to default settings click the Reset Defaults button To refresh the page click the Refresh button To save the settings click the Save button 5 4 2 6 UPnP UPnP stands for Universal Plug and P...

Страница 44: ...tion To reset to default settings click the Reset Defaults button To refresh the page click the Refresh button To save the settings click the Save button 5 4 2 7 SNMP SNMP stands for Simple Network Ma...

Страница 45: ...ulticast address Port This field allows the user to enter a multicast port To reset to default settings click the Reset Defaults button To refresh the page click the Refresh button To save the setting...

Страница 46: ...ndow Setup Network Connection set the HTTPS port values and then check the box to enable HTTPS For more information on how to setup HTTPS in the web user interface visit https www youtube com watch v...

Страница 47: ...low is an explanation of the fields on the Motion Detect tab Enable This checkbox enables motion detection for the camera Schedule Clicking this button opens a weekly schedule that can be used to set...

Страница 48: ...xpired Detection Area Clicking this button opens a pop up screen that can be used to set detection areas o When the setup button is clicked a live stream of the video is shown The user can then set up...

Страница 49: ...ld be Send Email This checkbox allows the user to enable the camera to send an email when a motion detection alarm is triggered Snapshot This checkbox allows the user to enable the camera to take a sn...

Страница 50: ...rm port on the back of the camera when a video tamper alarm is triggered Alarm Delay This field specifies in seconds how long the delay between alarm activation and Relay alarm activation should be Se...

Страница 51: ...ower the sensitivity the more audio variance is required to trigger an alarm Enable Intensity Change This checkbox enables the user to adjust sensitivity and threshold settings for audio detection o S...

Страница 52: ...l alarm signal at the fifth second the buzzer tour PTZ activation snapshot record channel functions will begin another 10 seconds while the screen prompt alarm upload email will not be activated again...

Страница 53: ...low is a screenshot of this menu Below is a description of each feature Enable Allows the user to enable the relay activation function Relay In Allows the user to set specific relayed alarms to the ca...

Страница 54: ...This checkbox allows the user to enable the camera to record video when an audio detection alarm is triggered Record Delay his field specifies in seconds how long the delay between alarm activation an...

Страница 55: ...k tab screen Below is an explanation of the fields on the Network settings tab Event Type This dropdown box allows the user to select which Network abnormality to set event triggers for The 2 options...

Страница 56: ...tivation and relay alarm activation should be Send Email This checkbox allows the user to enable the camera to send an email when illegal access is attempted To reset to default settings click the Res...

Страница 57: ...nly footage when an alarm is activated Alarm recording is represented by the color red Video Recording Schedule To specify a video recording range first select the type of recording desired then click...

Страница 58: ...pshots when an alarm is activated Alarm recording is represented by the color red Snapshot Recording Schedule To specify a snapshot range first select the type of snapshot desired then click and drag...

Страница 59: ...it can be customized to stop recording or snapshots for that day by using the Record and Snapshot checkboxes To refresh the page click the Refresh button To save the settings click the Save button 5...

Страница 60: ...SD Card settings tab Device Name This column designates the name of the SD card that is currently in the camera Status This column designates the status of the SD card Attribute This column designate...

Страница 61: ...the FTP server is unavailable To reset to default settings click the Reset Defaults button To refresh the page click the Refresh button To save the settings click the Save button 5 4 4 2 4 NAS This ta...

Страница 62: ...stream to record The options are main stream and sub stream To reset to default settings click the Reset Defaults button To refresh the page click the Refresh button To save the settings click the Sav...

Страница 63: ...in the camera Video Standard This dropdown box allows the user to select either the NTSC or PAL video standard To reset to default settings click the Reset Defaults button To refresh the page click t...

Страница 64: ...hronize with NTP This checkbox allows the user to enable the camera s synchronization with an NTP server NTP Server This field allows the user to enter in an NTP server Port This field allows the user...

Страница 65: ...ties are assigned to an account Add User This button allows the user to add a new user to the camera 5 4 5 3 Default Settings This screen allows the user to reset the camera and all its settings to th...

Страница 66: ...k the camera will auto reboot Auto Delete Old Files This checkbox allows the user to enable the auto deletion of old files on the camera Manual Reboot This button allows the user to manually reboot th...

Страница 67: ...wer from the camera 5 4 6 Information This menu section allows the user to view information about the camera for reference purposes 5 4 6 1 Version This screen allows the user to see various informati...

Страница 68: ...This tab allows the user to enable and access remote logs within the camera Below is a screenshot of this menu To use this menu check the enable check box to enable remote log functionality Enter the...

Страница 69: ...the alarm log and all the alarm instances that have occurred The checkboxes allow the user to narrow down which alarms they want to see in the alarm log Clicking the checkbox next to Prompt will caus...

Страница 70: ...s web user interface via a laptop or PC Navigate to Setup System General Click on the Date Time tab Click on PC Sync to sync the date and time Click Save to save and apply the new date and time settin...

Страница 71: ...t be able to read the file format The PC may not have DirectX 8 1 or higher The PC may not have Windows XP or higher 12 When I login via HTTPS a dialogue says the certificate has expired or is not val...

Страница 72: ...strings quickly Record Delay Record Delay specifies in seconds how long the delay between alarm activation and recording should be Relay Out Relay Out triggers a connected alarm connected to the alar...

Страница 73: ...encouraged to try to correct the interference by one or more of the following measures Reorient or relocate the receiving antenna Increase the separation between the equipment and receiver Connect th...

Страница 74: ...oncentration of the hazardous substance of at least one of all homogeneous materials in the parts is above the relevant threshold of the SJ T11363 2006 standard During the environmental friendly use p...

Страница 75: ...h kind of substances or elements please return to the corresponding local authorities to process according to your local government statutes Note To view setup videos for many of the steps outlined in...

Отзывы: