5
6
G
H1
NOW YOU ARE READY TO FLY!
If you have successfully synced your PA-1003 to your controller as explained on page 4 you are now ready to
fly. Before beginning to fly your drone you should familiarize yourself with how to start and stop the rotors,
how to use your auto land feature and how the controls work so please carefully read and familiarize yourself
with various control features explained in the next. Once again as a beginner pilot you should learn how to
control your drone in a large open field or park on a day with zero or very light wind. Do not try to fly your
PA-1003 too high until you become a more experience pilot.
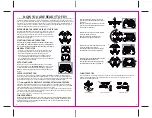
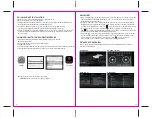
Even though the PA-1003 has four rotors there is still a front or "forward"
facing direction and "rear" or backwards facing direction. The front and
forward facing direction of the PA-1003 is the side with a camera (see
diagram G). The rear and backward facing direction of the drone is the side
with a red light (see diagram G).
FRONT
REAR
RECOGNIZING THE FRONT & REAR OF THE PA-1003
SPEED SELECT BUTTON
The PA-1003 has 4 speed settings; T(Training),1 (SLOW), 2 (MEDIUM) and 3 (HIGH). The Default setting
when you first turn on your PA-1003 is the 1 (SLOW) speed mode. To increase the speed simply trigger the
speed setting button (see remote diagram on pg 3) you will hear beeping sounds of the controller will show
you what speed setting you are on. Speed settings can be set before flight or during the flight.
Fixed-Point Landing
Square Pattern Maneuver
Cross Pattern Maneuver
FLIGHT PRACTICE
To master flying your aircraft try practicing the exercises shown below, start with simple vertical takeoffs,
maneuvers. Good luck and have fun!
STARTING/STOPPING THE ROTORS
AUTO START/LAND
automatically. Simply press the
AUTO START / LAND
button on the top of the
NOTE:
to avoid
obstacles.
Note: You can start/stop your PA-1003 manually or automatically.
Please follow one of the steps below to operate accordingly. Make
sure you have properly synced the PA-1003 and the power stays on.
MANUAL START/STOP
(see diagram H1), hold until the rotors start spinning. Now release both
sticks to the neutral position and push the throttle up to take off.
the rotor you can simply wait about 15
seconds, and it will stop automatically. Or move both sticks down and
in to stop immediately (see diagram H2). After take off, you can simply pull
the throttle all the way down and land.
I
J
K
L
T (Training)MODE & OBSTACLE AVOIDANCE TRAINING FEATURE
Simply press and hold the Speed Button 2 seconds, you will hear a long beep indicating you are in T Mode
now.T mode allows you to learn how to operate your PA-1003 at a very slow speed. Also there are maximum
and minim height limits set to avoid crashing to ceiling or floor in T mode.
New obstacle avoidance training feature will cause the drone to automatically circumvent walls and other
obstructions so new pilots can get the hang of flying. Set the PA-1003 speed in the T(Training) speed mode
the obstacle avoidance feature will start working.
Note: the obstacle avoidance feature only works for T(Training) mode.
FLIGHT CONTROL
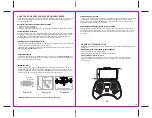
Below is a list of basic flight functions for your long-range remote to control the PA-1003. While learning
to fly your PA-1003 it is best to start in a large space with the drone facing away from you until you get used
to the basic controls. As you master flying your PA-1003 you can move to more advanced maneuvering
techniques. Practice makes perfect!
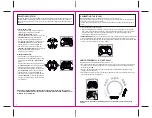
Move the left Throttle stick up to increase the
propeller speed and the PA-1003 will accelerate
and ascend.
Move the left Throttle stick down to decrease the
propeller speed and the PA-1003 will decelerate
and descend (see diagram I).
While in the air, move the left Throttle stick left
and the PA-1003 will rotate left.
Move the left Throttle stick right and the
PA-1003 will rotate right (see diagram J).
While in the air, move the right Direction Stick up
and the PA-1003 will move forward.
Move the right Direction Control down and the
PA-1003 will move backward (see diagram K).
While in the air, move the right Direction Control left
and the PA-1003 will bank to the left.
Move the right Direction Control right and the
PA-1003 will bank to the right (see diagram L).
H3
H2


