5
6
G
NOW YOU ARE READY TO FLY!
If you have successfully synced your ASC-2500 to your controller as explained on page 4 you are now ready to
fly. Before beginning to fly your drone you should familiarize yourself with how to start and stop the rotors,
how to use your auto land feature and how the controls work so please carefully read and familiarize yourself
with various control features explained in the next. Once again as a beginner pilot you should learn how to
control your drone in a large open field or park on a day with zero or very light wind. Do not try to fly your
ASC-2500 too high until you become a more experience pilot.
Even though the ASC-2500 has four rotors there is still a front or
"forward" facing direction and "rear" or backwards facing direction. The
front and forward facing direction of the ASC-2500 is the side with a
camera (see diagram G). The rear and backward facing direction of the drone
is the side with a red light (see diagram G).
FRONT
REAR
RECOGNIZING THE FRONT & REAR OF THE ASC-2500
SPEED SELECT BUTTON
The ASC-2500 has 3 speed settings; 1 (SLOW), 2 (MEDIUM) and 3 (HIGH). The Default setting when you first
turn on your ASC-2500 is the 1 (SLOW) speed mode. To increase the speed simply trigger the speed setting
button (see remote diagram on pg 3) you will hear beeping sounds of the controller will show you what
speed setting you are on. Speed settings can be set before flight or during the flight.
Fixed-Point Landing
Square Pattern Maneuver
Cross Pattern Maneuver
FLIGHT PRACTICE
To master flying your aircraft try practicing the exercises shown below, start with simple vertical takeoffs,
landings, and left/right turning and rotating. Once those are mastered move on to square and cross
maneuvers. Good luck and have fun!
STARTING/STOPPING THE ROTORS
AUTO START/LAND
The ASC-2500 has an auto start/land feature which allows you to start/land
automatically. Simply press the
AUTO START / LAND
button on the top of the
controller and your ASC-2500 will begin taking off/landing(see diagram H1).
NOTE:
You can still control the direction while auto starting/landing to avoid
obstacles.
Note: You can start/stop your ASC-2500 manually or automatically.
Please follow one of the steps below to operate accordingly. Make
sure you have properly synced the ASC-2500 and the power stays on.
MANUAL START/STOP
• To start the rotors simply move the two control sticks simultaneously down inside or
outside corners(see diagram H), hold until the rotors start spinning. Now release
both sticks to the neutral position and push the throttle up to take off.
• To stop the rotors, after starting the rotor you can simply wait about 10 seconds, and
it will stop automatically. Or move the two control sticks simultaneously down inside
or outsideagain to stop immediately. After take off, you can simply pull the throttle
all the way down and land.
I
J
K
L
FLIGHT CONTROL
Below is a list of basic flight functions for your long-range remote to control the ASC-2500. While
learning to fly your ASC-2500 it is best to start in a large space with the drone facing away from you until
you get used to the basic controls. As you master flying your ASC-2500 you can move to more advanced
maneuvering techniques. Practice makes perfect!
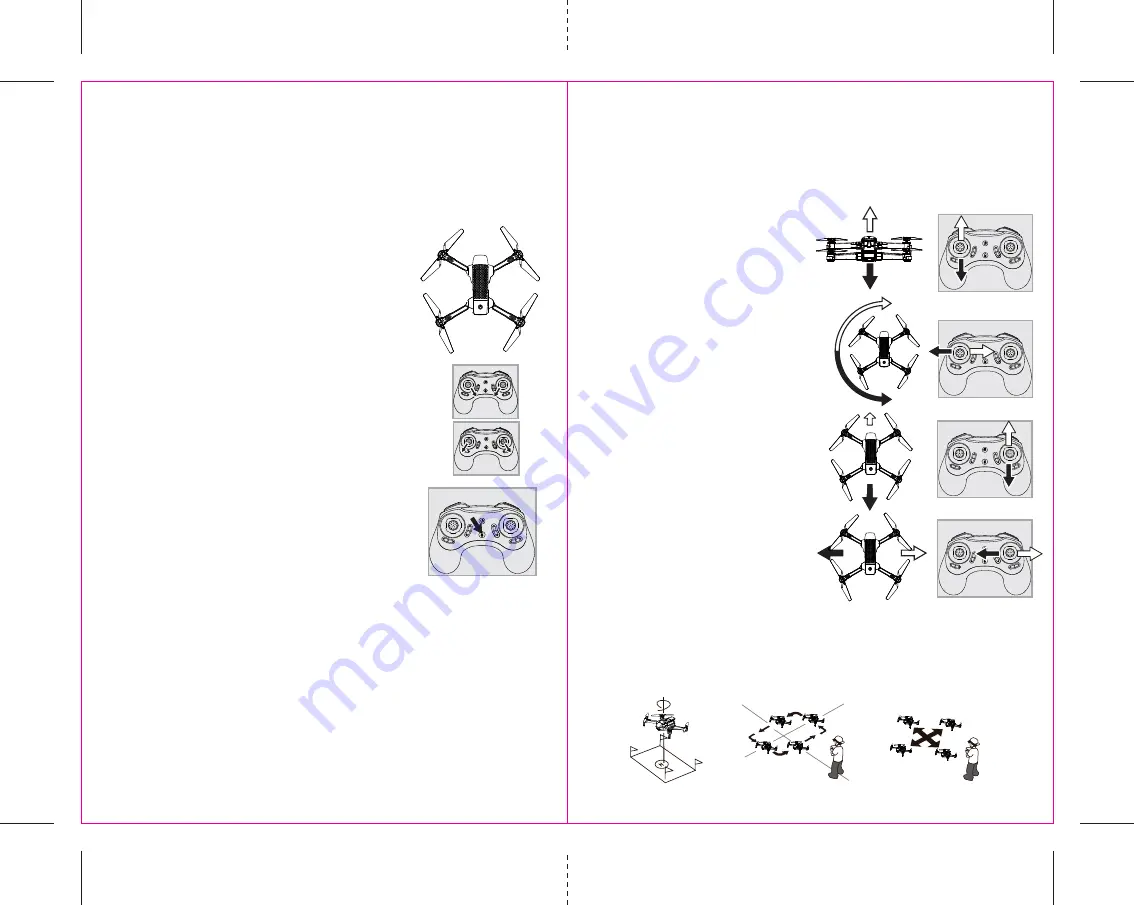
Move the left Throttle stick up to increase the
propeller speed and the ASC-2500 will accelerate
and ascend.
Move the left Throttle stick down to decrease the
propeller speed and the ASC-2500 will decelerate
and descend (see diagram I).
While in the air, move the left Throttle stick left
and the ASC-2500 will rotate left.
Move the left Throttle stick right and the
ASC-2500 will rotate right (see diagram J).
While in the air, move the right Direction Stick up
and the ASC-2500 will move forward.
Move the right Direction Control down and the
ASC-2500 will move backward (see diagram K).
While in the air, move the right Direction Control left
and the ASC-2500 will bank to the left.
Move the right Direction Control right and the
ASC-2500 will bank to the right (see diagram L).
H1
H
OPTICAL FLOW
The ASC-2500 Optical Flow technology utilizes a separate downward facing camera which analyzes the
image of the ground below in realtime. Then using this image and its unique control system algorithms it
works to keep the drone in one stationary position regardless of wind or any other factors that might cause
the drone to drift. The Optical flow feature is only functional at altitudes below 30ft in the air.


