background image


Cautions


Do’s 


Always  install  the  heater  in  accordance  with  this  guide.  If  in  doubt  obtain 

expert advice. 


Always  make  sure  the  electrical  socket  is accessible and  located  adjacent 

to, but not above the heater. 


Always disconnect the heater from the electrical supply before moving it, or 

carrying out cleaning, maintenance. 


Always  make  sure  the  heater  is  firmly  secured  to  prevent  it  from  being 

tipped over. 


Always use a fireguard when young children and infirm persons can come 

into contact with the heater. 

Don’ts 


Never  leave  children  unsupervised  in  a  room  where  the  heater  is  ON  and 

unguarded. 


Never obstruct or cover the fan outlet or force items into heater openings. 


Never  install  or  use  the  heater  anywhere  where  water  is  in  use,  for 

example: bathrooms, kitchens, or swimming pools. 


Never use aerosols or steam cleaners on or around the heater. 


Never route the main supply cable under carpet etc . 


Never install the heater close to curtains or combustible materials. 


Never use the heater to dry clothes etc. 


Never sit or stand on the heater. 


Содержание Remii SYM-SLIM-42

Страница 1: ... FOR INSTALLER LEAVE THIS MANUAL WITH THE APPLIANCE CONSUMER RETAIN THIS MANUAL FOR FUTURE REFERENCE INSTALLER LEAVE THIS MANUAL WITH THE APPLIANCE CONSUMER RETAIN THIS MANUAL FOR FUTURE REFERENCE INSTALLER LEAVE THIS MANUAL WITH THE APPLIANCE CONSUMER RETAIN THIS MANUAL FOR FUTURE REFERENCE SYM SLIM 42 WM SLIM 45 Version 202104 ...

Страница 2: ...NSTRUCTIONS 3 UNPACKING AND TESTING THE APPLIANCE 6 GROUNDING THE APPLIANCE 6 LOCATING THE FIREPLACE 6 SYM SLIM 42 WM SLIM 45 7 WALL MOUNT INSTALLATION 8 BUILT IN INSTALLATION 9 HARDWIRE INSTALLATION 12 MEDIA OPTIONS 14 DECORATIVE MEDIA INSTALLATION 14 OPERATION 15 MANUAL OPERATION 15 REMOTE CONTROL OPERATION 16 WIFI OPERATION 19 INSTALLING WALL THERMOSTAT 22 REPLACEMENT PARTS 23 EXPLODED VIEW 24 ...

Страница 3: ...nner 10 A heater has hot and arcing or sparking parts inside Do not use it in areas where gasoline paint or flammable liquids are used or stored 11 Use this heater only as described in this manual Any other use is not recommended by the manufacturer as it may cause fire electric shock or injury 12 Avoid the use of an extension cord the extension cord will overheat and cause a fire 13 Always use pr...

Страница 4: ... they are occupied by persons not capable of leaving the room on their own unless constant supervision is provided 22 If the glass is damaged do not use the heater to avoid a hazard 23 Do not leave children unsupervised when the heater is turned on ...

Страница 5: ...fireguard when young children and infirm persons can come into contact with the heater Don ts Never leave children unsupervised in a room where the heater is ON and unguarded Never obstruct or cover the fan outlet or force items into heater openings Never install or use the heater anywhere where water is in use for example bathrooms kitchens or swimming pools Never use aerosols or steam cleaners o...

Страница 6: ...o operate at and 35 95 During the cold winter months allow the fireplace to reach room temperature before turning it on of odor during the first few minutes of initial use Th normal and will never occur again This appliance is for use on 120 Volts The cord has a plug as shown in A An adapter as shown in C is available for connecting three blade grounding type plugs to two receptacles The green gro...

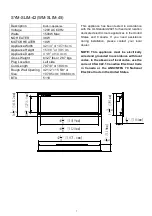
Страница 7: ...ested in accordance with the UL Standard 2021 for fixed and location dedicated electric room appliances in the United States and Canada If you need assistance during installation please contact your local dealer NOTE This appliance must be electrically wired and grounded in accordance with local codes In the absence of local codes use the current CSA C22 1 Canadian Electrical Code in Canada or the...

Страница 8: ... in the area to be drilled Drill 8 or more holes depending on the size of the unit purchased 8mm diameter 40mm depth using a suitable size drill bit and insert the wall plugs into the holes 4 Remove the hanger from the fireplace by removing the screws See Figure 2 5 Screw the left and right side steel panel to the left and right side to cover the screws See Figure 3 Min 5cm 2 in Min 5cm 2 in Min 5...

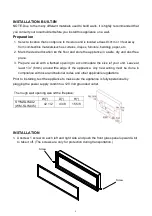
Страница 9: ... location on the floor and store the appliance in a safe dry and dus Prepare a wall with a framed opening to accommodate the size of your unit Leave at least 1 4 6mm around the edge of the appliance Any new wiring must be done in compliance with local and national codes and other applicable regulations rior to installing test the appliance to make sure the appliance is fully operational by pluggin...

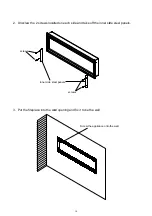
Страница 10: ...Put the fireplace into the wall op Unscrew the 2 screws located on each side and take off the inner side steel panels Put the fireplace into the wall opening and fix it to be the wall side steel panels inner side steel panels screws screws Screw the appliance onto the wall ...

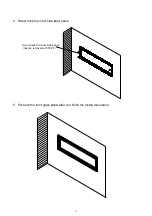
Страница 11: ...steel panel 5 Put back the front glass panel after you finish the media Screw back the inner side steel panel back the front glass panel after you finish the media decoration Screw back the inner side panel that you removed at STEP 2 ...

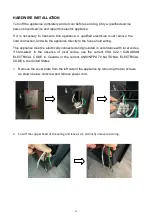
Страница 12: ...ppliance must be electrically connected and grounded in accordance with local codes if hard wired In the absence of local codes use the current CSA C22 1 CANADIAN ELECTRICAL CODE in Canada or the current ANSI NFPA 70 NATIONAL ELECTRICAL CODE in the United States 1 Remove the cover plate from the left side of the appliance by removing the two screws as shown below Unscrew and remove power cord 2 Cu...

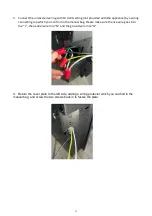
Страница 13: ...ecting cap which you can find in the manual bag Please make sure the live wire goes into the L the neutral wire into N and the ground wire into G 4 Return the cover plate to the left side adding a wiring protector which you can find in the manual bag and screw the two screws back in to fasten the plate ...

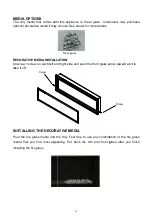
Страница 14: ...e fire glass media that you find most appealing Put back the trim and front glass after you finish installing the fire glass NSTALLING THE DECORATIVE MEDIA Pour the fire glass media into the tray Feel free to use any combination of the fire glass media that you find most appealing Put back the trim and front glass after you finish Pour the fire glass media into the tray Feel free to use any combin...

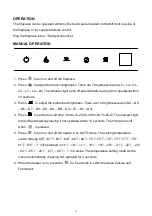
Страница 15: ...L4 L3 L2 L1 L0 L6 The indicator light turns off automatically leaving it not operated within 10 seconds 3 Press to adjust the ember bed brightness There are 12 brightness levels D4 D5 D6 D7 D8 D9 DA DB D0 D1 D2 D3 4 Press to set the turn off time 30min 1h 2h 3h 4h 5h 6h 7h 8h t0 The indicator light turns off automatically leaving it not operated within 10 seconds The timing turns off when is press...

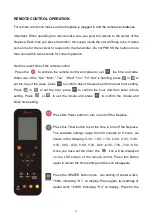
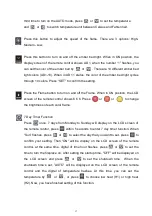
Страница 16: ...ss to confirm day of the week and then enter hour setting Press or to set the hour press to confirm the hour and then enter minute setting Press or to set the minute and press to confirm the minute and finish time setting Press this Power button to turn on and off the fireplace Press this Timer button to set the time to turn off the fireplace The available settings range from 30 minutes to 8 hours...

Страница 17: ...emote control shows 6 6 6 Press or or to change the brightness of each color flame 7 Day Timer Function Press once 7 days from Monday to Sunday will display on the LCD screen of the remote control press within 5 seconds to enter 7 day timer function When Sun flashes press or to select the day that you want to set press to confirm your setting Then ON will be display on the LCD screen of the remote...

Страница 18: ... will disappears NOTE If the 7 day timing and the general timing are set at the same time the system will respond to an earlier shutdown time Press Refer button to check the settings of 7 day timer Press or to see the settings of the day of the week and or the settings of the startup and shutdown time 18 y timer and the icon ...

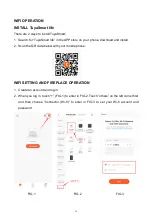
Страница 19: ...e download and install 2 Scan the QR code below with your mobile phone WIFI SETTING AND FIREPLACE OPERATION 1 Create an account and log in 2 When you log in touch FIG 1 to enter in FIG 2 Touch others on the left corner first and then choose Connector Wi fi to enter in FIG 3 to set your Wi fi account and password FIG 1 FIG 2 FIG 3 19 ...

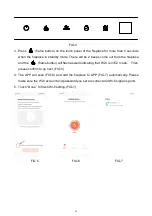
Страница 20: ... the fireplace and the flame button will flash as well indicating that Wi fi is in EZ mode Then please confirm to go next FIG 5 4 The APP will scan FIG 6 and add the fireplace to APP FIG 7 automatically Please make sure the Wi fi account and password you set are correct and Wi fi signal is good 5 Touch Done to finish Wi fi setting FIG 7 FIG 5 FIG 6 FIG 7 20 ...

Страница 21: ...6 Now you are in the interface like FIG 7 You can operate the fireplace via Wi fi FIG 7 21 ...

Страница 22: ... located at the bottom on the left side of the appliance Pull the wire out and cut the inside thermostat Connect the wires to the wall thermostat as shown below Follow the instructions provided with wall switch kit Install Wall Thermostat per instructions provided with kit and per the following left side of the appliance Pull the wire out and cut the inside thermostat Connect the wires to the wall...

Страница 23: ...236505 FLICKER ASSEMBLY 1 8 601129G CIRCUIT BOARD 1 9 3236010 METAL SIDE PANEL RIGHT SIDE 1 10 10114001B TEMPERATURE SENSOR 1 11 601300M 2 TOUCH PANEL 1 12 602130C BLOWER AND HEATER ASSEMBLY 1 13 3236007 HANGER 1 14 3236009 METAL SIDE PANEL LEFT SIDE 1 15 3001506B SIGNAL RECEIVER 1 16 10125023 TRAY LIGHT 1 17 212051 WIFI CARD 1 18 10105501 REMOTE CONTROL 1 NOTE Remote control and tray light are no...

Страница 24: ...24 EXPLODED VIEW ...

Страница 25: ... fuse has blown Replace the fuse Appliance will not come on when switch is flipped to ON Appliance is not plugged into an electrical outlet Check plug and plug in Appliance has overheated and safety device has caused the thermal switch to disconnect Turn off the main switch allow appliance to cool for 10 minutes then turn on Circuit board is burnt out Inspect the circuit board and replace if neces...

Страница 26: ...SERVICE HISTORY This heater must be serviced annually depending on usage Date Dealer Name Service Technician Name Service Performed Special Concerns NOTES 26 ...

Страница 27: ...o the above limitation may not apply to the purchaser All other warranties expressed or implied with respect to the product its components and accessories or any obligation liabilities on the part of Amantii are hereby expressly excluded Limitations to Coverage under Limited Warranty This limited warranty does not apply to products that have been repaired or otherwise altered except by Amantii or ...

Страница 28: ...s costs or damages or if such losses costs or damages are foreseeable In no event will Amantii including without limitation any of its directors officers shareholders employees consultants agents heirs executors administrators and assigns be liable for any direct losses costs or damages that exceed the purchase price of the product Some jurisdictions do not allow the exclusion or limitation of inc...

Отзывы: