background image

8

Machine Set-up

EN


WARNING:

   Always remove the electrical plug from the   


          electrical outlet before installing or changing  


          the pad or brush.

How To Install The Brush Or Pad Driver

To install the brush or pad driver, follow this

procedure:

1.  Put the handle in the vertical position.

2.  To lock the handle, push the locking lever down.See figure 5.

3.  Tilt the machine backward until the handle is on the floor.  See figure 6.

4.  Put one foot on each side of the machine. See figure 6.

5.  Align the lugs (1) on the locking plate into the pad driver adapter 

openings (2).  See figure 7.

6.  To lock the brush or pad into position, turn the brush or pad driver 

clockwise.

7.  Turn the brush or pad counterclockwise to unlock and remove the 

brush.

8.  Lift the machine to the vertical position.

NOTE:  To prevent damage to the brush or pad driver, remove the 

             accessory while not in use.  Keep the brush in a cool, dry place.

How To Adjust The Handle

To adjust the handle, follow this procedure:

1.    The locking lever is on the lower part of the handle tube.  Use your 

foot to lift the lever.  See figure 5.

2.    Lower the handle to the best operating position.

NOTE:  For the best operating position, keep your back straight, bend 

only your arms.   

3.  Using your foot, push the locking lever down.

4.    Hold the handle against your body for the best control.

Figure 5

Figure 6

Figure 7


1. The lugs.

     2. 

The 

drive 

adpater 

openings.

Содержание American Sanders Epoch HD

Страница 1: ...Epoch HD 230V Dual Speed Rotary Sander Operator s Manual ...

Страница 2: ...g to the use of these Products in such environments The Manufacturer disclaims any responsibility to advise purchasers of any specific requirements that may be applicable to the use of the Products in such environments In this Operation Manual you will find three statements that you must read and observe to ensure safe operation of this machine DANGER means Severe bodily injury or death can occur ...

Страница 3: ...pad Always lift the cord over the machine Do not move the machine by the power cord C Shock hazard Do not use the machine if it has been rained on or sprayed with water DANGER To avoid injury keep hands feet and loose clothing away from all moving parts on the machine Disconnect the power cord before replacing the pad changing the abrasive or when servicing Do not operate the machine unless all gu...

Страница 4: ...4 EN ...

Страница 5: ...5 EN ...

Страница 6: ...extension cord with minimum wire size 10 AWG Do not use an extension cord longer than 50 ft Do not join two extension cords WARNING Do not cut remove or break the ground terminal Do not try to fit a three terminal plug into a receptacle or connector body that does not fit the plug If the receptacle or connector body does not fit the plug see your Authorized person to make the connection Electrical...

Страница 7: ...that can lead to closing wood pours and discoloration from burnishing the woods surface This speed is also used for buffing and polishing 300 RPM operation will yield the greatest wood removal and productivity and can successfully be used with more course grit abrasives 80 grit or below CAUTION Wood species differ greatly in their sanding characteristics always test the speed selection with any gr...

Страница 8: ...ush or pad into position turn the brush or pad driver clockwise 7 Turn the brush or pad counterclockwise to unlock and remove the brush 8 Lift the machine to the vertical position NOTE To prevent damage to the brush or pad driver remove the accessory while not in use Keep the brush in a cool dry place How To Adjust The Handle To adjust the handle follow this procedure 1 The locking lever is on the...

Страница 9: ...Weight This Machine comes with four 4 6 25 pound 2 8 kg removable weights for a total of 25 pounds 11 3 kg maximum that can be added to increase the PSI load and abrasive performance See figure 10 Caution should be used if adding weight to the machine as this increases the torque required to turn the abrasive thus increasing the amperage required by the motor to perform the sanding operation Floor...

Страница 10: ...s the contacts from being closed If any part of the switch is not operating replace the part If any part of the electrical system of the machine is not operating or is damaged replace the part Make sure all connections are tight Return the machine to theAmerican Sanders Service Branch or a American SandersAuthorized Service Center for electrical repairs or testing Maintenance Of The Motor If repai...

Страница 11: ...act an authorized American Sander Dealer Fuse circuit breaker repeatedly trips Low voltage Eliminate extension cord locate a power source closer to work site Have voltage checked by a qualified electrican Electrically connect to American Sanders Power Booster Not on a dedicated circuit Make sure there is no other items using power on the circuit Motor is overloaded Remove weights Switch to high sp...

Страница 12: ......

Страница 13: ...______________________________________ ________________________________________________ ________________________________________________ ________________________________________________ ________________________________________________ ________________________________________________ ________________________________________________ ________________________________________________ __________________...

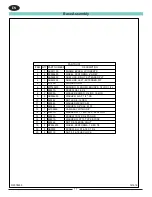
Страница 14: ...14 Main Assembly EN RF079200 122019 19 13 14 15 17 16 6 8 7 11 12 10 20 21 23 3 1 9 22 4 18 27 14 26 29 19 25 24 29 28 31 30 32 2 5 ...

Страница 15: ...2 LIGHT LED 35 DEG 230V ASM AS042100 8 1 1 BULB LIGHT LED NOT SHOWN AS027600 1 TRANSFORMER LIGHT LED 230V NOT SHOWN AS028600 1 SHADE LIGHT LED NOT SHOWN AS027800 1 TRANSFORMER HOUSING LIGHT LED NOT SHOWN AS027900 1 SOCKET WIRE ASM LIGHT LED NOT SHOWN AS028000 1 ROCKER SWITCH LIGHT LED NOT SHOWN AS028100 1 SWITCH COVER LIGHT LED NOT SHOWN AS028200 1 SCREW 8 32 X 1 RH PHILLIPS NB073900 9 1 8 SKIRT R...

Страница 16: ...16 Base Assembly EN RF078900 121919 15 16 8 9 14 6 14 6 9 8 2 16 15 2 3 4 12 10 11 13 7 17 1 5 12 20 18 19 20 18 19 ...

Страница 17: ... 3 8 16 X 6 80087A 1 7 WASHER BOWED 516ID X 1 06OD 80295A 2 8 WASHER FLAT 1 2 SS NB034600 2 9 NUT LK 3 8 16 REG 920342 1 10 WASHER WEAR CAM 980349 1 11 WASHER 3 8 SAE FLAT 980645 2 12 CAM ASSY WITH GRIP 56109699 1 13 WASHER FLT 1 25X 52 X 06 NYLON 87607A 2 14 SCREW 10 32 X 3 4 PAN HD 85383A 2 15 WASHER FLAT 10 TYPE B WIDE 80291A 2 16 NUT 3 8 16 ESNA LIGHT 920248 1 17 WHEEL PERFORMA 1 5 8 X 7 8 MP2...

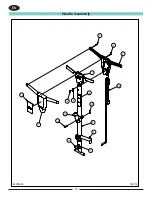
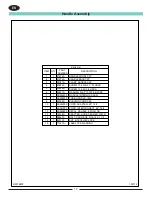
Страница 18: ...18 Handle Assembly EN RF078800 100719 4 4 2 10 16 6 5 13 15 14 3 8 9 11 12 1 7 ...

Страница 19: ...80290A 1 5 WASHER FLAT 10 TYPE B WIDE 80291A 1 6 MODULE INTERLOCK ASM AS034500 1 7 TUBE HANDLE 1600 AS029500 1 8 BUSHING CORD C2K 50796A 1 9 CORD ADAPTER 60 12 3 AS042000 1 10 CORD INTERCONNECT 46 18 4 AS041900 1 11 DECAL HANDLE EPOCH HD AS042600 1 12 ADAPTER HOSE SANDER WELD 10304A 1 13 BOLT CARRIAGE 5 16 18 X 1 1 2 88643A 1 14 NUT 5 16 18 HEX LOCK 920110 1 15 LABEL CCA WARNING 71347A 1 16 RF0788...

Страница 20: ...20 Connection Diagram EN ...

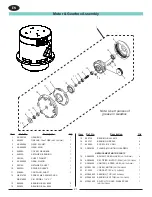
Страница 21: ... Item Ref No Description Qty 15 902736 BEARING BALL 6010 1 16 902737 BEARING NEEDLE 6 17 84808A SCREW 10 X 3 4tt 6 18 AS056100 FLANGE MOUNTING GEARBOX 1 REPLACEMENT MOTOR PARTS 19 AS056200 BRUSH CARBON ASM NOT SHOWN 4 20 AS028400 RECTIFIER MOTOR 230V NOT SHOWN 1 21 AS056300 CONTROL SPEED ASM NOT SHOWN 1 22 MP504700 COVER MOTOR NOT SHOWN 1 23 41053A CORDSET IEC NOT SHOWN 1 24 MP488400 BEARING TOP N...

Страница 22: ... DRIVER 6 4 NB019100 BOLT HEX 1 4 X 3 4 12 5 NB6110 WASHER LOCK 1 4 12 6 NB070200 RING RETAINING 15MM 6 7 AS004800 RING ISOLATOR 1 8 AS004600 PLATE CLUCH DRIVER 1 9 56380282 BEARING BALL 6002 6 10 NB3275 NUT LOCK 1 4 6 11 87007A WASHER 6 12 NB071300 SCREW FLAT 1 4 X 1 3 4 6 13 AS003600 PLATE DRIVER 1 14 AS003400 PAD DRIVER 5 ASM 6 15 NB071400 WASHER GROUND 1 4 6 16 AS004700 RING SPACER 2 102317 ...

Страница 23: ...4 NB019100 BOLT HEX 1 4 X 3 4 12 5 NB6110 WASHER LOCK 1 4 12 6 NB070200 RING RETAINING 15MM 6 7 AS004800 RING ISOLATOR 1 8 AS004600 PLATE CLUCH DRIVER 1 9 56380282 BEARING BALL 6002 6 10 NB3275 NUT LOCK 1 4 6 11 NB9505 WASHER FLAT 5 16 X 1 1 2 6 12 NB055400 SCREW SOCKET FLAT CS 1 4 20 x 2 SS 6 13 AS036800 PLATE DRIVE 20 HYDRA SAND 1 14 AS003400 PAD DRIVER 5 ASM 6 15 NB071400 WASHER GROUND 1 4 6 16...

Страница 24: ...24 Wiring Diagram EN ...

Страница 25: ...ance INSTRUCTIONS AND CONDITIONS FOR WARRANTY REIMBURSEMENT l Order replacement part Orders will be processed and charged as normal procedure l Call American Sanders for R A number l You will need the Machine Serial Number and the Machine Model Number l Parts must be returned accompanied with the R A number to be eligible for warranty credit l All Warranty Parts will be shipped prepaid UPS Ground ...

Страница 26: ... Cliente de American Sanders para recibir más ayuda INSTRUCCIONES Y CONDICIONES PARA EL REEMBOLSO DE GARANTÍA l Pida la pieza de reemplazo Los pedidos se procesarán y cobrarán como un procedimiento normal l Llame a American Sanders para obtener el número de R A l Necesitará el número de serie del equipo y el número de modelo del equipo l Las piezas se deben devolver acompañadas con el número de R ...

Страница 27: ...uniquez avec le service à la clientèle d American Sanders pour obtenir de l aide INSTRUCTIONS ET CONDITIONS POUR L OBTENTION D UN REMBOURSEMENT SOUS GARANTIE l Commande de pièce de rechange Les commandes sont traitées et facturées comme toute procédure normale l Communiquez avec American Sanders pour obtenir un numéro d autorisation de renvoi l Il vous faudra le numéro de série et le numéro de mod...

Страница 28: ... an AMANO Company 1 Eclipse Rd l PO Box 909 Sparta North Carolina 28675 l USA www pioneereclipse com www americansanders com 1 336 372 8080 1 800 367 3550 Fax 1 336 372 2913 2020 American Sanders LT079500 REV 03 23 20 ...

Отзывы: