Amana PGB58B Скачать руководство пользователя страница 18

18

X. Heating Sequence of Operations
PGB & PGC)

Normal Sequence of Operation - Heating
See Figure 12

1. Thermostat calls for heat. The combustion blower is

immediately energized.

2. The pressure switch contacts transfer.

3. The ignitor is energized and allowed to preheat for

38 seconds.

4. The gas valve is energized delivering gas to the

burners and starting combustion.

5. The control checks the signal from the flame sen-

sor. Gas flow will continue only if a proper signal is
present within seven seconds after the gas valve
opens. As soon as flame is proven, the ignitor is de-
energized.

6. The unit will continue to fire while the helical fan

control heats up. The fan control will start the main
circulating air blower approximately 75 seconds af-
ter the gas valve opens (this time may vary depend-
ing on the control setting).

7. The furnace will deliver heat to the conditioned space

until the thermostat is satisfied.

8. The gas valve and combustion blower will be de-

energized when the thermostat opens.

9. There is a 90 second delay (approximate) before

the main air blower stops. This allows any additional
heat in the heat exchanger to be transferred to the
conditioned space.

XI. Cooling Sequence of Operations

PGB Normal Sequence of Operations - Cooling
See Figure 13A

1. Thermostat calls for cooling. The compressor and

outdoor fan are energized.

2. Approximately 15 seconds later, the fan time delay

relay closes. The indoor fan now begins operation.

3. The unit will deliver cooling to the conditioned space

until the thermostat is satisfied.

4. The compressor and outdoor fan will be de-ener-

gized when the thermostat opens. It is normal for
the scroll compressor to produce a short  burping
sound at this time as its internal pressures are equal-
ized.

5. Refrigerant will continue to flow through the capil-

lary tube (sizes 24 to 42) until the high and low side
pressures are approximately equal. Refrigerant will
continue to flow through the thermal expansion valve
until the high and low side pressures are approxi-
mately 50 PSI apart.

6. The indoor fan continues to run for approximately

45 seconds after the thermostat is satisfied. This
allows additional cooling from the indoor coil to be
transferred to the conditioned space.

PGC Normal Sequence of Operations - Cooling
See Figure 13B

1. Thermostat calls for cooling. The compressor, in-

door fan, and outdoor fan are energized.

2. Approximately 30 seconds later, the indoor fan

ramps up to full speed.

3. The unit will deliver cooling to the conditioned space

until the thermostat is satisfied.

4. The compressor and outdoor fan will be de-ener-

gized when the thermostat opens. It is normal for
the scroll compressor to produce a short  burping
sound at this time as its internal pressures are equal-
ized. (The PGC48 has a piston compressor.  All other
PGC and PGB have scroll compressors.)

5. Refrigerant will continue to flow through the capil-

lary tube (sizes 24 to 42) until the high and low side
pressures are approximately equal. For the PGC48,
60 and PGB58 refrigerant will continue to flow
through the thermal expansion valve until the high
and low side pressures are approximately 50 PSI
apart.

6. The indoor fan continues to run for approximately

30 seconds after the thermostat is satisfied. This
allows additional cooling from the indoor coil to be
transferred to the conditioned space. Then, the in-
door fan ramps down in 30 seconds to the OFF con-
dition.

XIl. Startup and Adjustment

Heating Startup

General Information
This furnace is equipped with an electronic ignition de-
vice which lights the burners. It also has a power vent
blower to exhaust combustion products.

On new installations, or if a major part such as the gas
valve, pressure switch or fan/limit control has been re-
placed, the operation of the furnace must be checked.

Check furnace operation as outlined in the following in-
structions. If any sparking, odors, or unusual noises are
encountered, shut off electrical power and recheck for
wiring errors, or obstructions in or near the blower mo-
tors. Various shipping materials must be removed be-
fore the indoor and outdoor fans can be operated.

Heat Anticipator Setting
The heat anticipator in the room thermostat must be
correctly adjusted to obtain the proper number of heat-
ing cycles per hour and to prevent  the room tempera-
ture from  over-shooting the room  thermostat setting.
Heat anticipator must be set at 0.8 amps.

Roll-out Protection Control
If the flames from the burners are not properly drawn
into the heat exchanger, a protection device will open,
causing the gas valve to close. The protection device is
located on the manifold assembly (Figure 14).

Содержание PGB58B

Страница 1: ...is a matter of common sense a matter of think ing before acting Most dealers have a list of specific good safety practices follow them The precautions listed in this Installation Manual should not sup...

Страница 2: ...ckout Timing sec 4 4 4 4 4 Flame Sense Current microamps Minimum 1 1 1 1 1 Maximum 6 6 6 6 6 Evaporator Coil Face Area Sq Ft 4 4 4 4 4 Rows Deep 2 2 2 4 4 Fins Inch 16 16 16 12 12 External Filter Size...

Страница 3: ...in 24 24 24 24 24 24 CFM 3500 3500 3700 3700 4700 4700 Condenser Fan Motor Horsepower 1 4 1 4 1 2 1 2 1 3 1 3 R L Amps 1 5 1 5 1 5 1 5 2 5 2 5 L R Amps 3 4 3 4 3 6 3 6 6 4 6 4 Blower Motor Horsepower...

Страница 4: ...Dia x Width in 11X8 11X8 11X8 Rated CFM Cooling 1750 1750 1750 Max External 0 5 wc 0 5 wc 0 5 wc Combustion Blower Diameter x Width in 4 x 1 25 4 x 1 25 4 x 1 25 No 1 1 1 Condenser Blower Motor H P 1...

Страница 5: ...applicable for both vertical and horizontal airflow Table 2B PGB CFM Temperature Rise vs External Static Pressure Table External Static Pressure Inches Water Column Motor 0 1 0 2 0 3 0 4 0 5 0 6 0 7...

Страница 6: ...r unit four hours prior to operat ing air conditioner after the electrical dis connect is off for a prolonged period of time during vacation etc This time lapse allows the compressor crankcase to atta...

Страница 7: ...the unit to avoid these problems When the unit is heating the temperature of the re turn air entering the unit must be between 50 F and 100 F Ground Level Installations Only When the unit is installe...

Страница 8: ...8 Figure 1 Required Clearances For All Installations...

Страница 9: ...w local codes when disposing or recycling the packaging material Locating The Thermostat The thermostat should be mounted 5 feet above the floor on a vibration free inside wall in a room or a hallway...

Страница 10: ...ssure to a lower pres sure reading than what is specified on the furnace name plate is not a proper derate procedure With a lower den sity of air and a lower manifold pressure at the burner orifice th...

Страница 11: ...s no open flame in the vicinity during air bleeding procedure The unit is placed in operation by closing the main electrical disconnect switch for the furnace Tanks And Piping for Propane Gas Units WA...

Страница 12: ...ntacting a propane gas supplier about installing a warning device to warn of a gas leak Propane gas is heavier than air and any leaking gas can settle in low areas or confined areas Propane gas odoran...

Страница 13: ...he unit must be electrically grounded in accordance with local codes or in the ab sence of local codes with the latest edition of National Electrical Code ANSI NFPA No 70 WARNING To avoid death or per...

Страница 14: ...Typical Wiring Ground Level Disconnect Switch High Voltage Source High Voltage Entrance Low Voltage Entrance Typical Wiring Rooftop Disconnect Switch High Voltage Source High Voltage Entrance Low Volt...

Страница 15: ...8 60 or PGB58 PFK5B1 or PFK5B6 32 5 8 x 22 3 8 x 1 The Amana filter kit includes a permanent filter door label and installation instructions PFK3A1 and PFK5B1 contain filter label and instructions for...

Страница 16: ...pliance not connected to the common venting system Turn on any exhaust fans such as the range hoods and bathroom exhausts so they will operate at maximum speed Do not operate a summer exhaust fan Clos...

Страница 17: ...Combustion Product Purge Ends Air Blower OFF Combustion Blower OFF Figure 12 Timing Chart for Normal Robertshaw Operation PGB PGC Figure 13B PGC Timing Chart for Normal Cooling Operation On Off On Of...

Страница 18: ...itioned space PGC Normal Sequence of Operations Cooling See Figure 13B 1 Thermostat calls for cooling The compressor in door fan and outdoor fan are energized 2 Approximately 30 seconds later the indo...

Страница 19: ...kout by disengaging the electric disconnect switch to the furnace for thirty sec onds Operating Instructions Heating NOTE Figure 16 illustrates the proper gas valve mount ing location Flame Roll Out P...

Страница 20: ...the burner orifices Check The Gas Input Natural Gas Only NOTE On outdoor equipment the gas input will vary with the temperature of the gas Rated input will be ob tained at approximately 10 F With war...

Страница 21: ...rd lo cated on the blower housing The speed tap settings have been factory selected according to unit size and performance Field select taps are provided on the speed tap board to assist the final ins...

Страница 22: ...be affected by any of the above compressor protection de vices WARNING To avoid personal injury or death always disconnect electrical power before in specting or servicing the unit All com pressor pro...

Страница 23: ...during vacation etc This time lapse allows the compressor crankcase to attain a proper operating temperature NOTE Mechanical cooling cannot be reliably provided at ambient temperatures below 50 F If l...

Страница 24: ...death due to electrical shock disconnect electrical power before performing any mainte nance Important Note Touching the ignitor body with bare fin gers rough handling or vibration could result in ear...

Страница 25: ...ire oiling Flue Passages At the start of each heating season inspect and if nec essary clean the furnace flue passages Cleaning Flue Passages Qualified Servicer Only 1 Shut off electric power and gas...

Страница 26: ...nd Functional Parts Accessories Additional Amana accessories can be purchased to fit specific application needs Accessories can be ordered by description in Table 5 Each accessory includes its own sep...

Страница 27: ...8 89 255 10 7 8 87 251 13 4 8 85 275 16 2 95 72 13 88 251 10 6 13 86 249 13 3 13 85 274 16 1 67 18 88 252 10 7 18 86 249 13 3 18 84 274 16 1 62 23 87 254 10 7 23 85 249 13 3 23 83 274 16 1 77 8 88 23...

Страница 28: ...256 21 3 10 80 268 29 2 95 72 13 82 258 19 6 13 85 257 21 2 16 80 267 29 2 67 18 82 257 19 5 19 84 256 21 2 22 79 267 29 2 62 24 81 256 19 5 25 84 255 21 1 28 78 266 29 1 77 8 82 241 18 8 8 84 240 20...

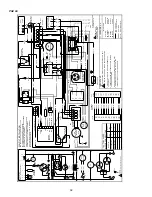
Страница 29: ...29 XVI Wiring Diagram PGC24 36...

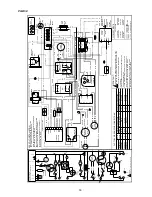
Страница 30: ...30 PGC 42...

Страница 31: ...31 PGC 48...

Страница 32: ...IGNITION CONTROL L2 IGN IGN L1 RS TH VALVE GND NC NO COM BR 11 BK 27 C W G R Y TERMINAL BOARD YL 12 VT 20 RD 10 BK 33 GND OR 49 BU 10 BR 21 GY 30 RD 23 RD 22 BR 22 GY 70 OR 15 RD 1 CONTACTOR CC T2 T1...

Страница 33: ...VT 47 RD 1 GND OR 49 BU 10 BR 21 RD 23 RD 22 BR 22 OR 15 OR 8 BU RD 230V BK 208V H H 3 1 FAN TIME DELAY FD FOR PROPER OPERATION ON 208 VOLT THE FOLLOWING CHANGES MUST BE MADE 208 VOLT INSTALLATION MOV...

Отзывы: