background image

10

1

2

R C

1

2

R C

CTK01AA
Thermostat

CT™ Compatible
Modular Blower
Integrated Control 
Module

CT™ Compatible
AC/HP Integrated
Control Module

40VA Transformer (included in
            CTK01AA kit)

208/230 VAC

24 VAC

1

2

R C

System Wiring using Two-Wires between Air Handler and AC/

HP and Four-Wires between Air Handler and Thermostat

C

OMFORT

N

ET

™ S

YSTEM

 A

DVANCED

 F

EATURES

The ComfortNet™ system permits access to additional sys-
tem information, advanced setup features, and advanced di-
agnostic/troubleshooting features.  These advanced features
are organized into a menu structure.  The menus are ac-
cessed and navigated as described below.

A

CCESSING


AND

 N

AVIGATING


THE

 A

DVANCED

 F

EATURES

M

ENUS

The advanced system features are accessed using the
ComfortNet™ thermostat.  These advanced features are ac-
cessed as follows:

On the CT™ thermostat Home Screen Display, touch
the 

Menu

 key to display additional key choices.

Touch and hold the 

Installer Config

 key for

approximately 3 seconds to enter the Thermostat
Options Configuration menu.

Touch and hold the 

Installer Config

 key again for

approximately 3 seconds to enter the Advanced
Installer Configuration menu.

Clean Display

Installer

Config

Set Time

Set 

Schedule

R un

Sch ed u le

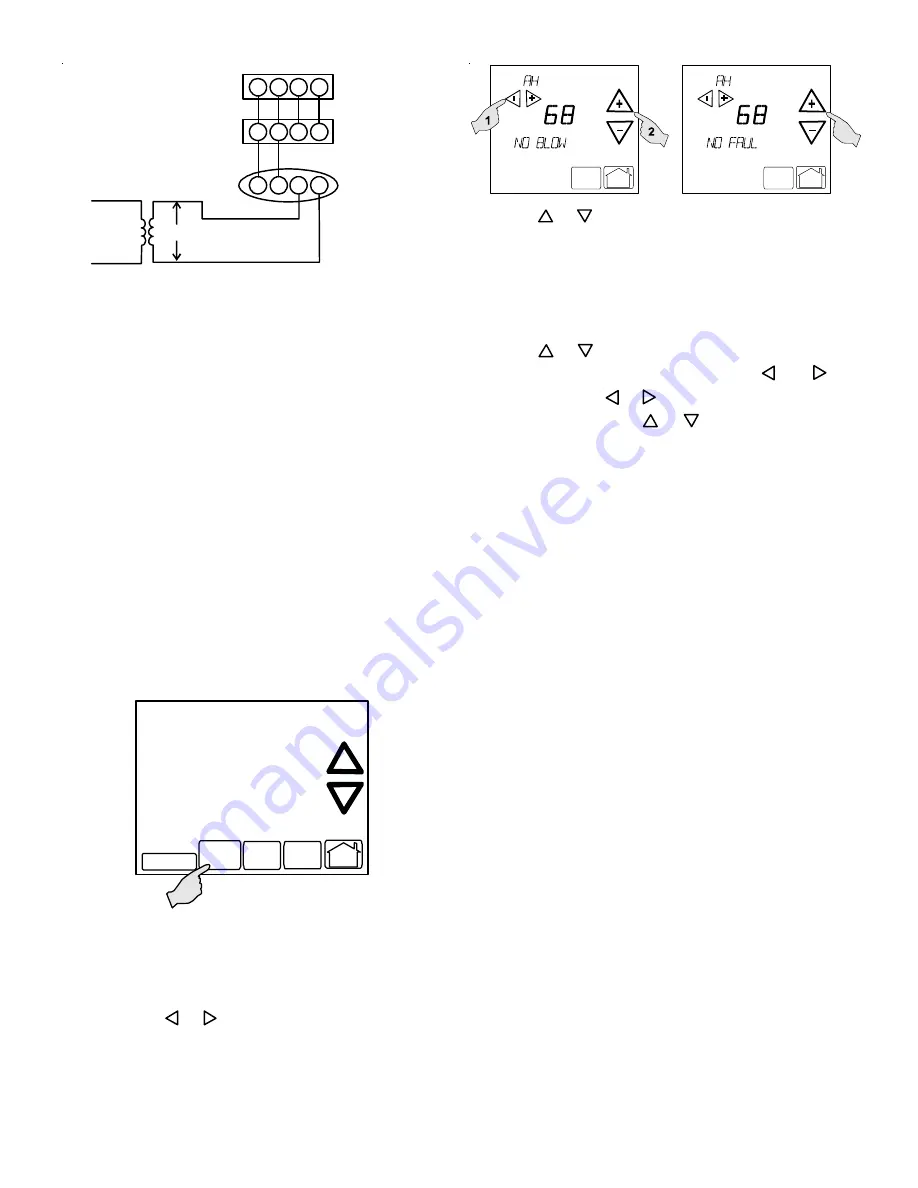
Upon entering the advanced menus, the Advanced Fault
Menu is displayed.  The display will change to the Fault Screen
and indicate any faults that may be present in the indoor or
outdoor equipment.  If a fault is present, the Fault Screen will
show the equipment and an error code with a description of
the fault.  Touch 

_

 or 

+

 keys to view the fault status of any

remaining equipment.  The text 

“NO FAULTS”

 will be scrolled

if no errors are present.

Menu

Run

Schedule

Call for Service

Advanced

Menu

Run

Schedule

Call for Service

Advanced

Touch the 

+

 or 

_

 to step through the list of installed equip-

ment, including the thermostat.  Touch the 

Installer Config

key to enter the submenus for the equipment displayed.  The
text 

“WORKING”

 will be displayed in the scrolling display

area while the data is being retrieved.  The first sub-menu is
then displayed.  See tables below for listing of modular blower
submenus.

Touch the 

+

 or 

_

 to step through the list of submenus and

view settings.  If a setting can be adjusted, 

_

 and 

+

 keys

will appear.  Use the 

_

 or 

+

 keys to adjust the setting to the

desired value.  Touch the 

+

 or 

_

 to step to the next item.

“WORKING”

 will appear as the settings are being updated.

“DONE”

 will appear to indicate the change was accepted.  If

the change is not accepted, the display will show 

“FAIL”

 then

revert to the Fault Screen.

Some parameters being displayed switch between the item
name and the item value.  Touch the 

Hold

 key to momen-

tarily stop the display from switching.

To exit an equipment submenu and revert back to the equip-
ment menus, touch the 

Menu

 key.  Touch Menu again to re-

vert back to the Thermostat Options Menu.  Touch the 

Run

Schedule

 key at any time it is displayed to step out of all

menus and back to the CT™ thermostat Home Screen Dis-
play.

Содержание MBVC

Страница 1: ...1 San Felipe Suite 500 Houston TX 77056 www goodmanmfg com or www amana hac com P N IO 344C Date November 2010 3 Service integrated control module or connecting wiring following the discharge process in step 2 Use caution not to recharge your body with static electricity i e do not move or shuffle your feet do not touch ungrounded objects etc If you come in contact with an ungrounded object repeat...

Страница 2: ...mobile space heater gas water heater etc should not be operated in enclosed areas such as unventilated garages utility rooms or parking areas because of the danger of carbon monoxide CO poisoning resulting from the exhaust emissions If a furnace or air handler is installed in an enclosed area such as a garage utility room or parking area and a carbon monoxide producing device is operated therein t...

Страница 3: ...inet assembly and all attached ductwork 2 Connect refrigerant and condensate drain connections per the evaporator coil installation instructions Ensure refrigerant and drain lines do not interfere with service access to the unit 3 Attach supply ductwork Seal connections between unit and ductwork as required to reduce eliminate air leakage 4 Make electrical connections as specified in Electrical Co...

Страница 4: ... W ARNI NG SO FTW ARE VER TOP FRONT VIEW Figure 6 MBVC Motor Orientation ELECTRICAL CONNECTIONS Consult the local power company and local codes before in stalling this unit All wiring must be in accordance with the National Electrical Code as well as all local codes Knock outs have been provided on side and top of the cabinet for the installation of the electrical conduit If the knockouts on the c...

Страница 5: ...le Stage Heat Thermostat Dehumidistat Optional Remote Condensing Unit Single Stage AC NEU HOT 1 2 R C G W1 Y1 Y2 O DEHUM R C G W1 Y1 R C Y Place Jumper Between Y1 and O for Proper Dehumidification Operation and Proper Ramping Profile Operation W2 Figure 7 Typical Single Stage Cooling with Single Stage Heating Air Handler Integrated Control Module Typical Two Stage Cool Two Stage Heat Thermostat De...

Страница 6: ...ication Sheet applicable to your model Look up the cooling air flow determined in step 2 and find the required cooling speed and adjustment setting Example A MBVC1200 modular blower installed with a 2 5 ton air conditioning system The air flow needed is 1000 CFM Looking at the cooling speed chart for MBVC1200 find the air flow closest to 1000 CFM A cooling airflow of 1000 CFM can be attained by se...

Страница 7: ... ON ON ON ON ON ON C OFF ON OFF ON OFF ON 1 Select model and desired high stage cooling airflow Determine the corresponding tap A B C or D Set dip switches 1 and 2 to the appropriate ON OFF positions 2 Select model and installed electric heater size Set switches 9 10 and 11 to the appropriate ON OFF positions 3 Select the airflow adjustment factor tap A and D are 0 Tap B is 10 Tap C 10 Set dip swi...

Страница 8: ...a blower Return any old or new controls to their containers before touching any ungrounded object DIAGNOSTIC CHART HIGH VOLTAGE TO AVOID PERSONAL INJURY OR DEATH DUE TO ELECTRICAL SHOCK DISCONNECT ELECTRICAL POWER BEFORE PERFORMING ANY SERVICE OR MAINTENANCE WARNING Refer to the Troubleshooting Chart at the end of this manual for assistance in determining the source of unit operational problems Th...

Страница 9: ...gured for a low medium or high continuous fan speed The low medium and high fan speeds correspond to 25 50 and 75 respectively of the air handlers maximum airflow capability During continuous fan operation the thermostat sends a fan request along with the continuous fan demand to the air handler The air handler in turn sends the demand to the ECM motor The ECM motor delivers the requested continuo...

Страница 10: ...oor or outdoor equipment If a fault is present the Fault Screen will show the equipment and an error code with a description of the fault Touch _ or keys to view the fault status of any remaining equipment The text NO FAULTS will be scrolled if no errors are present Menu Run Schedule Call for Service Advanced Menu Run Schedule Call for Service Advanced Touch the or _ to step through the list of in...

Страница 11: ...y only Fault 5 FAULT 5 Next most recent fault For display only Fault 6 FAULT 6 Least recent fault For display only Clear Fault History CLEAR NO or YES Selecting YES clears the fault history NOTE Consecutively repeated faults are shown a maximum of 3 times DIAGNOSTICS Submenu Item Indication for Display Only not User Modifiable Model Number MOD NUM Displays the modular blower model number Serial Nu...

Страница 12: ... Accessing and Navigating the Advanced Features Menus NOTE It is highly recommended that the fault history be cleared when performing maintenance or servicing the modular blower NETWORK TROUBLESHOOTING NOTE Indoor Unit BIAS and TERMINATION Dipswitches are factory set and should not be changed 1 2 ON OFF 3 BIAS BIAS TERM Indoor Unit BIAS and TERMINATION Dipswitches The ComfortNet system is a fully ...

Страница 13: ...a wire s x Modular blower is installed as a legacy traditional system x Check communications wiring data 1 data 2 wires x Check wire connections at terminal block x Verify modular blower installation type legacy traditional or communicating x Check data 1 data 2 voltages x Turn power OFF prior to repair x Verify wires at terminal blocks are securely twisted together prior to inserting into termina...

Страница 14: ...14 APPENDIX A ...

Страница 15: ...g power ON Memory card may be removed after data is loaded x Electric heat airflow is higher than expected on a call for W1 or Auxiliary Emergency heat x Integrated control module LED display provides the indicated error code 1 Flash x Heater kit selected via dipswitches does not heater kits specified in shared data set NO HTR MATCH Ec x Heater kit selected via dipswitches is doesn t match heater ...

Страница 16: ...rd for the specific model x Insert memory card BEFORE turning power ON Memory card may be removed after data is loaded x Error code will be cleared once data is loaded x Operation different than expected or no operation x Integrated control module LED display provides indicated error code x ComfortNet thermostat Call for Service icon illuminated x ComfortNet thermostat scrolls Check Air Handler me...

Страница 17: ...tor blower motor horse power MOTOR MISMATCH b2 x Incorrect circulator blower motor in modular blower x Incorrect shared data set in integrated control module x Verify circulator blower motor horse power is the same specified for the specific modular blower model Replace if necessary x Verify shared data set is correct for the specific model Re populate data using correct memory card if required x ...

Страница 18: ...emperatures x Check power to modular blower Verify line voltage to blower is within the range specified on the modular blower rating plate x See Installation Instructions for installation requirements x Turn power OFF prior to repair x Modular blower fails to operate x Integrated control module LED display provides indicated error code x ComfortNet thermostat Call for Service icon illuminated x Co...

Страница 19: ...MOSTAT CONNECTIONS GN GREEN TRANSFORMER HEAT SEQUENCER R2 GND FIELD GND INTERNAL TO TWO STAGE INTEGRATED CONTROL MODULE TX 3 DEHUM C W1 1 5 FIELD SPLICE W1 CFM LED R Y1 NOTES LOW VOLTAGE 24V 4 GND W1 24 V 3 A 4 RX 2 COLOR CODES Y2 TH STATUS LED 5 TO RECALL THE LAST 6 FAULTS MOST RECENT TO LEAST RECENT DEPRESS SWITCH FOR MORE THAN 2 SECONDS WHILE IN STANDBY N THERMOSTAT INPUTS 208 VAC Y1 VDC 1 TH I...

Страница 20: ...product failure They are simple to service and forgiving to operate We use quality materials and components Finally every unit is run tested before it leaves the factory That s why we know There s No Better Quality Visit our websites at www goodmanmfg com or www amana hac com for information on Products Warranties Customer Services Parts Contractor Programs and Training Financing Options 2009 2010...

Отзывы: