background image

16

Fonctionnement (suite)

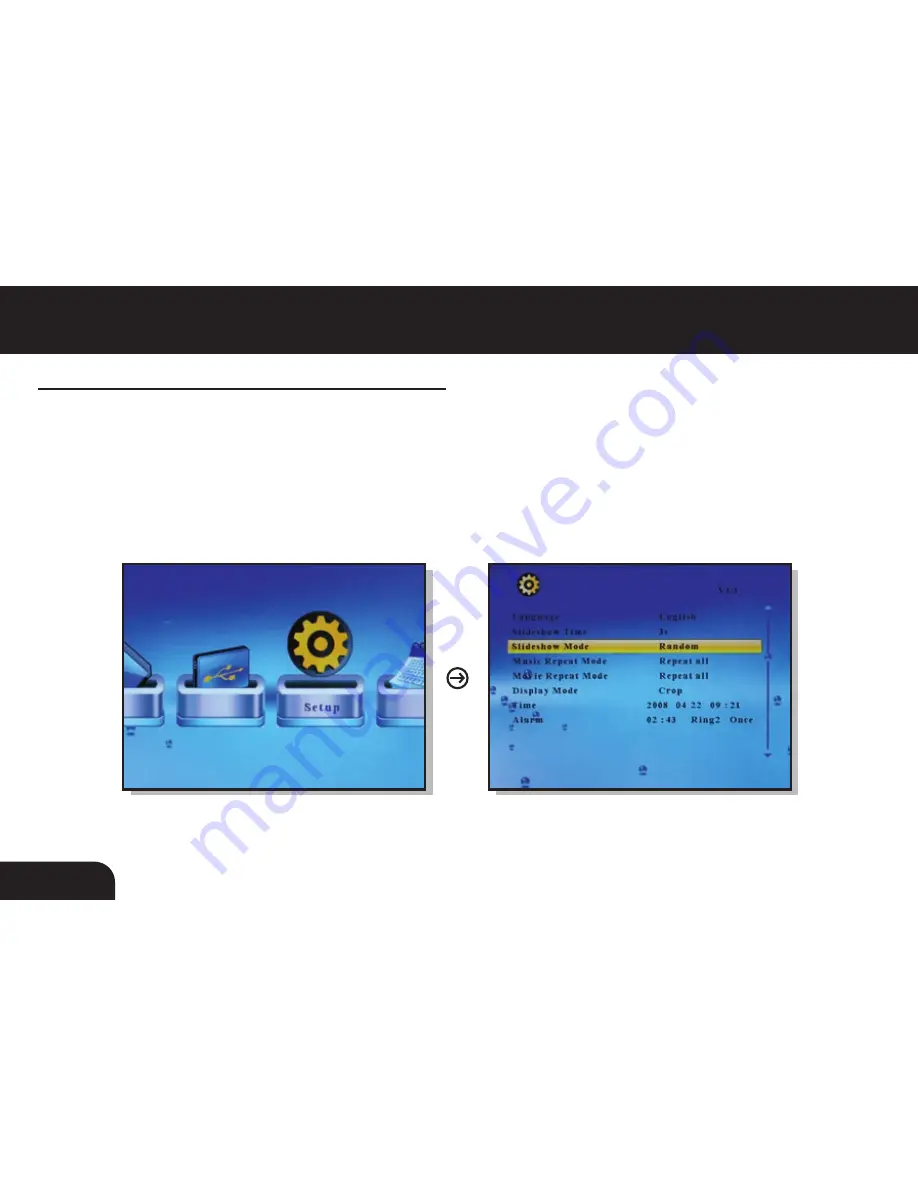
Ajustement de l’effet de transition de l’image

1. Sélectionner “

Setup

 [Configuration]

 depuis le menu principal et appuyer sur “

Enter

 [Entrée]

.

2. Sélectionner “

Slideshow Mode

”.

3. Utiliser les flèches Haut ou Bas pour sélectionner votre effet de transition d’image désiré, puis

    appuyer sur “

Enter

 [Entrée]

.

4. Appuyer “

Menu

” retourner au menu principal.

Содержание ADMPF110

Страница 1: ...10 5 11 12 Digital Photo Frame models ADMPF110 ADMPF110F ADMPF210 ADMPF210F ADMPF311F ADMPF312F Instructional Manual mnl M10015 M10057 M10039 M10058 M10053 M10063...

Страница 2: ...ing Which Media to Use Viewing Photos Adjust Speed of Slideshow Adjust Slide Transition Effect Listen to Music Music Play Mode View Videos Video Play Mode Copy Files Between Memory Cards Internal Memo...

Страница 3: ...begin In addition to making sure only quality materials are used for manufacturing Aluratek is also dedicated to provide the best customer satisfaction and support The goal of Aluratek is to embody S...

Страница 4: ...r memory card and USB hard drive thumb drive to easily transfer your favorite pictures music or videos with hi speed USB 2 0 Can be displayed either on a table top with the included stand or mounted o...

Страница 5: ...other memory cards Package Contents Your order has been carefully packaged and inspected The following should be included in your pack age Please inspect the contents of the package to ensure that you...

Страница 6: ...13 6 7 10 5 viewing area Quality wood frame Built in speakers Sensor Menu selection buttons Power on off switch Power adapter port USB port USB mini B port Memory card slots Frame stand Wall mount ho...

Страница 7: ...12 13 6 8 11 viewing area Quality wood frame Built in speakers LED Menu selection buttons Power on off switch Power adapter port USB mini B port USB port Memory card slots Frame stand Wall mount hole...

Страница 8: ...14 9 12 viewing area Quality wood frame Built in speakers LED Menu selection buttons Power on off switch Power adapter port USB mini B port USB port Memory card slots Frame stand Wall mount holes Remo...

Страница 9: ...photo music and video modes 4 Menu Returns to the previous menu 5 OSD On Screen Display 6 Slide Show Automatically places photos in slideshow format 7 Up Down Left Right Arrows Use arrow keys to navi...

Страница 10: ...of the following memory cards Compact Flash CF Type I II Ultra and Extreme Secure Digital SD MMC RS MMC Memory Stick MS Memory Stick Pro Memory Stick Duo Memory Stick Pro Duo XD Adapter required Conne...

Страница 11: ...the power adapter in then turn the power switch on STEP 2 Please insert your memory card SD MMC CF MS or XD at this time You may also insert a USB thumb ash drive into the on board USB 2 0 port which...

Страница 12: ...The internal memory is usually the last one in the list Simply drag and drop the photo music and or video les you would like to have stored on your digital photo frame at this time You may add or remo...

Страница 13: ...screen 2 Select the photo you desire by using the up and down keys on your remote control 3 Once you have selected your photo press Enter 4 You may zoom in on your photos by pressing the Zoom button o...

Страница 14: ...deshow 1 Select Setup and press Enter from the main menu 2 Use the up or down key to select Slideshow Time 3 Use the left or right key to select the time interval from 3sec to 1hour then press Enter 4...

Страница 15: ...ion Effect 1 Select Setup and press Enter from the main menu 2 Use the up or down key to select Slideshow Mode 3 Use the left or right key to select your desired slide transition effect then press Ent...

Страница 16: ...n your media will appear on the screen Use the up and down keys on the remote control to select the desired song then press Enter You can press the to pause play 3 The next song will play automaticall...

Страница 17: ...1 Select Setup and press Enter from the main menu 2 Use the up or down key to select Music Repeat Mode 3 Use the left or right key to select Repeat One Repeat All or Repeat Off then press Enter 4 Pre...

Страница 18: ...n Use the up and down keys on the remote control to select the desired video then press Enter You can press the to pause play 3 You may zoom in on the video by pressing the Zoom button on the remote 4...

Страница 19: ...1 Select Setup and press Enter from the main menu 2 Use the up or down key to select Movie Repeat Mode 3 Use the left or right key to select Repeat One Repeat All or Repeat Off then press Enter 4 Pre...

Страница 20: ...sing the up and down keys on your remote control and press the key You will see a next to the le name 3 Press the OSD button 4 Select Copy and press Enter on the remote 5 Select the memory card or int...

Страница 21: ...photo you want to delete using the up and down keys on your remote control and press the key You will see a next to the le name 3 Press the OSD button 4 Select Delete and press Enter on the remote 5...

Страница 22: ...e Display Language 1 Select Setup and press Enter from the main menu 2 Use the up or down key to select Language 3 Use the left or right key to select the desired language then press Enter 4 Press Men...

Страница 23: ...p and press Enter from the main menu 2 Use the up or down key to select Time 3 Use the left or right key to select what you want to change and use the up or down key to change to the correct value the...

Страница 24: ...3 Use the left or right key to select what you want to change and use the up or down key to change to the correct value then press Enter The 1st number is the hour follow by the minute The next item...

Страница 25: ...up from the main menu and press Enter on the remote control 2 Scroll to Auto Power On or Auto Power Off and press the button on the remote control 3 Use the up or down key to set the time in 24H forma...

Страница 26: ...Mode Setup 1 Select Setup and press Enter from the main menu 2 Use the up or down key to select Display Mode 3 Use the left or right key to select Cinema Crop and Stretch then press Enter 4 Press Menu...

Страница 27: ...lor Setup 1 Select Setup from the main menu and press Enter on the remote control 2 Scroll to the desired option Brightness Contrast or Saturation and press the or button on the remote control to sele...

Страница 28: ...ther assistance please contact Aluratek support department prior to returning this device E mail support aluratek com Web www aluratek com support Local Irvine CA 949 419 6504 Toll free 1 866 580 1978...

Страница 29: ...energy and if not installed and used in accordance with the instruction may cause harmful interference to radio communications However there is no guarantee that interference will not occur in a part...

Страница 30: ...ne other than Aluratek D Products sold AS IS or WITH FAULTS IN NO EVENT SHALL ALURATEK S LIABILITY EXCEED THE PRICE PAID FOR THE PRODUCT FROM DIRECT INDIRECT SPECIAL INCIDENTAL OR CONSEQUENTIAL DAMAGE...

Страница 31: ...Aluratek Inc 12A Mauchly Irvine CA 92618 sales aluratek com 949 419 6504 of ce 949 419 6477 fax aluratek com...

Страница 32: ...Cadre de Photos Num rique de 10 5 po 11 po 12 po Mod les ADMPF110 ADMPF110F ADMPF210 ADMPF210F ADMPF311F ADMPF312F Manuel d instructions mnl M10015 M10057 M10039 M10058 M10053 M10063...

Страница 33: ...la vitesse du diaporama Ajustement de l effet de transition de l image coute de la musique Mode jouer musique Visualisation de vid os Mode r p ta vid o Copie de chiers entre les cartes m moires m moi...

Страница 34: ...Que ce soit au travail ou la maison amusez vous En plus de s assurer d utiliser que des mat riaux de qualit pour la fabrication Aluratek s engage aussi offrir la meilleure satisfaction aux clients de...

Страница 35: ...che votre ordinateur personnel carte m moire et lecteur USB et facilite le transfert de vos images de votre musique ou de vos vid os pr f r s avec un lecteur USB 2 0 haute vitesse Peut tre pos sur une...

Страница 36: ...tres cartes m moires Contenu Votre commande a t emball e et inspect e avec soin Voici les articles contenus dans l emballage Veuillez v ri er le contenu de l emballage pour vous assurer que vous avez...

Страница 37: ...e qualit Haut parleurs int gr s D tecteur Touches de s lection par menu Touche de Mise en marche Arr t Port d adaptateur de courant Port USB 1 Port USB 2 mini B Carte m moire avec fentes Support sur p...

Страница 38: ...s de qualit Haut parleurs int gr s DEL Touches de s lection par menu Touche de Mise en marche Arr t Port d adaptateur de courant Port USB 2 mini B Port USB 1 Carte m moire avec fentes Support sur pied...

Страница 39: ...s de qualit Haut parleurs int gr s DEL Touches de s lection par menu Touche de Mise en marche Arr t Port d adaptateur de courant Port USB 2 mini B Port USB 1 Carte m moire avec fentes Support sur pied...

Страница 40: ...et vid o 4 Menu Retourner au menu precedent 5 OSD On Screen Display 6 Slideshow Diaporama Place automatiquement les photos en format diaporama 7 Up Down Left Right Arrows Fl ches Haut Bas Gauche Droi...

Страница 41: ...ne des cartes m moires suivantes Compact Flash CF Type I II Ultra and Extreme Secure Digital SD MMC RS MMC Memory Stick MS Memory Stick Pro Memory Stick Duo Memory Stick Pro Duo XD Adaptateur requis B...

Страница 42: ...ande Fonctionnement Con guration tape 1 Brancher l adaptateur de courant puis mettre en marche Un t moin DEL rouge appara tra lorsque l appareil sera en marche tape 2 Veuillez ins rer maintenant votre...

Страница 43: ...oto la musique ou le chier vid o que vous d sirez stocker sur votre cadre de photo num rique Vous pouvez en tout temps ajouter ou supprimer ces chiers en le rebran chant votre port USB Remarque Vous d...

Страница 44: ...la touche Photo de votre t l commande 2 S lectionner la photo d sir e en utilisant les ches de votre t l commande 3 Apr s avoir s lectionn votre photo appuyer sur Enter Entr e 4 Vous pouvez faire un z...

Страница 45: ...puyer sur la touche Setup Con guration puis sur Enter Entr e 2 Utiliser les ches Haut ou Bas pour s lectionner la Slideshow Time 3 Utiliser la touche ou pour entrer l heure d sir e et appuyer sur Ente...

Страница 46: ...lectionner Setup Con guration depuis le menu principal et appuyer sur Enter Entr e 2 S lectionner Slideshow Mode 3 Utiliser les ches Haut ou Bas pour s lectionner votre effet de transition d image d s...

Страница 47: ...ppara tra l cran Utiliser les ches Haut et Bas de la t l commande pour s lectionner la chanson d sir e puis appuyer sur Enter Entr e Vous pouvez appuyer a Jouer Pause 3 La prochaine chanson jouera aut...

Страница 48: ...puis le menu principal et appuyer sur Enter Entr e 2 Utiliser les ches Haut ou Bas pour s lectionner la Music Repeat Mode 3 Utiliser la touche ou pour s lectionner la Repeat All ou Repeat Off puis app...

Страница 49: ...hes Haut et Bas de la t l commande pour s lectionner la chanson d sir e puis appuyer sur Enter Entr e Vous pouvez appuyer a Jouer Pause 3 Vous pouvez faire un zoom sur vos vid o en appuyant sur Zoom Z...

Страница 50: ...puis le menu principal et appuyer sur Enter Entr e 2 Utiliser les ches Haut ou Bas pour s lectionner la Movie Repeat Mode 3 Utiliser la touche ou pour s lectionner la Repeat All ou Repeat Off puis app...

Страница 51: ...ou photo que vous d sirez copier Chaque chier s lectionn doit comprendre la n du nom de chier 3 Appuyer sur la touche OSD 4 S lectionner Copy Copier et appuyer sur Enter Entr e 5 S lectionner l empla...

Страница 52: ...sur la touche de chaque chier MP3 ou photo que vous d sirez copier Chaque chier s lectionn doit comprendre la n du nom de chier 3 Appuyer sur la touche OSD 4 S lectionner Delete Supprimer et appuyer...

Страница 53: ...p Con guration depuis le menu principal et appuyer sur Enter Entr e 2 Utiliser les ches Haut ou Bas pour s lectionner la Language 3 Utiliser la touche ou pour entrer langue d sir e et appuyer sur Ente...

Страница 54: ...nner Setup Con guration depuis le menu principal et appuyer sur Enter Entr e 2 Utiliser les ches Haut ou Bas pour s lectionner la Time 3 Utiliser la touche ou pour entrer l heure d sir e et appuyer su...

Страница 55: ...Con guration depuis le menu principal et appuyer sur Enter Entr e 2 Utiliser les ches Haut ou Bas pour s lectionner la Alarm 3 Utiliser la touche ou pour r gler l heure en format 24H et appuyer sur E...

Страница 56: ...principal et appuyer sur Enter Entr e 2 Faire d ler jusqu Auto Power On Mise en marche ou Auto Power Off Mise en arr t puis appuyer sur la touche 3 Vuillez utiliser la touche ou pour r gler l heure e...

Страница 57: ...n depuis le menu principal et appuyer sur Enter Entr e 2 Utiliser les ches Haut ou Bas pour s lectionner la Display Mode 3 Utiliser la touche left ou right pour s lectionner la Cinema Crop ou Stretch...

Страница 58: ...nt suite Con guration des couleurs 1 S lectionner Setup Con guration depuis le menu principal et appuyer sur Enter Entr e 2 Faire d ler jusqu aux options d sir es 3 Utiliser la touche ou pour entrer l...

Страница 59: ...lez communiquer avec le service de soutien Aluratek avant de retourner votre appareil Courriel support aluratek com Site Web www aluratek com support Num ro local Irvine CA 949 419 6504 Num ro sans fr...

Страница 60: ...est pas cor rectement install et utilis il peut causer des interf rences nuisibles dans les communications radio Toutefois il est impossible de garantir que de telles interf rences ne surviendront pas...

Страница 61: ...paration par une personne autre que Aluratek D Les produits sont venus TELS QUELS ou SANS D FAUT EN AUCUN CAS LA RESPONSABILIT D ALURATEK N EXC DE LE PRIX PAY POUR LE PRODUIT LA SUITE D UN DOMMAGE DIR...

Страница 62: ...Aluratek Inc 12A Mauchly Irvine CA 92618 sales aluratek com 949 419 6504 of ce 949 419 6477 fax aluratek com...

Отзывы: