Alto SPIN 43 Скачать руководство пользователя страница 6

19

2 Description

2.1

Purpose of the machine

All single-disc cleaners are
designed to clean and care for
floor coverings inside buildings
only.

Any other use is considered as
improper use. The manufacturer
accepts no liability for any
damage resulting from such
use. The risk for such use is
borne solely by the user.

The cleaners are suitable for
commercial use, e.g. in hotels,
schools, hospitals, etc.

Proper use also includes proper
operation, servicing and repairs
as specified by the
manufacturer.

Observe the relevant accident
prevention regulations and any
other generally accepted safety
and working regulations.

The manufacturer accepts no
liability for damage resulting
from any changes made to the
cleaner by the user.

Before using the cleaner, check
whether floor coverings are
suitable for this cleaning
technique. Beware of area
compression in point-elastic
floors, e.g. in gym halls.

The manufacturer accepts no
liability for damage to the
cleaner and the cleaned floor
that is caused by the use of
wrong brushes and cleaning
agents.

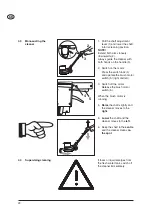
1 Shaft adjustment lever
2 Guide handle
3 Switch lock
4 Socket (SPIN 43 HS)
5 Brush motor switch
6 Power cord
7 Power cord hook
8 Shaft adjustment joint
9 Wheels
10 Connector for waste hose
11 Speed switch (SPIN 43 DS)
12 Shaft

2.2

Product liability

Please note that the cleaners
may be used for their intended
purpose only. If the cleaners are
not used for their intended
purpose, the user has the sole

Accessories
(not included):
13

Spraymaster

14

Tank lever

15

Tank bracket

16

Liquid tank

17

Waste hose

18

Brush

19

Drive plate for pad

20

Pad

responsibility. The manufacturer
accepts no liability whatsoever.

+

2.3

Operating elements

Содержание SPIN 43

Страница 1: ...2 Istruzioni sull uso 55 Driftsinstruks 69 Bruksanvisning 81 Driftsvejledning 94 K ytt ohje 107 Navodilo za uporabo 120 Uputstvo za rad 133 Prev dzkov n vod 146 Provozn n vod 159 Instrukcja obs ugi 17...

Страница 2: ...0 1 2 4 5 6 7 8 9 10 12 1 2 11 13 14 15 16 17 18 19 20 3...

Страница 3: ...Operating elements 19 3 1 Assembly 20 3 2 Transport 20 4 1 Electrical connections 21 4 2 Using accessories 21 4 3 Manoeuvring the cleaner 22 4 4 Supervising cleaning 22 5 1 Cleaning techniques 23 5 2...

Страница 4: ...e of the cleaner please read the information and recommendations in these operating instructions This ensures that you are well acquainted with the cleaner and can use it efficiently Care and maintena...

Страница 5: ...hose specified by the manufacturer When replacing couplings or power cords ensure that splash water protection and mechanical strength are adequate Do not start the cleaner unless the power supply in...

Страница 6: ...ng the cleaner check whether floor coverings are suitable for this cleaning technique Beware of area compression in point elastic floors e g in gym halls The manufacturer accepts no liability for dama...

Страница 7: ...n upright position to prevent it from catching on elevator shaft walls 3 1 Assembly For transport reasons the motor head and the shaft are supplied not assembled 1 Loosen the hexagon socket screws 1 i...

Страница 8: ...d the brush flange are vertically aligned 3 Lower the cleaner on to the accessory 4 Pull the shaft adjustment lever 1 and lower the shaft into its cleaning position NOTE Extend both arms loosely downw...

Страница 9: ...h lock 4 and operate the brush motor switch 5 right and left 3 Switch off the motor Release the brush motor switch 5 When the brush motor is running 4 Raise the shaft slightly and the cleaner moves to...

Страница 10: ...hat penetrates into the pile no superficial dust or fluff 5 1 Cleaning techniques 5 1 2 Routine cleaning Routine cleaning means cleaning work at defined intervals Aim results Different aim results dep...

Страница 11: ...Std scrubbing brush Std scrubbing brush red pad Cleaning agent Alto Tornado Alto Quick fresh Comments Application Thorough cleaning Routine cleaning Spraying 5 2 3 Linoleum Accessories SPIN 43 and SPI...

Страница 12: ...t 2 to the upright position 6 2 Removing accessories 1 Tip the cleaner on to its wheels and briefly operate the brush motor switch 1 The accessory 2 disengages 6 3 Rolling up the power cord Danger of...

Страница 13: ...ce and repair work in particular repairs concerning electrical faults to Alto customer service or authorized persons 8 Troubleshooting Fault Cause Remedy Brush motor does not start Brush motor does no...

Страница 14: ...Our general conditions of business are applicable with regard to the guarantee Subject to change as a result of technical advances 9 3 Accessories Description Standard scrubbing brush 0 6 PP Shampooi...

Страница 15: ...ALTO Deutschland GmbH Guido Oberdorfer Stra e 2 8 D 89287 Bellenberg Product Model Description The design of the machine complies with the following regulations Harmonized standards National standards...

Страница 16: ...7 68 86 47 13 E mail sales alto uk com HONG KONG ALTO Hong Kong RM 602 Tower B Regent Ctr 70 Ta Chuen Ping Street Kwai Chung Hong Kong Tel 852 26 10 10 42 Fax 852 26 10 10 47 E mail waphk netvigator c...

Отзывы: