DXR Drainback
Page 14
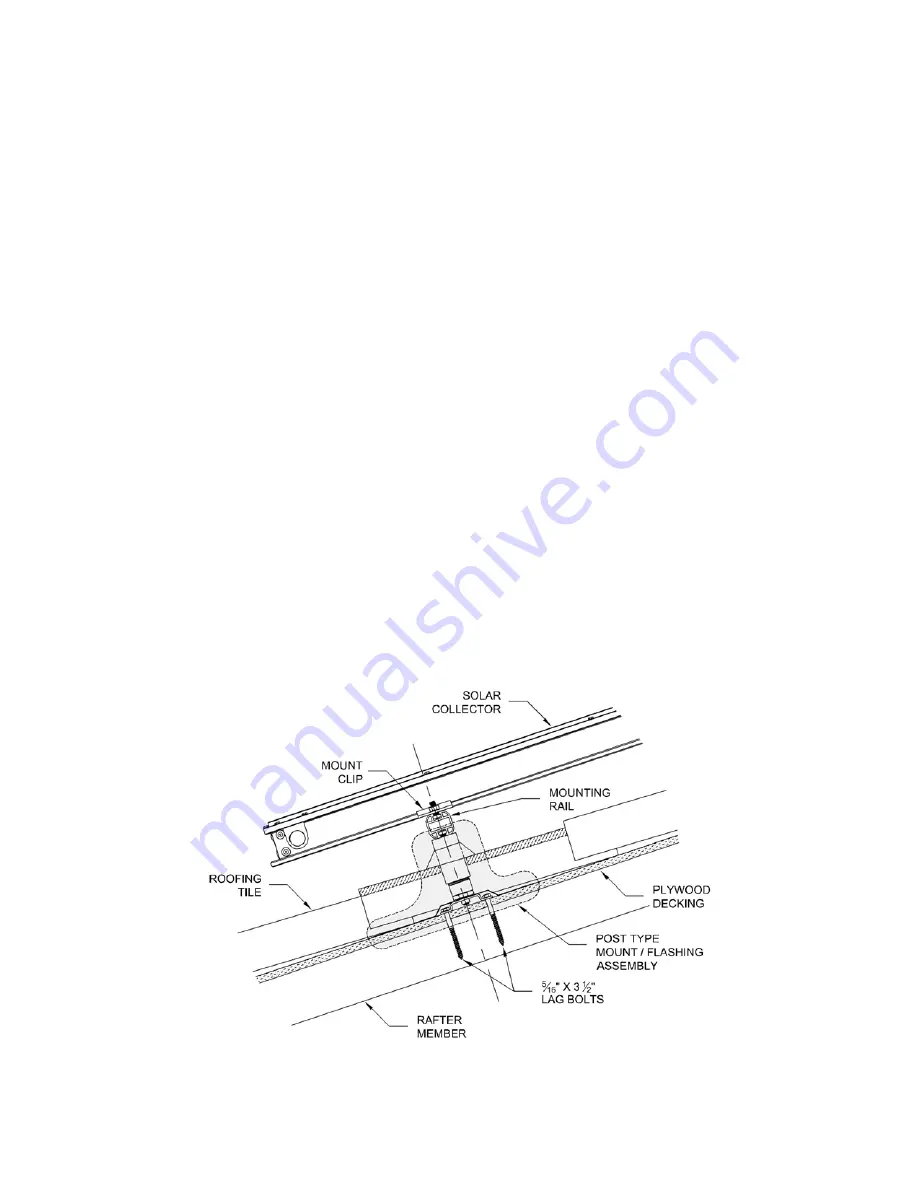
ARRAY MOUNTING ON TILE / METAL ROOFS
Tile and metal roofs are a little more difficult to mount solar collectors on but following this procedure will render a
leak free installation. The solar panels are mounted on two rails located about a foot and half from the top and
bottom of the solar collectors. The collectors are secured to the rails using rack mount hardware. The 1 ¾”
aluminum mounting rails are anchored to the roof by using post-type, mount / flashing assemblies (preferred) or
stainless steel 3/8” hanger bolts. Mounting rails are to be anchored having a sufficient number of mount points to
transfer the projected loads.
Procedure:
1.
Locate the roof rafters beneath the tile where the mount assembly will be attached. Mark the tiles at the
points where the mount assemblies are to be installed.
2.
Using a ¼” x 6” drill bit, drill a pilot hole through the tile and at a sufficient depth to intersect the roof
decking, marking it.
3.
Using a 2” hole saw, drill a hole through the tile, then remove tile and place aside.
4.
Using the ¼” hole/mark as a center point for alignment, fasten the mount base plate through the decking
and into the rafter members with (2) 5/16” x 3 ½” lag bolts.
5.
Apply a liberal amount of roofing caulk or mastic to the bottom of the roof flashing and position it over the
mount base plate. Secure its position with several roofing nails and screw in the double stud bolt with the
silicone washer against the flashing.
6.
Attach the male section of the threaded standoff to the open thread of the double stud bolt.
7.
Replace the tile and thread the female section onto the male section through the hole in the tile.
8.
Place the rubber sealing boot onto the threaded standoff.
9.
Thread a 3/8” x 1” stainless steel bolt into the top end of the threaded standoff allowing for sufficient space
to slide the mounting rail onto the head of the bolt.
10.
Install additional mount assemblies using the methods described in steps 1-9.
11.
Slide a section of mounting rail across the bolt heads spanning the threaded standoffs and secure into
position by turning the standoffs in the in the counter-clockwise direction. Repeat for each mounting rail
section.
NOTE: Where it is not possible to locate the rafters, use the spanner mount method. Be sure to follow the
instruction for the proper use and placement of spacer blocks.
Содержание EAGLESUN
Страница 2: ...DXR Drainback Page 2 this page left blank intentionally ...
Страница 6: ...DXR Drainback Page 6 INSTALLATION INSTRUCTIONS ...
Страница 20: ...DXR Drainback Page 20 OPERATION INSTRUCTIONS Refer to the diagrams on pages 30 32 for part identifications ...
Страница 22: ...DXR Drainback Page 22 SERVICE MAINTENANCE PROCEDURES ...


