background image


DE2-70 User Manual


46 


found on the manufacturer's web site, or in the 

Datasheet/VGA DAC

 folder on the 

DE2-70 System 

CD-ROM

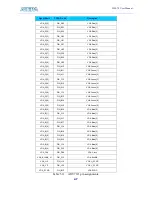
. The pin assignments between the Cyclone II FPGA and the ADV7123 are listed in Table 

5.11. An example of code that drives a VGA display is described in Sections 6.2, 6.3 and 6.4. 


Figure 5.13.  VGA horizontal timing specification. 


VGA mode 

Horizontal Timing Spec 

Configuration Resolution(HxV)

a(us)

b(us)

c(us)

d(us)

Pixel clock(Mhz) 

VGA(60Hz) 

640x480 

3.8 

1.9 

25.4

0.6

25   (640/c) 

VGA(85Hz) 

640x480 

1.6 

2.2 

17.8

1.6

36   (640/c) 

SVGA(60Hz) 

800x600 

3.2 

2.2 

20 

40   (800/c) 

SVGA(75Hz) 

800x600 

1.6 

3.2 

16.2

0.3

49   (800/c) 

SVGA(85Hz) 

800x600 

1.1 

2.7 

14.2

0.6

56   (800/c) 

XGA(60Hz) 

1024x768 

2.1 

2.5 

15.8

0.4

65   (1024/c) 

XGA(70Hz) 

1024x768 

1.8 

1.9 

13.7

0.3

75   (1024/c) 

XGA(85Hz) 

1024x768 

1.0 

2.2 

10.8

0.5

95   (1024/c) 

1280x1024(60Hz) 

1280x1024 

1.0 

2.3 

11.9

0.4

108  (1280/c) 

Table 5.9.    VGA horizontal timing specification. 


VGA mode 

Vertical Timing Spec 

Configuration 

Resolution  (HxV) 

a(lines)

b(lines) 

c(lines)

d(lines) 

VGA(60Hz) 640x480  2 

33 

480 

10 

VGA(85Hz) 640x480  3 

25 

480 

SVGA(60Hz) 800x600  4 

23 

600 

SVGA(75Hz) 800x600  3 

21 

600 

SVGA(85Hz) 800x600  3 

27 

600 

XGA(60Hz) 1024x768  6 

29 

768 

XGA(70Hz) 1024x768  6 

29 

768 

XGA(85Hz) 1024x768  3 

36 

768 

1280x1024(60Hz) 1280x1024 

3  38  1024  1 

Table 5.10.    VGA vertical timing specification. 


Содержание DE2-70

Страница 1: ...Altera DE2 70 Board Version 1 01 Copyright 2007 Terasic Technologies ...

Страница 2: ... USB Monitoring 18 3 6 PS2 Device 19 3 7 SD CARD 20 3 8 Audio Playing and Recording 21 3 9 Overall Structure of the DE2 70 Control Panel 23 Chapter 4 DE2 70 Video Utility 25 4 1 Video Utility Setup 25 4 2 VGA Display 26 4 3 Video Capture 27 4 4 Overall Structure of the DE2 70 Video Utility 28 Chapter 5 Using the DE2 70 Board 30 5 1 Configuring the Cyclone II FPGA 30 5 2 Using the LEDs and Switches...

Страница 3: ...ns 66 6 1 DE2 70 Factory Configuration 66 6 2 TV Box Demonstration 67 6 3 TV Box Picture in Picture PIP Demonstration 69 6 4 USB Paintbrush 72 6 5 USB Device 74 6 6 A Karaoke Machine 76 6 7 Ethernet Packet Sending Receiving 78 6 8 SD Card Music Player 80 6 9 Music Synthesizer Demonstration 83 6 10 Audio Recording and Playing 87 Chapter 7 Appendix 90 7 1 Revision History 90 7 2 Copyright Statement ...

Страница 4: ...E2 70 package contains all components needed to use the DE2 70 board in conjunction with a computer that runs the Microsoft Windows software 1 1 Package Contents Figure 1 1 shows a photograph of the DE2 70 package Figure 1 1 The DE2 70 package contents ...

Страница 5: ... software Bag of six rubber silicon covers for the DE2 70 board stands The bag also contains some extender pins which can be used to facilitate easier probing with testing equipment of the board s I O expansion headers Clear plastic cover for the board 12V DC wall mount power supply 1 2 The DE2 70 Board Assembly To assemble the included stands for the DE2 70 board Assemble a rubber silicon cover a...

Страница 6: ...u can get help if you encounter problems Altera Corporation 101 Innovation Drive San Jose California 95134 USA Email university altera com Terasic Technologies No 356 Sec 1 Fusing E Rd Jhubei City HsinChu County Taiwan 302 Email support terasic com Web DE2 70 terasic com ...

Страница 7: ... Supply Connector RUN PROG Switch for JTAG AS Modes 18 Red LEDs Expansion Header 1 Altera Cyclone II FPGA with 70K LEs VGA 10 bit DAC 28Mhz Oscillator 2Mbyte SSRAM 32Mbyte SDRAMx2 4 Push button Switches Ethernet 10 100M Controller TV Decoder NTSC PAL X2 PS2 Port RS 232 Port Ethernet 10 100M Port USB Host Port USB Device Port USB Blaster Port VGA Out Video In 2 Video In 1 Line In Mic in Line Out Lo...

Страница 8: ...t for standard I O interfaces and a control panel facility for accessing various components Also software is provided for a number of demonstrations that illustrate the advanced capabilities of the DE2 70 board In order to use the DE2 70 board the user has to be familiar with the Quartus II software The necessary knowledge can be acquired by reading the tutorials Getting Started with Altera s DE2 ...

Страница 9: ... II 2C70 FPGA 68 416 LEs 250 M4K RAM blocks 1 152 000 total RAM bits 150 embedded multipliers 4 PLLs 622 user I O pins FineLine BGA 896 pin package Serial Configuration device and USB Blaster circuit Altera s EPCS16 Serial Configuration device On board USB Blaster for programming and user API control JTAG and AS programming modes are supported ...

Страница 10: ...ss Accessible as memory for the Nios II processor and by the DE2 70 Control Panel SD card socket Provides SPI and 1 bit SD mode for SD Card access Accessible as memory for the Nios II processor with the DE2 70 SD Card Driver Pushbutton switches 4 pushbutton switches Debounced by a Schmitt trigger circuit Normally high generates one active low pulse when the switch is pressed Toggle switches 18 tog...

Страница 11: ...ats 8 bit ITU R BT 656 YCrCb 4 2 2 output HS VS and FIELD Applications DVD recorders LCD TV Set top boxes Digital TV Portable video devices and TV PIP picture in picture display 10 100 Ethernet controller Integrated MAC and PHY with a general processor interface Supports 100Base T and 10Base T applications Supports full duplex operation at 10 Mb s and 100 Mb s with auto MDIX Fully compliant with t...

Страница 12: ... allows users to see quickly if the board is working properly To power up the board perform the following steps 1 Connect the provided USB cable from the host computer to the USB Blaster connector on the DE2 70 board For communication between the host and the DE2 70 board it is necessary to install the Altera USB Blaster driver software If this driver is not already installed on the host computer ...

Страница 13: ...tch SW17 to the DOWN position you should hear a 1 kHz sound Set the toggle switch SW17 to the UP position and connect the output of an audio player to the Line in connector on the DE2 70 board on your headset you should hear the music played from the audio player MP3 PC iPod or the like You can also connect a microphone to the Microphone in connector on the DE2 70 board your voice will be mixed wi...

Страница 14: ...t it to perform required tasks The control codes include one sof file and one elf file To download the codes just click the Download Code button on the program The program will call Quartus II and Nios II tools to download the control codes to the FPGA board through USB Blaster USB 0 connection The sof file is downloaded to FPGA The elf file is downloaded to either SDRAM U2 or SSRAM according to t...

Страница 15: ...0 board Figure 3 1 The DE2 70 Control Panel The concept of the DE2 70 Control Panel is illustrated in Figure 3 2 The Control Codes that performs the control functions is implemented in the FPGA board It communicates with the Control Panel window which is active on the host computer via the USB Blaster link The graphical interface is used to issue commands to the control codes It handles all reques...

Страница 16: ...nd read SD CARD specification information The feature of reading writing a word or an entire file from to the Flash Memory allows the user to develop multimedia applications Flash Audio Player Flash Picture Viewer without worrying about how to build a Memory Programmer 3 2 Controlling the LEDs 7 Segment Displays and LCD Display A simple function of the Control Panel is to allow setting the values ...

Страница 17: ...Choosing the 7 SEG tab leads to the window in Figure 3 4 In the tab sheet directly use the Up Down control and Dot Check box to specified desired patterns the 7 SEG patterns on the board will be updated immediately Figure 3 4 Controlling 7 SEG display ...

Страница 18: ...function is suspected Thus it can be used for troubleshooting purposes 3 3 Switches and Buttons Choosing the Button tab leads to the window in Figure 3 6 The function is designed to monitor the status of switches and buttons in real time and show the status in a graphical user interface It can be used to verify the functionality of the switches and buttons Press the Start button to start button sw...

Страница 19: ... troubleshooting purposes 3 4 SDRAM SSRAM Flash Controller and Programmer The Control Panel can be used to write read data to from the SDRAM SSRAM and FLASH chips on the DE2 70 board We will describe how the SDRAM U1 may be accessed the same approach is used to access the SDRAM U2 SRAM and FLASH Click on the Memory tab and select SDRAM U1 to reach the window in Figure 3 7 Please note the target me...

Страница 20: ...ess box 2 Specify the number of bytes to be written in the Length box If the entire file is to be loaded then a checkmark may be placed in the File Length box instead of giving the number of bytes 3 To initiate the writing of data click on the Write a File to Memory button 4 When the Control Panel responds with the standard Windows dialog box asking for the source file specify the desired file in ...

Страница 21: ...before writing data to it 3 5 USB Monitoring The Control Panel provides users a USB monitoring tool which monitors the real time status of a USB mouse connected to the DE2 70 board The movement of the mouse and the status of the three buttons will be shown in the graphical and text interface The mouse movement is translated as a position x y with range from 0 0 1023 767 This function can be used t...

Страница 22: ...implemented This function can be used to verify the functionality of the PS2 Interface Please follow the steps below to exercise the PS2 device 1 Choosing the PS2 tab leads to the window in Figure 3 9 2 Plug a PS2 Keyboard to the FPGA board Then 3 Press the Start button to start PS2Keyboard input receiving process Button caption is changed from Start to Stop 4 In the receiving process users can st...

Страница 23: ...o access the SD card This function can be used to verify the functionality of SD CARD Interface Follow the steps below to exercise the SD card 1 Choosing the SD CARD tab leads to the window in Figure 3 10 First 2 Insert a SD card to the DE2 70 board then press the Read button to read the SD card The SD card s identification and specification will be displayed in the control window ...

Страница 24: ...o play audio plug a headset or speaker to the LINE OUT port on the board 3 Select the Play Audio item in the com box as shown in Figure 3 11 4 Click Open Wave to select a WAVE file The waveform of the specified wave file will be displayed in the waveform window The sampling rate of the wave file also is displayed in the Sample Rate Combo Box You can drag the scrollbar to browse the waveform In the...

Страница 25: ...desired sampling rate as shown in Figure 3 12 3 Click Start Record to start the record process The program will configure the audio chip for MIC recording retrieve audio signal from the MIC port and then save the audio signal into SDRAM U1 4 To stop recording click Stop Record Finally audio signal saved in SDRAM U1 will be uploaded to the host computer and displayed on the waveform window Click Sa...

Страница 26: ...the hardware part is implemented in Verilog code with SOPC builder which makes it possible for a knowledgeable user to change the functionality of the Control Panel The code is located inside the DE2_70_demonstrations directory on the DE2 System CD ROM To run the Control Panel users must first configure it as explained in Section 3 1 Figure 3 13 depicts the structure of the Control Panel Each inpu...

Страница 27: ...sh Controller SSRAM Controller Avalon MM Tristate Bridge SDRAM U2 SDRAM U1 Avalon MM Tri state Bridge SDRAM Controller USB Controller LCD LED Button Switch Seg7 SD Card PS2 Keyboard USB Mouse Flash SSRAM JTAG Blaster Hardware Nios II Program Nios II Program SEG7 Controller 7 SEG Display Figure 3 13 The block diagram of the DE2 70 control panel ...

Страница 28: ...o your FPGA board before the Control Panel can request it to perform required tasks The configuration files include one sof file and one elf file To download the codes simply click the Download Code button on the program The program will call Quartus II and Nios II tools to download the control codes to the FPGA board through USB Blaseter USB 0 connection The sof file is downloaded to FPGA The elf...

Страница 29: ...the steps below to exercise the Video Utility 1 Connect a VGA monitor to the VGA port of the board 2 Click Load button and specify an image file for displaying It can be a bitmap or jpeg file The selected image file will be displayed on the display window of the Video Utility 3 Select the desired Image Positioning method to fit the image to the VGA 640x480 display dimension 4 Click Display button ...

Страница 30: ...SC signals Please follow the steps below to capture an image from a video source 1 Connect a video source such as a VCD DVD player or NTSC PAL camera to VIDEO IN 1 or VIDEO IN 2 port on the board 2 Specify Video Source as VIDEO IN 1 or VIDEO IN 2 3 Click Capture button to start capturing process Then you will see the captured image shown in the display window of the Video Utility The image dimensi...

Страница 31: ... builder which makes it possible for a knowledgeable user to change the functionality of the Video Utility The code is located inside the DE2_70_demonstrations directory on the DE2 70 System CD ROM Figure 4 4 depicts the block diagram of the Video Utility Each input output device is controlled by the NIOS II Processor instantiated The communication between the DE2 70 board and the host PC is via t...

Страница 32: ...terprets the command received and moves the raw image data from the SDRAM to SSRAM through the Multi Port SSRAM controller 4 VGA Controller continuously reads the raw image data from the SSRAM and sends them to the VGA port The control flow for video capturing is described below 1 Host computer issues a capture command to Nios II processor 2 Nios II processor interprets the command and controls Vi...

Страница 33: ... named after the IEEE standards Joint Test Action Group the configuration bit stream is downloaded directly into the Cyclone II FPGA The FPGA will retain this configuration as long as power is applied to the board the configuration is lost when the power is turned off 2 AS programming In this method called Active Serial programming the configuration bit stream is downloaded into the Altera EPCS16 ...

Страница 34: ...ation Device JTAGConfig Port USB JTAG Config Signals Auto Power on Config MAX 3128 Quartus II Programmer JTAG UART PROG RUN RUN Figure 5 1 The JTAG configuration scheme Configuring the EPCS16 in AS Mode Figure 5 2 illustrates the AS configuration set up To download a configuration bit stream into the EPCS16 serial EEPROM device perform the following steps Ensure that power is applied to the DE2 70...

Страница 35: ...trol some of the board s features remotely from a host computer Details that describe this method of using the USB Blaster port are given in Chapter 3 5 2 Using the LEDs and Switches The DE2 70 board provides four pushbutton switches Each of these switches is debounced using a Schmitt Trigger circuit as indicated in Figure 5 3 The four outputs called KEY0 KEY1 KEY2 and KEY3 of the Schmitt Trigger ...

Страница 36: ...GND GND VCC33 GND GND GND GND VCC33 GND GND SW7 SW6 SW5 SW4 KEYIN0 SW12 GND VCC33 GND GND GND GND VCC33 VCC33 GND GND GND GND VCC33 GND GND VCC33 GND GND GND GND VCC33 GND GND SW11 SW10 SW9 SW8 GND GND VCC33 VCC33 GND GND GND GND GND GND GND VCC33 GND GND GND GND VCC33 SW14 SW17 SW15 SW16 KEY0 KEY2 KEY3 KEY1 SW13 KEYIN1 KEYIN2 KEYIN3 SW 0 17 KEY 0 3 VCC33 VCC33 SW13 SLIDE SW SW13 SLIDE SW 1 2 3 4 ...

Страница 37: ...EDR LEDR15 LEDR LEDR16 LEDR LEDR16 LEDR LEDR17 LEDR LEDR17 LEDR LEDG2 LEDG LEDG2 LEDG LEDR0 LEDR LEDR0 LEDR RN13 330 RN13 330 1 2 3 4 5 6 7 8 LEDR10 LEDR LEDR10 LEDR LEDR11 LEDR LEDR11 LEDR LEDR12 LEDR LEDR12 LEDR RN14 330 RN14 330 1 2 3 4 5 6 7 8 LEDG7 LEDG LEDG7 LEDG LEDR13 LEDR LEDR13 LEDR LEDR2 LEDR LEDR2 LEDR LEDG4 LEDG LEDG4 LEDG Figure 5 5 Schematic diagram of the LEDs Signal Name FPGA Pin ...

Страница 38: ... LEDR 2 PIN_AJ5 LED Red 2 LEDR 3 PIN_AJ4 LED Red 3 LEDR 4 PIN_AK3 LED Red 4 LEDR 5 PIN_AH4 LED Red 5 LEDR 6 PIN_AJ3 LED Red 6 LEDR 7 PIN_AJ2 LED Red 7 LEDR 8 PIN_AH3 LED Red 8 LEDR 9 PIN_AD14 LED Red 9 LEDR 10 PIN_AC13 LED Red 10 LEDR 11 PIN_AB13 LED Red 11 LEDR 12 PIN_AC12 LED Red 12 LEDR 13 PIN_AB12 LED Red 13 LEDR 14 PIN_AC11 LED Red 14 LEDR 15 PIN_AD9 LED Red 15 LEDR 16 PIN_AD8 LED Red 16 LEDR...

Страница 39: ...d by an index from 0 to 6 with the positions given in Figure 5 7 In addition the decimal point is identified as DP Table 5 4 shows the assignments of FPGA pins to the 7 segment displays F0 HEX0_D4 HEX0_D3 HEX0_D2 HEX0_D6 HEX0_D1 HEX0_D5 HEX0_D0 E0 B0 C0 A0 D0 G0 DP0 HEX0_D 0 6 HEX0_DP VCC33 e d dp c g b f a CA1 CA2 HEX0 7Segment Display e d dp c g b f a CA1 CA2 HEX0 7Segment Display 1 2 3 4 5 6 10...

Страница 40: ...en Segment Digit 2 2 HEX2_D 3 PIN_AG4 Seven Segment Digit 2 3 HEX2_D 4 PIN_AB18 Seven Segment Digit 2 4 HEX2_D 5 PIN_AB19 Seven Segment Digit 2 5 HEX2_D 6 PIN_AE19 Seven Segment Digit 2 6 HEX2_DP PIN_AC19 Seven Segment Decimal Point 2 HEX3_D 0 PIN_P6 Seven Segment Digit 3 0 HEX3_D 1 PIN_P4 Seven Segment Digit 3 1 HEX3_D 2 PIN_N10 Seven Segment Digit 3 2 HEX3_D 3 PIN_N7 Seven Segment Digit 3 3 HEX3...

Страница 41: ...ent Digit 7 2 HEX7_D 3 PIN_H1 Seven Segment Digit 7 3 HEX7_D 4 PIN_H2 Seven Segment Digit 7 4 HEX7_D 5 PIN_H3 Seven Segment Digit 7 5 HEX7_D 6 PIN_G1 Seven Segment Digit 7 6 HEX7_DP PIN_G2 Seven Segment Decimal Point 7 Table 5 4 Pin assignments for the 7 segment displays 5 4 Clock Circuitry The DE2 70 board includes two oscillators that produce 28 86 MHz and 50 MHz clock signals Both two clock sig...

Страница 42: ... 1 SDRAM 2 SSRAM FLASH SD Card Figure 5 8 Block diagram of the clock distribution Signal Name FPGA Pin No Description CLK_28 PIN_E16 28 MHz clock input CLK_50 PIN_AD15 50 MHz clock input CLK_50_2 PIN_D16 50 MHz clock input CLK_50_3 PIN_R28 50 MHz clock input CLK_50_4 PIN_R3 50 MHz clock input EXT_CLOCK PIN_R29 External SMA clock input Table 5 5 Pin assignments for the clock inputs ...

Страница 43: ... Table 5 6 LCD_D2 LCD_VCC LCD_D0 LCD_D6 LCD_D7 LCD_D1 LCD_D4 LCD_BL LCD_D3 LCD_D5 LCD_CONT LCD_D 0 7 LCD_BLON LCD_ON LCD_EN LCD_RS LCD_RW VCC43 VCC43 VCC43 VCC5 R38 1K R38 1K 2 X 16 DIGIT LCD DIS1 LCD 2x16 2 X 16 DIGIT LCD DIS1 LCD 2x16 GND 1 VCC 2 CONT 3 RS 4 RW 5 EN 6 D0 7 D1 8 D2 9 D3 10 D4 11 D5 12 D6 13 D7 14 BL 15 GND 16 Q5 8050 Q5 8050 R39 47 R39 47 R36 680 R36 680 R37 680 R37 680 Q3 8050 Q...

Страница 44: ...locks in the FPGA The voltage level of the I O pins on the expansion headers can be adjusted to 3 3V 2 5V or 1 8V using JP1 Because the expansion I Os are connected to the BANK 5 of the FPGA and the VCCIO voltage VCCIO5 of this bank is controlled by the header JP1 users can use a jumper to select the input voltage of VCCIO5 to 3 3V 2 5V and 1 8V to control the voltage level of the I O pins Table 5...

Страница 45: ... and diodes not shown for other ports IO_B1 IO_B0 IO_B2 GPIO_D32 IO_B0 GPIO_D33 IO_B1 GPIO_D33 GPIO_D32 IO_B20 IO_B24 IO_B28 IO_B16 IO_B10 IO_B13 IO_B15 IO_B31 IO_B27 IO_B19 IO_B9 IO_B23 IO_B14 IO_B4 IO_B5 IO_B8 IO_B6 IO_B3 IO_B7 IO_B12 IO_B11 IO_B18 IO_B17 IO_B22 IO_B21 IO_B26 IO_B25 IO_B30 IO_B29 IO_CLKINp1 IO_CLKINn1 IO_CLKOUTp1 IO_CLKOUTn1 VCC33 VCC5 VCCIO5 VCCIO5 GPIO 1 D50 BAT54S D50 BAT54S ...

Страница 46: ...O_A 19 PIN_H24 GPIO Connection 0 IO 19 IO_A 20 PIN_J25 GPIO Connection 0 IO 20 IO_A 21 PIN_K24 GPIO Connection 0 IO 21 IO_A 22 PIN_J24 GPIO Connection 0 IO 22 IO_A 23 PIN_K25 GPIO Connection 0 IO 23 IO_A 24 PIN_L22 GPIO Connection 0 IO 24 IO_A 25 PIN_M21 GPIO Connection 0 IO 25 IO_A 26 PIN_L21 GPIO Connection 0 IO 26 IO_A 27 PIN_M22 GPIO Connection 0 IO 27 IO_A 28 PIN_N22 GPIO Connection 0 IO 28 I...

Страница 47: ...GPIO Connection 1 IO 18 IO_B 19 PIN_P27 GPIO Connection 1 IO 19 IO_B 20 PIN_M29 GPIO Connection 1 IO 20 IO_B 21 PIN_R26 GPIO Connection 1 IO 21 IO_B 22 PIN_M30 GPIO Connection 1 IO 22 IO_B 23 PIN_R27 GPIO Connection 1 IO 23 IO_B 24 PIN_P24 GPIO Connection 1 IO 24 IO_B 25 PIN_N28 GPIO Connection 1 IO 25 IO_B 26 PIN_P23 GPIO Connection 1 IO 26 IO_B 27 PIN_N29 GPIO Connection 1 IO 27 IO_B 28 PIN_R23 ...

Страница 48: ...R0 39 R1 40 R2 41 R3 42 R4 43 R5 44 R6 45 R7 46 R8 47 R9 48 R80 4 7K R80 4 7K Figure 5 12 VGA circuit schematic The timing specification for VGA synchronization and RGB red green blue data can be found on various educational web sites for example search for VGA signal timing Figure 5 13 illustrates the basic timing requirements for each row horizontal that is displayed on a VGA monitor An active l...

Страница 49: ...3 2 2 2 20 1 40 800 c SVGA 75Hz 800x600 1 6 3 2 16 2 0 3 49 800 c SVGA 85Hz 800x600 1 1 2 7 14 2 0 6 56 800 c XGA 60Hz 1024x768 2 1 2 5 15 8 0 4 65 1024 c XGA 70Hz 1024x768 1 8 1 9 13 7 0 3 75 1024 c XGA 85Hz 1024x768 1 0 2 2 10 8 0 5 95 1024 c 1280x1024 60Hz 1280x1024 1 0 2 3 11 9 0 4 108 1280 c Table 5 9 VGA horizontal timing specification VGA mode Vertical Timing Spec Configuration Resolution H...

Страница 50: ... VGA Green 3 VGA_G 4 PIN_B12 VGA Green 4 VGA_G 5 PIN_A12 VGA Green 5 VGA_G 6 PIN_C13 VGA Green 6 VGA_G 7 PIN_B13 VGA Green 7 VGA_G 8 PIN_B14 VGA Green 8 VGA_G 9 PIN_A14 VGA Green 9 VGA_B 0 PIN_B16 VGA Blue 0 VGA_B 1 PIN_C16 VGA Blue 1 VGA_B 2 PIN_A17 VGA Blue 2 VGA_B 3 PIN_B17 VGA Blue 3 VGA_B 4 PIN_C18 VGA Blue 4 VGA_B 5 PIN_B18 VGA Blue 5 VGA_B 6 PIN_B19 VGA Blue 6 VGA_B 7 PIN_A19 VGA Blue 7 VGA...

Страница 51: ... C38 1u C38 1u C39 1u C39 1u R103 330 R103 330 R106 47K R106 47K C42 1n C42 1n C44 100u C44 100u J10 PHONE JACK P J10 PHONE JACK P L 1 R 2 GND 3 NCR 4 NCL 5 C40 1u C40 1u J11 PHONE JACK B J11 PHONE JACK B L 1 R 2 GND 3 NCR 4 NCL 5 R107 47K R107 47K C43 100u C43 100u R105 47K R105 47K R102 4 7K R102 4 7K R108 2K R108 2K R101 4 7K R101 4 7K R109 2K R109 2K U13 WM8731 U13 WM8731 BCLK 7 HPVDD 12 XTO 2...

Страница 52: ... V 2 V 6 R1OUT 12 R2OUT 9 T1OUT 14 T2OUT 7 VCC 16 GND 15 R44 330 R44 330 R45 330 R45 330 BC33 0 1u BC33 0 1u C11 1u C11 1u TXD LEDG TXD LEDG C12 1u C12 1u Figure 5 15 MAX232 RS 232 chip schematic Signal Name FPGA Pin No Description UART_RXD PIN_D21 UART Receiver UART_TXD PIN_E21 UART Transmitter UART_CTS PIN_G22 UART Clear to Send UART_RTS PIN_F23 UART Request to Send Table 5 13 RS 232 pin assignm...

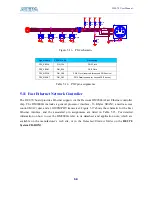
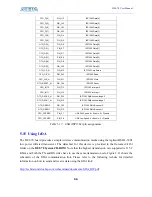
Страница 53: ...2_KBDAT PIN_E24 PS 2 Data PS2_MSCLK PIN_D26 PS 2 Clock reserved for second PS 2 device PS2_MSDAT PIN_D25 PS 2 Data reserved for second PS 2 device Table 5 14 PS 2 pin assignments 5 11 Fast Ethernet Network Controller The DE2 70 board provides Ethernet support via the Davicom DM9000A Fast Ethernet controller chip The DM9000A includes a general processor interface 16 Kbytes SRAM a media access contr...

Страница 54: ...1 27 GP3 SD10 28 GP2 SD9 29 VDD 30 GP1 SD8 31 CMD 32 GND 33 INT 34 IOR 35 IOW 36 CS 37 LED2 38 LED1 39 PWRST 40 TEST 41 VDD 42 X2 43 X1 44 GND 45 SD 46 RXGND 47 BGGND 48 R76 49 9 R76 49 9 YELLOW GREEN J6 RJ45INTLED YELLOW GREEN J6 RJ45INTLED CTT 4 RD 6 CTR 5 TD 2 TD 1 RD 3 CHSG 8 SMNT0 13 SMNT1 14 MNT1 15 MNT0 16 D1 9 D2 10 D3 11 D4 12 C19 0 1u C19 0 1u Figure 5 17 Fast Ethernet schematic Signal N...

Страница 55: ... 4 2 2 component video data compatible with the 8 bit ITU R BT 656 interface standard The ADV7180 is compatible with a broad range of video devices including DVD players tape based sources broadcast sources and security surveillance cameras The registers in both of the TV decoders can be programmed by a serial I2C bus which is connected to the Cyclone II FPGA as indicated in Figure 5 18 Note that ...

Страница 56: ...EFP 25 AVDD 27 AGND 28 VREFN 26 AIN3 30 RESET 31 ALSB 32 SDATA 33 SCLK 34 DVDD 36 VS FIELD 37 ELPF 19 EXPOSED 41 C29 0 1u C29 0 1u C32 0 1u C32 0 1u RN45 47 RN45 47 1 2 3 4 5 6 7 8 9 10 11 12 13 14 15 16 C33 0 1u C33 0 1u R91 1 74K R91 1 74K C30 10n C30 10n C28 0 1u C28 0 1u C35 0 1u C35 0 1u C31 0 1u C31 0 1u U12 ADV7180 U12 ADV7180 HS 39 DGND 3 XTAL1 12 XTAL 13 DVDD 14 DGND 35 P1 16 P0 17 P4 8 P...

Страница 57: ..._J18 I2C Data I2C_SDAT PIN_H18 I2C Clock Table 5 16 TV Decoder pin assignments 5 13 Implementing a TV Encoder Although the DE2 70 board does not include a TV encoder chip the ADV7123 10 bit high speed triple ADCs can be used to implement a professional quality TV encoder with the digital processing part implemented in the Cyclone II FPGA Figure 5 19 shows a block diagram of a TV encoder implemente...

Страница 58: ... H_VCC5 U_VCC33 BC66 0 1u BC66 0 1u R120 330 R120 330 C54 47p C54 47p J13 USB A TYPE J13 USB A TYPE 1 2 3 4 5 6 L10 BEAD L10 BEAD R115 15K R115 15K C53 47p C53 47p R111 4 7K R111 4 7K R118 4 7K R118 4 7K D88 BAT54S D88 BAT54S 1 2 3 D85 BAT54S D85 BAT54S 1 2 3 R126 22 R126 22 D86 BAT54S D86 BAT54S 1 2 3 R119 4 7K R119 4 7K C52 47p C52 47p R112 22 R112 22 U14 ISP1362 U14 ISP1362 D6 7 INT2 31 INT1 30...

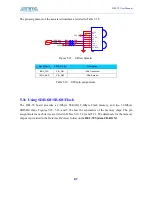
Страница 59: ...N_E12 ISP1362 DMA Acknowledge 1 OTG_DREQ0 PIN_G12 ISP1362 DMA Request 0 OTG_DREQ1 PIN_F12 ISP1362 DMA Request 1 OTG_FSPEED PIN_F7 USB Full Speed 0 Enable Z Disable OTG_LSPEED PIN_F8 USB Low Speed 0 Enable Z Disable Table 5 17 USB ISP1362 pin assignments 5 15 Using IrDA The DE2 70 board provides a simple wireless communication media using the Agilent HSDL 3201 low power infrared transceiver The dat...

Страница 60: ...A Pin No Description IRDA_TXD PIN_W21 IRDA Transmitter IRDA_RXD PIN_W22 IRDA Receiver Table 5 18 IrDA pin assignments 5 16 Using SDRAM SRAM Flash The DE2 70 board provides a 2 Mbyte SSRAM 8 Mbyte Flash memory and two 32 Mbyte SDRAM chips Figures 5 22 5 23 and 5 24 show the schematics of the memory chips The pin assignments for each device are listed in Tables 5 19 5 20 and 5 21 The datasheets for ...

Страница 61: ... DRAM1_CAS_n DRAM1_RAS_n DRAM1_CS_n DRAM1_A 0 12 DR_VCC33 DR_VCC33 DR_VCC33 SDRAM0 SDRAM1 U2 SDRAM 16Mx16 U2 SDRAM 16Mx16 A0 23 A1 24 A2 25 A3 26 A4 29 A5 30 A6 31 A7 32 A8 33 A9 34 nCAS 17 nRAS 18 LDQM 15 nWE 16 nCS 19 CKE 37 CLK 38 UDQM 39 D0 2 D1 4 D2 5 D3 7 D4 8 D5 10 D6 11 D7 13 D8 42 D9 44 D10 45 D11 47 D12 48 D13 50 D14 51 D15 53 A12 36 BA0 20 VDD 1 VDD 27 VSS 28 VSS 41 A10 22 VDDQ 3 VDDQ 9...

Страница 62: ...9 NC A20 38 VSS 40 VDD 41 A6 44 A7 45 A8 46 A9 47 A10 48 A11 49 A12 50 A13 81 A14 82 DQPA 51 DQA0 52 DQA1 53 VDDQ 54 VSSQ 55 DQA2 56 DQA3 57 DQA4 58 DQA5 59 VSSQ 60 VDDQ 61 DQA6 62 DQA7 63 ZZ 64 VDD 65 VSS 67 DQB0 68 DQB1 69 VDDQ 70 VSSQ 71 DQB2 72 DQB3 73 DQB4 74 DQB5 75 VSSQ 76 VDDQ 77 DQB6 78 DQB7 79 DQPB 80 A15 99 A16 100 ADV_n 83 ADSP_n 84 ADSC_n 85 OE_n 86 BWE_n 87 GW_n 88 CLK 89 VSS 90 VDD ...

Страница 63: ...RAM0_D 1 PIN_AC2 SDRAM 1 Data 1 DRAM_D 2 PIN_AC3 SDRAM 1 Data 2 DRAM_D 3 PIN_AD1 SDRAM 1 Data 3 DRAM_D 4 PIN_AD2 SDRAM 1 Data 4 DRAM_D 5 PIN_AD3 SDRAM 1 Data 5 DRAM_D 6 PIN_AE1 SDRAM 1 Data 6 DRAM_D 7 PIN_AE2 SDRAM 1 Data 7 DRAM_D 8 PIN_AE3 SDRAM 1 Data 8 DRAM_D 9 PIN_AF1 SDRAM 1 Data 9 DRAM_D 10 PIN_AF2 SDRAM 1 Data 10 DRAM_D 11 PIN_AF3 SDRAM 1 Data 11 DRAM_D 12 PIN_AG2 SDRAM 1 Data 12 DRAM_D 13 ...

Страница 64: ...A 11 PIN_Y4 SDRAM 2 Address 11 DRAM1_A 12 PIN_Y7 SDRAM 2 Address 12 DRAM_D 16 PIN_U1 SDRAM 2 Data 0 DRAM_D 17 PIN_U2 SDRAM 2 Data 1 DRAM_D 18 PIN_U3 SDRAM 2 Data 2 DRAM_D 19 PIN_V2 SDRAM 2 Data 3 DRAM_D 20 PIN_V3 SDRAM 2 Data 4 DRAM_D 21 PIN_W1 SDRAM 2 Data 5 DRAM_D 22 PIN_W2 SDRAM 2 Data 6 DRAM_D 23 PIN_W3 SDRAM 2 Data 7 DRAM_D 24 PIN_Y1 SDRAM 2 Data 8 DRAM_D 25 PIN_Y2 SDRAM 2 Data 9 DRAM_D 26 PI...

Страница 65: ... SRAM Address 5 SRAM_A 6 PIN_AE12 SRAM Address 6 SRAM_A 7 PIN_AG12 SRAM Address 7 SRAM_A 8 PIN_AD13 SRAM Address 8 SRAM_A 9 PIN_AE13 SRAM Address 9 SRAM_A 10 PIN_AF14 SRAM Address 10 SRAM_A 11 PIN_AG14 SRAM Address 11 SRAM_A 12 PIN_AE15 SRAM Address 12 SRAM_A 13 PIN_AF15 SRAM Address 13 SRAM_A 14 PIN_AC16 SRAM Address 14 SRAM_A 15 PIN_AF20 SRAM Address 15 SRAM_A 16 PIN_AG20 SRAM Address 16 SRAM_A ...

Страница 66: ...24 SRAM_DQ 25 PIN_AJ14 SRAM Data 25 SRAM_DQ 26 PIN_AJ13 SRAM Data 26 SRAM_DQ 27 PIN_AH13 SRAM Data 27 SRAM_DQ 28 PIN_AK12 SRAM Data 28 SRAM_DQ 29 PIN_AK7 SRAM Data 29 SRAM_DQ 30 PIN_AJ8 SRAM Data 30 SRAM_DQ 31 PIN_AK8 SRAM Data 31 SRAM_ADSC_N PIN_AG17 SRAM Controller Address Status SRAM_ADSP_N PIN_AC18 SRAM Processor Address Status SRAM_ADV_N PIN_AD16 SRAM Burst Address Advance SRAM_BE_N0 PIN_AC21...

Страница 67: ...ddress 6 FLASH_A 7 PIN_AF22 FLASH Address 7 FLASH_A 8 PIN_AH27 FLASH Address 8 FLASH_A 9 PIN_AJ27 FLASH Address 9 FLASH_A 10 PIN_AH26 FLASH Address 10 FLASH_A 11 PIN_AJ26 FLASH Address 11 FLASH_A 12 PIN_AK26 FLASH Address 12 FLASH_A 13 PIN_AJ25 FLASH Address 13 FLASH_A 14 PIN_AK25 FLASH Address 14 FLASH_A 15 PIN_AH24 FLASH Address 15 FLASH_A 16 PIN_AG25 FLASH Address 16 FLASH_A 17 PIN_AF21 FLASH A...

Страница 68: ...AC30 FLASH Data 12 FLASH_DQ 13 PIN_AB30 FLASH Data 13 FLASH_DQ 14 PIN_AA30 FLASH Data 14 FLASH_DQ15_AM1 PIN_AE24 FLASH Data 15 FLASH_BYTE_N PIN_Y29 FLASH Byte Word Mode Configuration FLASH_CE_N PIN_AG28 FLASH Chip Enable FLASH_OE_N PIN_AG29 FLASH Output Enable FLASH_RESET_N PIN_AH28 FLASH Reset FLASH_RY PIN_AH30 LASH Ready Busy output FLASH_WE_N PIN_AJ29 FLASH Write Enable FLASH_WP_N PIN_AH29 FLAS...

Страница 69: ...tory DE2_70_demonstrations into a local directory of your choice It is important to ensure that the path to your local directory contains no spaces otherwise the Nios II software will not work 6 1 DE2 70 Factory Configuration The DE2 70 board is shipped from the factory with a default configuration that demonstrates some of the basic features of the board The setup required for this demonstration ...

Страница 70: ... to YUV444 YCrCb to RGB and VGA Controller The figure also shows the TV Decoder ADV7180 and the VGA DAC ADV7123 chips used As soon as the bit stream is downloaded into the FPGA the register values of the TV Decoder chip are used to configure the TV decoder via the I2C_AV_Config block which uses the I2C protocol to communicate with the TV Decoder chip Following the power on sequence the TV Decoder ...

Страница 71: ...layer s composite video output yellow plug to the Video IN 1 RCA jack J8 of the DE2 70 board The DVD player has to be configured to provide o NTSC output o 60 Hz refresh rate o 4 3 aspect ratio o Non progressive video Connect the VGA output of the DE2 70 board to a VGA monitor both LCD and CRT type of monitors should work Connect the audio output of the DVD player to the line in port of the DE2 70...

Страница 72: ... will multiplex two different video source signals from the TV decoders and display both video signals on the LCD CRT monitor using picture in picture mode PIP mode One picture is displayed on the full screen and the other picture is displayed in a small sub window Also users can select which video is displayed in main sub window via a toggle switch Figure 6 3 shows the basic block diagram of this...

Страница 73: ...k Composite_to_ VGA Sub window TD_clock_ PLL Composite_to_ VGA Main window TD_clock 54Mhz TD data TD_clock TD data 27Mhz PiP_position_ controller VGA data VGA multiplexer VGA data Main VGA data Sub Control signal VGA DAC VGA data TV decoder Sub window TV decoder Main window Video in 1 or Video in 2 Video in 2 or Video in 1 Figure 6 3 Block diagram of the TV PIP demonstration Demonstration Setup Fi...

Страница 74: ...ers Load the bit stream into FPGA The detailed configuration for switching video source of main and sub window are listed in Table 6 1 Figure 6 4 illustrates the setup for this demonstration PIP_Control To TV_to_VGA VGA LCD CRT Monitor VGA Out Figure 6 4 The setup for the TV box PIP demonstration Configuration VGA Display Mode Video source SW 17 OFF Signal display mode Video in 2 ...

Страница 75: ...ip and the Nios II processor to implement a USB mouse movement detector We also implemented a video frame buffer with a VGA controller to perform the real time image storage and display Figure 6 5 shows the block diagram of the circuit which allows the user to draw lines on the VGA display screen using the USB mouse The VGA Controller block is integrated into the Altera Avalon bus so that it can b...

Страница 76: ...USB Host Connector type A of the DE2 70 board Connect the VGA output of the DE2 70 board to a VGA monitor both LCD and CRT type of monitors should work Load the bit stream into FPGA Run the Nios II and choose DE2_70_NIOS_HOST_MOUSE_VGA as the workspace Click on the Compile and Run button You should now be able to observe a blue background with an Altera logo on the VGA display Move the USB mouse a...

Страница 77: ...I processor to initialize the Philips ISP1362 chip Once the software program is successfully executed the host computer will identify the new device in its USB device list and ask for the associated driver the device will be identified as a Philips PDIUSBD12 SMART Evaluation Board After completion of the driver installation on the host computer the next step is to run a software program on the hos...

Страница 78: ...LED SW Connect the USB Device connector of the DE2 70 board to the host computer using a USB cable type A B Load the bit stream into FPGA Run Nios II IDE with HW as the workspace Click on Compile and Run A new USB hardware device will be detected Specify the location of the driver as DE2_70_NIOS_DEVICE_LED D12test inf Philips PDIUSBD12 SMART Evaluation Board Ignore any warning messages produced du...

Страница 79: ... serial bit clock BCK and the left right channel clock LRCK automatically As indicated in Figure 6 9 the I2C interface is used to configure the Audio CODEC The sample rate and gain of the CODEC are set in this manner and the data input from the line in port is then mixed with the microphone in port and the result is sent to the line out port For this demonstration the sample rate is set to 48 kHz ...

Страница 80: ...on the DE2 70 board Connect the audio output of a music player such as an MP3 player or computer to the line in port blue color on the DE2 70 board Connect a headset speaker to the line out port green color on the DE2 70 board Load the bit stream into the FPGA You should be able to hear a mixture of the microphone sound and the sound from the music player Press KEY0 to adjust the volume it cycles ...

Страница 81: ... Nios II processor to send and receive Ethernet packets using the DM9000A Ethernet PHY MAC Controller The demonstration can be set up to use either a loop back connection from one board to itself or two DE2 70 boards connected together On the transmitting side the Nios II processor sends 64 byte packets every 0 5 seconds to the DM9000A After receiving the packet the DM9000A appends a four byte che...

Страница 82: ...iving using the Nios II processor Demonstration Setup File Locations and Instructions Project directory DE2_70_NET Bit stream used DE2_70_NET sof Nios II Workspace DE2_70_NET Software Plug a CAT5 loop back cable into the Ethernet connector of DE2 70 Load the bit stream into the FPGA Run the Nios II IDE under the workspace DE2_70_NET Click on the Compile and Run button You should now be able to obs...

Страница 83: ...ity can be produced The DE2 70 board provides the hardware and software needed for SD card access and professional audio performance so that it is possible to design advanced multimedia products using the DE2 70 board In this demonstration we show how to implement an SD Card Music Player on the DE2 70 board in which the music files are stored in an SD card and the board can play the music files vi...

Страница 84: ...I2C bus The I2C protocol is implemented by software Four PIO pins are connected to the SD CARD socket SD 1 Bit Mode is used to access the SD card and is implemented by software All of the other SOPC components in the block diagram are SOPC Builder built in components Figure 6 13 Block diagram of the SD music player demonstration Figure 6 14 shows the software stack of this demonstration SD 1 Bit M...

Страница 85: ...e 7 segment display and the LEDs The top and bottom row of the LCD module will display the file name of the music that is playing on the DE2 70 board and the value of music volume respectively The 7 segments display will show how long the music file has been played The LED will indicate the audio signal strength Demonstration Setup File Locations and Instructions Project directory DE2_70_SD_Card_A...

Страница 86: ... fils wav SD Card Speaker Lock Figure 6 16 The setup for the SD music player demonstration 6 9 Music Synthesizer Demonstration This demonstration shows how to implement a Multi tone Electronic Keyboard using DE2 70 board with a PS 2 Keyboard and a speaker PS 2 Keyboard is used as the piano keyboard for input The Cyclone II FPGA on the DE2 70 board serves as the Music Synthesizer SOC to generate mu...

Страница 87: ...e pressed The TONE_GENERATOR is the core of music synthesizer SOC User can switch the music source either from PS2_KEYBOAD or the DEMO_SOUND block using SW9 To repeat the demo sound users can press KEY1 The TONE_GENERATOR has two tones 1 String 2 Brass which can be controlled by SW0 The audio codec used on the DE2 70 board has two channels which can be turned ON OFF using SW1 and SW2 Figure 6 17 i...

Страница 88: ...0 are set to 0 Down Position Press KEY1 on the DE2 70 board to start the music demo Press KEY0 on the DE2 70 board to reset the circuit Table 6 2 and 6 3 illustrate the usage of the switches pushbuttons KEYs PS 2 Keyboard z Switches and Pushbuttons Signal Name Description KEY 0 Reset Circuit KEY 1 Repeat the Demo Music SW 0 OFF BRASS ON STRING SW 9 OFF DEMO ON PS2 KEYBOARD SW 1 Channel 1 ON OFF SW...

Страница 89: ... Usage of the PS 2 Keyboard s keys Line Out Keyboard Input VGA Out Music Synthesizer Algorithms for Audio Processing VGA LCD CRT Monitor Keyboard Speaker C D E F G A B C D E F G A B C D E F G A B Figure 6 16 The Setup of the Music Synthesizer Demonstration ...

Страница 90: ...re used to specify recording sample rate as 96K 48K 44 1K 32K or 8K The 16x2 LCD is used to indicate the Recording Playing status The seg7 is used to display Recording Playing duration with time unit in 1 100 second The LED is used to indicate the audio signal strength Table 6 4 summarizes the usage of toggle switches for configuring the audio recorder and player Record Play Status Signal Strength...

Страница 91: ...n of the audio chip through the AUDIO Controller Figure 6 19 Block diagram of the audio recorder and player Demonstration Setup File Locations and Instructions Hardware Project directory DE2_70_AUDIO Bit stream used DE2P_TOP sof Software Project directory DE2_70_AUDIO software project_audio Software Execution File DE2_70_AUDIO software project_auido audio debug audio elf Connect an Audio Source to...

Страница 92: ...d elf files 2 Recording process will stop if audio buffer is full 3 Playing process will stop if audio data is played completely Toggle Switches 0 DOWN Position 1 UP Position SW0 Audio is from MIC Audio is from LINE IN SW1 Disable MIC Boost Enable MIC Boost SW2 Disable Zero cross Detection Enable Zero cross Detection SW5 0 DOWN 1 UP SW4 0 DOWN 1 UP SW3 0 DOWN 1 UP Sample Rate 0 0 0 96K 0 0 1 48K 0...

Страница 93: ...apter 7 Appendix 7 1 Revision History Version Change Log V1 0 Initial Version Preliminary V1 01 1 Add appendix chapter 2 Modify Chapter 2 3 4 5 6 7 2 Copyright Statement Copyright 2007 Terasic Technologies All rights reserved ...

Отзывы: