


- 26 -
E. Loading and Using Altair DOS
In this demonstration, we will boot and use Altair DOS version 1.0. Announced
in 1975, but not delivered until 1977, Altair DOS was never widely adopted.
By the time it was released, the much easier to use and more flexible CP/M
operating system was rapidly gaining popularity.
Computer Configuration
Serial port 1 on the Altair Clone (the upper DB-25 connector) should be
configured as a 2SIO serial port at octal I/O address 20/21. This port
serves as the operator’s terminal. This is a standard Altair configura-
tion. This is also the default Altair Clone configuration for port 1. You
can confirm or change the Clone’s serial port configuration if needed. See
“Serial Port Menu” in Part 2, “Configuration Monitor” of this manual.
To boot a floppy disk, the “Disk Boot Loader” (DBL) PROM was typically in-
stalled in the Altair. Refer to the “PROM Menu” section in Part 2, “Con-
figuration Monitor” to see if this PROM is already installed in the Clone.
If not, follow the instructions to “Load New PROM Content” and install the
.hex file “ROMS\DBL.HEX” into one of the empty PROM slots.
Follow the “Insert Floppy” instructions in the “Floppy Disk Menu” section
of Part 2, “Configuration Monitor” to insert the floppy image “Altair DOS
(with FORTRAN)\AltairDOS.dsk”. Either insert the floppy directly into
drive 0, or use the “Change Drive Assignment” menu option after uploading
to assign the floppy to drive 0. Once uploaded, you do not need to repeat
this step unless you over-write the floppy with other content.
Follow these steps to boot Altair DOS from floppy disk:
1) Turn the power switch on.
2) Raise and hold the STOP switch in the STOP position, then raise and re-
lease the RESET switch. Finally, release the STOP switch. This performs
a hard reset on the computer and sets all address lights to zero.
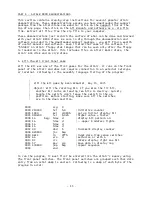
3) Set switches A15-A8 to the up position (one) and switches A7-A0 to the
down position (zero). This represents the start address of the Disk
Boot Loader (177400 octal or FF00 hex).
4) Raise the EXAMINE switch to load this address into the processor.
5) Set switches A15-A13 to the down position. This leaves the first four
switches (A15-A12) set to 0001. This tells Altair DOS the console ter-
minal is connected to a 2SIO board with one stop bit.
6) Depress the RUN switch to boot from the Altair DOS floppy.
7) Turn on “Caps Lock” on the keyboard.
8) In response to the “MEMORY SIZE” prompt, press RETURN to let Altair DOS
determine the amount of RAM present.
9) In response to the “INTERRUPTS” prompt, key in “Y” (must be capital
“Y”) and press RETURN.
10) In response to “HIGHEST DISK NUMBER” key in “2” and press RETURN.
11) In response to “HOW MANY FILES” key in “4” and press RETURN.
12) In response to “HOW MANY RANDOM FILES” key in “4” and press RETURN.
At this point, Altair DOS is up and running! The DOS prompt is a period. All
commands must be in upper case. When backspace is typed to correct an error,
Altair DOS echoes each character as it is deleted.
Содержание 8800 Clone
Страница 1: ......


