


15
-EN
RCA INPUT
ANALOG 1
Ai-NET IN
ANALOG2
CHANGER IN
ANALOG3
CD
DIGITAL1
CHANGER
DIGITAL2
DVD
DIGITAL3
DISPLAY
INPUT
(L)
(R)
FUSE
15A
BATTERY
POWER SUPPLY
GND
CENTER
GUIDE INPUT
SUBWOOFER
REAR
FRONT LOW
FRONT MID
FRONT HIGH
OUTPUT
(L)
(R)
Battery
EQ
/DIV
Front Tweeter Output (L)
Front Tweeter Output (R)
Front Mid Range Output (L)
Front Mid Range Output (R)
Front Mid Bass Output (L)
Front Mid Bass Output (R)
Rear Output (L)
Rear Output (R)
Subwoofer Output (L)
Subwoofer Output (R)
Center Output
To External Amplifier
Input Side
Output Side
Ai-NET Cable (Included with CD Changer)
Fiber Optic Cable (Sold Separately)
Ai-NET Cable (Included)
Ai-NET Compatible
CD Changer
Ai-NET Compatible
Head Unit
System Switch
Remote OUT Cable
Remote ON Cable
Illumination Cable
Guide Control Cable 1
Guide Control Cable 2
Blue/White
Blue
Orange
White/green
White/green
To the vehicle's small light cable
Not used in this system
Not used
Not used in this system
To External Amplifier Remote ON Cable
Connect to a metal part of
chassis body with a screw.
★★
Fiber Optic Cable (Sold Separately)
★
★★★
Grounding Cable (Sold Separately)
Battery Power Cable (Sold Separately)
NOTES
★
When connecting a Optical
Digital CD Changer
★★
Used for connection to an
optical digital compatible
head unit.
★★★
When connecting a Optical
Digital CD Changer, change
the Digital/Analog switch of
the CD Changer to “2”
(Digital Output)
1
2
• PXA-H900 + Ai-NET Compatible Head Unit + CD C External Amplifier
NOTES
•
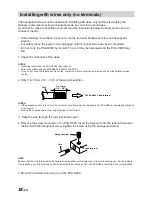
For the ground cord (sold separately) and battery power cord (sold sepa-
rately), pass the wires through the included terminal board cover before
connecting them to the PXA-H900. After this, mount the terminal board cover
on the PXA-H900.
•
If the ground cord (sold separately) and battery power cord (sold separately)
are only wires (if they do not have terminals), refer to “Installing with wires
only (no terminals)” (page 18) to install.
Please observe the following when using Fiber Optic Cable.
•
Do not coil the Fiber Optic Cable smaller than a 30mm radius.
•
Do not place anything on top of the Fiber Optic Cable.


