background image

8

-EN

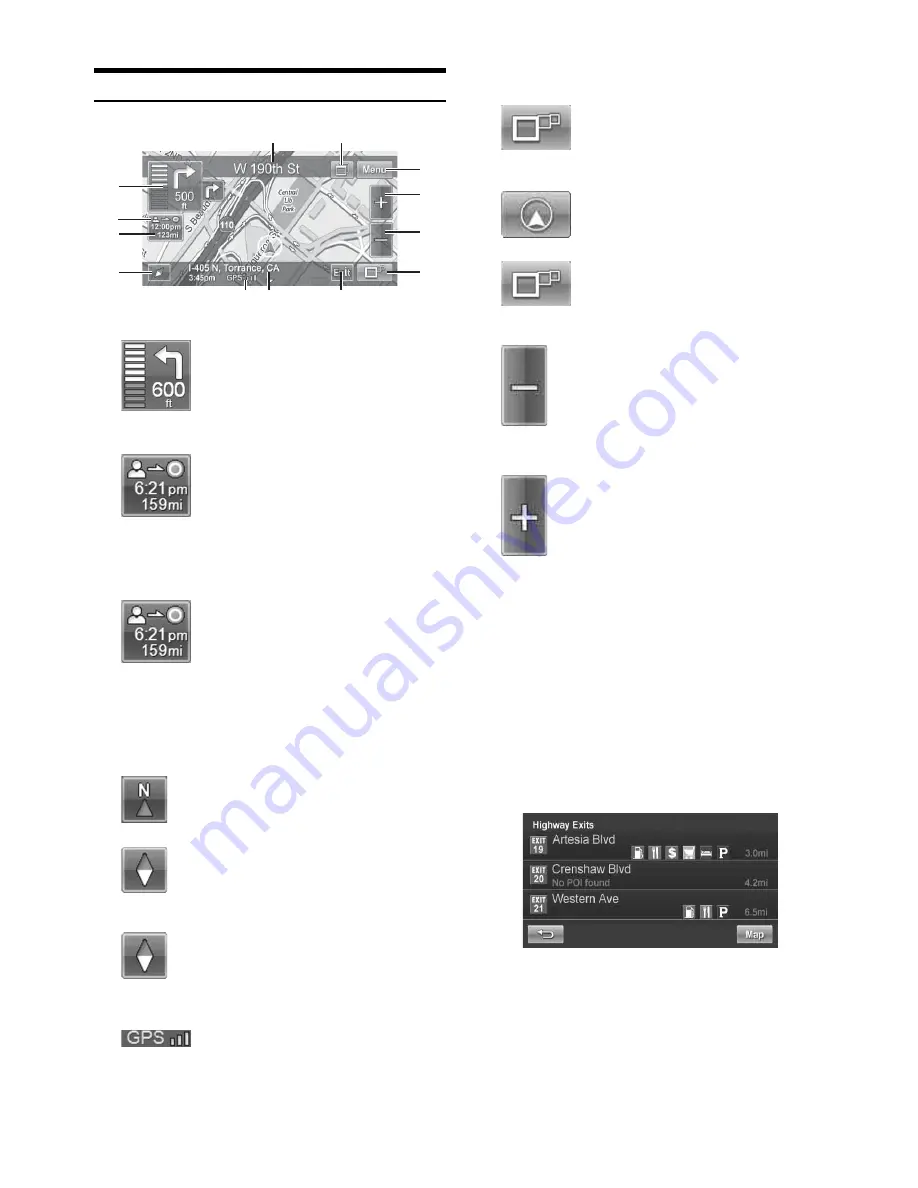
Map Functions

1

Next Maneuver Arrow and Voice Prompt Button

Repeating the Announcement

Touch this icon to repeat the guide 
announcement.
(Same as Next Maneuver Arrow)

2

Route Button

Touch this icon and it will take you to the 
route menu.

When not in the guidance mode, only the current position 
can be seen. Zoom buttons, Map Orientation button and 
Main Menu are available.

3

Estimate Time Display

This icon displays Estimated Time 
Remaining, Estimated Time of Arrival or 
Direction to Destination.
See page 23 to change this setting.

The time estimates are based on the average speed. The 
estimate time will vary depending on vehicle speed. The 
arrow always points toward the destination.

4

Map Orientation

Touch this icon to switch between North Up, Heading Up 
and 3D View.

North Up

In north up view, north is always at the top of the 
display. This makes it easy to determine your 
current heading with respect to the map.

Heading Up

In heading-up view, the current direction is 
always pointing to the top of the display. This 
makes it easy to see the direction of the next turn 
on the map.

3D View

The 3D View offers you a more realistic 
perspective by tilting the map and displaying it 
with a horizon line. Streets are displayed as you 
approach them instead of from a birds-eye view.

5

GPS Status Bar

GPS Signal Strength

6

Current Position

7

Change Route View to Arrow Only Mode

Switching Map Display

Touch this button to switch between Map 
and Arrow modes.

You can only switch map display during guidance mode.

Arrow Mode

Displays three successive arrow maneuvers 
all the way to your destination while 
providing turn-by-turn guidance prompts.

Map Mode

Shows a full-screen map of the area while 
providing turn-by-turn guidance prompts.

8

Zoom Out Button

Touch this icon to zoom out.

9

Zoom In Button

Touch this icon to zoom in.

0

Main Menu Button

!

Next Street Name

@

Touch panel-compatible monitor Access Button

Operation buttons on the connected Touch panel-
compatible monitor or AV Head Unit are displayed.
For details, refer to the Owner’s manual of the Touch panel-
compatible monitor or AV Head Unit.

#

Highway Exit Button

When the vehicle is on a Highway, the screen is displayed.
Highway exit information is displayed as a list in order of 
close proximity to current position.
You can also set a waypoint, etc., by touching the desired 
Highway Exit.

7

6

8

1

2

3

4

5

9

!

0

@

#

Содержание M300 - NVE - Navigation System

Страница 1: ...R EN FR ES NVE M300 GPS Navigation System OWNER S MANUAL MODE D EMPLOI MANUAL DE OPERACI N...

Страница 2: ......

Страница 3: ...ety or timing of your driving experience Use your own personal judgment if the navigation system is unable to provide you with an alternate route There may be situations where the navigation system di...

Страница 4: ...misspelling omission of letters or any other cosmetic discrepancy in layout found in the System The right to use the System shall expire either when the user destroys this software or when any of the...

Страница 5: ...dent DO NOT DISASSEMBLE OR ALTER Doing so may result in an accident fire or electric shock USE THIS PRODUCT AS SPECIFIED Use for other than its designed application may result in fire electric shock o...

Страница 6: ...Name First 14 Finding a Intersection by Entering a City Name First 15 Destination Options Finding Nearby Places 16 Finding Alternative Routes to the Destination 16 Setting a Destination as Home 16 Sa...

Страница 7: ...lock 24 Time Zone 24 Information Information Menu 25 Viewing Dashboard 25 Viewing GPS Status 26 Viewing System Information 26 Updating Software and Map Data Access software and or Map updates 26 Refer...

Страница 8: ...d Self tapping screw M4 14 4 13pin RGB extension Cable 1 USB mini Cable 1 GPS antenna 1 GPS Waterproof pad 1 Cable clamp for GPS antenna 5 Antenna mounting plate 1 Owner s Manual 1set System Features...

Страница 9: ...information See pages 25 26 2 Go to Button Press this to start entering a destination See pages 10 15 3 Home Button Press this to go to a saved home location See page 20 4 Settings Button Press this...

Страница 10: ...map 3D View The 3D View offers you a more realistic perspective by tilting the map and displaying it with a horizon line Streets are displayed as you approach them instead of from a birds eye view 5...

Страница 11: ...e arrow changes to a crosshair cursor 2 Touch the selected position bar on the bottom of the screen 3 Select Find Nearby Places 4 Select the desired category and the desired place 5 Touch Go on the Co...

Страница 12: ...See pages 12 13 4 Returns to the previous screen 5 Page List Down 6 Map Button Press this to go to the map See page 8 7 Address Book Button Select from saved destinations See page 13 8 Intersection B...

Страница 13: ...ty If there are multiple matches the system lists cities containing the street name and address number that you keyed in 6 The Confirm Destination Screen appears Touch Go to calculate the route 7 See...

Страница 14: ...he arrow to the right of the list to scroll up and down the list 4 Select the desired place For emergency locations such as Police Stations Hospitals etc please verify availability before proceeding t...

Страница 15: ...stination options on the Confirm Destination Screen see pages 16 18 for details Go to Main Menu History 1 Touch Clear All 2 Touch Yes to delete all previous destinations Set a Destination from the Add...

Страница 16: ...ersection 1 Select by Street 2 Type in the first street name Touch OK The list of applicable street names appears Select the desired street and input the address number 3 Input the second street name...

Страница 17: ...ering the street information 1 Select by City 2 Type the city name then select the city from the list 3 Input the first street name 4 Input the second street name 5 The Confirm Destination Screen appe...

Страница 18: ...ding Nearby Places 1 Touch Find Nearby Places 2 Select a desired place type 3 Select a desired place name 4 Touch Go to calculate the route To find local places directly from the map go to page 9 Find...

Страница 19: ...Go to calculate the route 1 Before you touch Go at the Waypoint List screen touch Add Waypoint 2 Enter the waypoint with any method just as finding a destination pages 10 15 3 Touch Set as Waypoint to...

Страница 20: ...ap screen touch Map to get back to the map 1 Main Menu Info Route Edit Waypoint or from the Map Route Button Edit Waypoint 2 At the Waypoint List Screen select the desired waypoint to edit 3 Touch Edi...

Страница 21: ...n touch Change Method You can select and re calculate an alternate route based on Quickest Route or Shortest Route and select Avoid Freeway Toll Road Time Restricted Road or Ferry Finding a Detour By...

Страница 22: ...annot select Route Menu until the next destination has been set To set next the destination see Go to Menu on page 10 You can go Home from anywhere once the Home Address is set See page 16 to set a de...

Страница 23: ...page 23 4 Returns to the previous screen 5 Page List Down 6 Map Button Press this to go to the map See page 8 7 Audio Button For audio settings see page 23 8 Regional Button For Regional settings see...

Страница 24: ...is synchronized with the color setting on the connected iXA W404 etc Customizing Map You can customize map color vehicle icon and place icons on the map Go to Main Menu Map Touch OK to complete the se...

Страница 25: ...ce begins When approaching a maneuver the map automatically zooms in This button avoids using roads not verified by the map provider You can watch a navigation demonstration with the system s voice an...

Страница 26: ...nguage from English French and Spanish You can set the Units of Measure to read in kilometers or miles You can set the Clock to 12 or 24 hour style and set Daylight Savings to fit your region You can...

Страница 27: ...system information see page 26 Viewing Dashboard Go to Main Menu Info Dashboard The odometer displays the speed and time traveled Information 4 1 3 2 Driving Average Average speed Overall Average Aver...

Страница 28: ...osition Temporary Poor GPS Coverage Thunderstorms dense foliage or surrounding tall buildings may cause temporary loss of position fix acceptable if under 30 seconds Poor GPS Signal Lost Position Fix...

Страница 29: ...be connected to the unit However some units may not work or some functions may not work when connecting to this unit For details contact your Alpine dealer Reset If malfunction occurs disconnect the u...

Страница 30: ...E ELECTRONICS GmbH Frankfurter Ring 117 80807 M nchen Germany Phone 089 32 42 640 ALPINE ELECTRONICS OF U K LTD Alpine House Fletchamstead Highway Coventry CV4 9TW U K Phone 0870 33 33 763 ALPINE ELEC...

Отзывы: