background image

English

152

Other Useful
Features

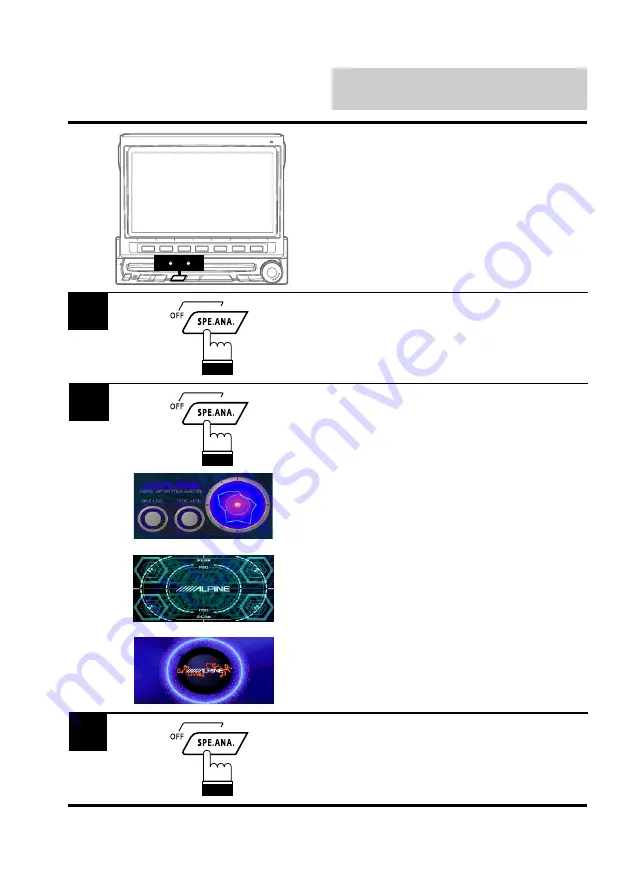
While the main screen for a music source is
displayed, press the SPE.ANA. button to turn
on the spectrum analyzer mode.

1

2

1

3

Displaying Spectrum
Analyzer

When this unit is connected to an external
audio processor and an external amplifier, or to
an external audio processor without a spectrum
analyzer function, this feature does not function.

Each time you press the SPE.ANA. button, the
spectrum analyzer modes change. There are
three modes, select your desired mode to
match the music being played.

Mode 1: This mode can be used for any genre

of music.

Mode 2: This mode is suitable to vocal song

music.

Mode 3: This mode emphasizes the rhythmical

bass sound and gives an image of
vivid low frequencies.

2

To deactivate the spectrum analyzer mode,
press the SPE.ANA. button for at least 2
seconds.

3

Содержание IVA-C800E

Страница 1: ...rezzano Sul Naviglio MI Italy Tel 02 48 47 81 ALPINE ELECTRONICS FRANCE S A R L RCS PONTOISE B 338 101 280 98 Rue De La Belle Etoile Z I Paris Nord Il B P 50016 F 95945 Roissy Charles De Gaulle Cedex France Tel 01 48 63 89 89 ALPINE ELECTRONICS OF U K LTD 13 Tanners Drive Blakelands Milton Keynes MK14 5BU U K Tel 01908 61 15 56 ALPINE ELECTRONICS DE ESPAÑA S A Portal De Gamarra 36 Pabellón 32 0101...

Страница 2: ... not installed correctly the driver will be able to watch the TV Video while driving the vehicle and may be distracted from looking ahead causing an accident The driver or other people could be severely injured DO NOT OPERATE ANY FUNCTION THAT TAKES YOUR ATTENTION AWAY FROM SAFELY DRIVING YOUR VEHICLE Any function that requires your prolonged attention should only be performed after coming to a co...

Страница 3: ...nd may result in fire MINIMIZE DISPLAY VIEWING WHILE DRIVING Viewing the display may distract the driver from looking ahead of the vehicle and cause an accident DO NOT WATCH VIDEO WHILE DRIVING Watching the video may distract the driver from looking ahead of the vehicle and cause an accident KEEP THE VOLUME AT A LEVEL WHERE YOU CAN STILL HEAR OUT SIDE NOISE WHILE DRIVING Failure to do so may resul...

Страница 4: ...sonal injury or damage to the product DO NOT MIX NEW BATTERIES WITH OLD BATTERIES INSERT WITH THE CORRECT BATTERY POLARITY When inserting the batteries be sure to observe proper polarity and as instructed Rupture or chemical leakage from the battery may cause fire or personal injury Remove the anti theft cover when you drive This prevents the cover from falling off the unit and interfering with th...

Страница 5: ...de if the car is moving The car must be parked and the parking brake must be en gaged for the procedure described in the Owner s Manual to be valid The warning CAN T OPERATE WHILE DRIVING will be displayed if any attempts are made to perform these operations while driving This operation is the same as when selecting sources using the remote control RUE 4185 When the car is parked the selection is ...

Страница 6: ...3 Storing into Direct Access Preset D A P Band 44 45 Tuning to Preset Stations 46 47 Selecting Preset Stations from List Displayed 48 49 T R V S Search for Local Stations CD Player Changer Optional Operation 50 51 Playing CD Player or Changer Optional 54 55 Fast Forward and Backward 54 55 Music Sensor Skip 56 57 Repeat Play on Single Track 58 59 M I X Random Play 60 61 Displaying and Scrolling CD ...

Страница 7: ...ions CDs 160 161 Adjusting Subwoofer Level 164 165 Switching Phase 166 167 Setting the External Device Interrupt Mode 170 171 Setting Interrupt Icon Display 172 173 Setting Bass Frequency 174 175 Setting Visual Modes 176 177 Selecting Rear Monitor 180 181 Displaying Time 182 183 Resetting Clock 186 187 Setting Daylight Saving Time 188 189 Turning Sound Guide Function On or Off 190 191 Demonstratio...

Страница 8: ...ircuitry Also have your vehicle s voltage regulator checked Maintenance If you have problems do not attempt to repair the unit yourself Return it to your Alpine dealer or the nearest Alpine Service Station for servicing Installation Location Make sure the IVA C800E monitor receiver will not be exposed to Direct sun and heat High humidity Excessive dust Excessive vibrations Alpine products equipped...

Страница 9: ... shows DVD AUX2 instead of AUX1 AUX2 4 This section describes the basic operation of the radio These operations also apply to the other sources Basic Operation To be continued Volume Level Niveau du volume Current Time Heure actuelle Selected Source Source sélectionnée The Function Guide displays the labels for each of the Function buttons These labels will change depending upon the functions for ...

Страница 10: ...ble monitor is opened do not place any object on the monitor and be careful not to bump or apply any pressure to the monitor while it is open This can cause damage to the mechanism Under low ambient temperature conditions the display may be dark for a short period of time immediately after the power is turned on Once the LCD has warmed up the display will return to normal For your safety some oper...

Страница 11: ...or touches an obstacle while it is being lowered the unit will stop lowering the monitor immediately Should this occur remove the obstacle and press the OPEN CLOSE button again to lower the monitor Lowering the Monitor Note The IVA C800E is a precision device With gentle handling its unique capabili ties can be enjoyed for a long time 1 ...

Страница 12: ... the battery post should the vehicle be left unused for an extended period of time An SPST Single Pole Single Throw switch sold separately can be added to simplify this procedure Then you can simply place it in the OFF position when you leave the vehicle Turn the SPST switch back ON before using the IVA C800E For connecting the SPST switch refer to the Installation manual Some operation of the uni...

Страница 13: ...roduces a beep and changes the screen angle between 80 and 104 degrees Notes If the monitor touches an obstacle while the angle is being adjusted the unit will stop the screen immediately Should this happen remove the obstacle and press the or button again The screen colour will vary when viewed at certain angles Adjust the screen angle for the best viewing position If the voltage of the vehicle s...

Страница 14: ...ss Treble Balance Fader 2 Rotate the rotary encoder to set to the desired sound within 5 seconds after selecting the mode Note If the rotary encoder is not turned or pressed within 5 seconds after selecting the BAS Bass TRE Treble BAL Balance or FAD Fader the unit automatically defaults back to the VOL Volume mode Press the MUTE button to switch between the Mute On and Off modes When the MUTE On m...

Страница 15: ...f modes Turning Loudness On or Off Loudness introduces a special low and high frequency emphasis at the lower volume settings This compensates for the ear s decreased sensitivity to bass and treble sound at these low listening levels Note When an equalizer or digital sound processor is connected this function is inoperative 1 ...

Страница 16: ...ncy downward or upward respectively Each press changes the frequency by one step When the button is pressed and held the frequency changes continuously until the button is released Note When a stereo FM station is tuned in the STEREO indicator appears in the display 5 Press the 2 TUNE button to choose the manual tuning mode Each press changes the function modes for the buttons 1 and 3 as follows D...

Страница 17: ...ng is DX Press the BAND button repeatedly to select the desired radio band FM or AM 1 2 Press the 2 TUNE button to select the desired mode DX or Local Each press changes as follows Distance Local Manual Press the 1 g or 3 f button to automatically seek a radio station downward or upward respectively When the unit finds a station it stops To automatically seek next station press the same button aga...

Страница 18: ...1 2 3 PAGE 1 2 P SET 1 P SET 2 P SET 3 P SET 4 P SET 5 P SET 6 While the P SET1 through P SET6 indicators in the display are blinking press the Function button into which you wish to store the station within 5 seconds The indicators in the display stop blinking showing that the station has been memorized at the Preset button pressed 3 4 Repeat the above procedure 1 to 3 to store up to 5 other stat...

Страница 19: ...uner automatically seeks and stores 6 strong stations into the 1 P SET1 to 6 P SET6 buttons in order of signal strength When the automatic storing has been com pleted the tuner goes to the station stored in the 1 P SET1 button Notes If no stations are stored the tuner will return to the original station you were listening to before the automatic storing procedure began The radio station names titl...

Страница 20: ...ton in the radio mode to activate the D A P mode 1 To memorize stations onto the D A P band follow the steps for the Manual Storing of Station Presets procedure on page 38 Note This function can be used together with the Automatic Memory Preset if you want to have all AM or all FM stations stored into D A P 2 1 3 D A P 3 Press the 4 D A P button for a second time to deactivate the D A P mode D A P...

Страница 21: ...select the D A P band press the 4 D A P button 1 Tuning to Preset Stations You can tune in the preset stations in memory on each band using the Function buttons Press the Function button 1 P SET1 through 6 P SET6 that has your desired preset station in memory The preset station is received 2 1 2 P SET 1 P SET 2 P SET 3 P SET 4 P SET 5 P SET 6 ...

Страница 22: ...ations with the station titles if they have been titled Rotate the rotary encoder to select a desired preset station from the list 2 3 When a desired station is selected press the rotary encoder The unit receives the selected preset station Notes Press the LIST or FUNC RETURN button while in the preset list menu station title list to return to the radio mode display With the preset list menu displ...

Страница 23: ...the display shows NO MEMORY 2 Press the 1 P DN or 3 P UP button and select your desired station 3 4 To deactivate the T R V S mode press the 5 T R V S button T R V S Search for Local Stations Using the T R V S feature of this unit you can automatically seek and memorize up to 12 local stations max in a memory separate from your regular preset memory This keeps the currently preset stations you nor...

Страница 24: ...sc 2 1 4 3 Press the SOURCE button to display the main menu screen 1 Rotate the rotary encoder and select the CD player mode Then press the rotary encoder to execute the selection The display shows the CD player mode screen When a CD is inserted into the CD SLOT of the IVA C800E with the label side facing up the unit starts to play the CD When an optional Alpine CD player is con nected inserting a...

Страница 25: ... on the optional CD player Notes Three inch 8cm CD s can be used Only compact discs containing the mark shown can be used We cannot fully guarantee the playback of CD R CD Recordable You cannot playback CD RW CD ReWritable on this unit Be sure to turn the ignition key to the ACC or ON position before inserting an CD Otherwise it may cause damage to the player ...

Страница 26: ...eature allows you to go to the beginning of a track Lightly press the 1 g button during the CD play to return to the beginning of the current track If you wish to return to the beginning of a track further back repeatedly press the 1 g button until the desired track is reached Lightly press the 3 f button during the CD play to advance to the beginning of the next track If you wish to advance to th...

Страница 27: ...The track will be repeatedly played until the repeat mode is cancelled To cancel the repeat play press the 4 REPEAT button until the REPEAT indication disappears Note Some Alpine CD changers have a REPEAT ALL function With REPEAT ALL selected all tracks on the selected disc will be played repeatedly Repeat Play on Single Track 1 REPEAT ...

Страница 28: ... X mode is cancelled To cancel the M I X play press the 5 M I X button repeatedly until the M I X indicator disappears Notes If the CD changer connected has the M I X ALL function you may select M I X ALL from the menu In this case all the tracks on all the discs in the magazine will play back in a random sequence Once all the tracks on all the discs have been played back once the CD changer begin...

Страница 29: ...d Text Title this unit allows you to title name CDs see page 156 Text Some CDs have pre recorded text information for the CD track names etc Notes If either of the disc and track titles is unavailable the space for that title in the display will be left blank If neither of the disc and track titles is available the display will show NO TITLE For the MD player the same display as above will be show...

Страница 30: ...f the disc titles will be displayed CD changer CD when connected to the CD player mode The list of CD titles will be displayed 1 Displaying List of Track Titles CD Titles If titles have been memorized for CDs the CD title list can be displayed and CDs can be selected by their titles For memorizing titles see pages 156 and 158 2 3 1 Rotate the rotary encoder and select highlight your desired Track ...

Страница 31: ...s NO TITLE If no disc is loaded the display shows NO DISC Pressing the LIST or FUNC RE TURN button while the list of the disc titles is being displayed changes the display back to the CD CD changer mode screen To directly go to the preset radio station list screen press the 1 RADIO button Then press the BAND button to change the radio band Press the 2 button display the title list or the track tit...

Страница 32: ...ttons 1 DISC1 through 6 DISC6 select the discs from the first disc to 6th disc For example press the 3 DISC 3 button to select the third disc Note To select your desired track number on the selected disc lightly press the 1 g or 3 f repeatedly until your desired track number is displayed 3 Controlling CD Changer If an optional Alpine CD Changer 6 Disc or 12 Disc is connected to the IVA C800E the C...

Страница 33: ...to select the disc numbers 7 to 12 The Function Guide display changes and now the Function buttons 1 6 represent disc numbers 7 12 Press the Function buttons 1 through 6 to select your desired disc For example to select 9th disc press 3 DISC 9 button Note To select your desired track number on the selected disc lightly press the 1 g or 3 f repeatedly until your desired track number is displayed PA...

Страница 34: ... 1 4 when one KCA 400C is connected or changer 1 6 when two KCA 400Cs are connected Then press the rotary encoder The display shows the selected CD changer mode screen Note When one KCA 400C is connected to the changer Changer 1 4 is displayed in the main menu When two KCA 400Cs are connected to the changer Changer 1 6 is displayed in the main menu 2 2 1 3 3 In Changer mode you can select the next...

Страница 35: ...ng an MD use your finger to feel around the MD cartridge If you feel any small bumps or irregularities remove them because these may cause a malfunction or damage to the player 2 Playing Mini Disc MD When an optional Alpine MD player is con nected to the IVA C800E you can control the player from the IVA C800E When the MDA 5051 is connected MDs can be played back only 3 Press the 2 J button to temp...

Страница 36: ... 3 f button once to advance to the beginning of the next track If you wish to access a track further ahead press repeatedly until the desired track is reached 2 Press and hold the 1 g or 3 f button to quickly move backward or forward until you reach the desired section of the track When you reach the desired section release the button The player starts playing from that section 1 Music Sensor Skip...

Страница 37: ... the repeat play 1 Repeat Play Press the 5 M I X button in the play or pause mode The M I X indicator will illuminate and the tracks on the disc will be played back in a random sequence After all the tracks on the disc have been played back once the player will begin a new random sequence play until the M I X mode is deactivated To stop the M I X play press the 5 M I X button repeatedly until the ...

Страница 38: ...lling The title will be scrolled repeatedly To deactivate the auto scrolling press and hold the 6 SCROLL button for at least 2 seconds Notes Depending on the MD deck used for recordings inputting titles the characters may not be displayed correctly If the MD title or track titles are not memorized the unit displays NO TITLE 2 Scrolling Displayed Titles The MD player can scroll titles disc or track...

Страница 39: ...ll appear Notes If the MD is not titled the display shows NO TITLE If no MD is loaded the display shows NO DISC Pressing the LIST or FUNC RE TURN button while the list of the titles is being displayed changes the display back to the MD player mode screen To directly return to the preset radio station list screen while the list of the titles is being displayed press the 1 RADIO button Then press th...

Страница 40: ...shows the cassette player mode screen When you play a cassette tape recorded using Dolby B Noise Reduction press the 5 DOLBY B button to activate or deactivate Dolby B Noise Reduction 3 To stop tape play and eject the cassette tape press the EJECT button on the cassette player 4 Controlling Cassette Player If an optional Alpine cassette player is con nected to the IVA C800E it can be controlled fr...

Страница 41: ...es the desired portion press and hold the 3 f or 1 g button again for at least 2 seconds or press the 2 J button to resume tape play 1 Press the FUNC PROG button to change the tape direction to play the other side of the tape 2 Press the 2 J button to temporarily pause the tape play Press again to resume tape play 3 Fast Forward Rewind Reversing Tape Direction Pause PROG 3 1 2 ...

Страница 42: ... to skip is obtained 1 Programme Sensor Lightly press the 3 f button once during tape play to advance to the beginning of the next programme If you wish to advance to a program further ahead press repeatedly until the number of programmes you would like to skip is obtained 2 Press the 4 REPEAT button to play back repeatedly the programme being currently played To stop the repeat play press the 4 R...

Страница 43: ...peration Optional Press the 6 B SKIP button during tape play to skip over blank portions of the tape lasting 15 seconds or longer To deactivate the blank skip mode press the 6 B SKIP button for a second time 1 Blank Skip 1 B SKIP ...

Страница 44: ...eo while driving the vehicle The driver may be distracted from looking ahead and an accident could occur Install the IVA C800E correctly so that the driver cannot watch TV Video unless the vehicle is stopped and the emergency brake is applied If the IVA C800E is not installed correctly the driver will be able to watch the TV Video while driving the vehicle and may be distracted from looking ahead ...

Страница 45: ...en Insert a disc into the DVD video CD CD player the player starts playing Note Press the FUNC F GUIDE button during DVD video CD CD play to turn on or off the Function Guide display In the ON position The Function Guide display will always be shown In the OFF position The Function Guide display will disappear after approx 5 seconds if no button is pressed If you want to display the Function Guide...

Страница 46: ... second time 1 Lightly press the 1 g or 3 f button during DVD video CD CD play to return to the beginning of the chapter track being currently played or advance to the beginning of the next chapter track respectively Note The word chapter or track means a division of the recorded picture sound on a DVD video CD CD respectively 1 Still Pause Chapter DVD Track Video CD Sensor 1 1 ...

Страница 47: ...d 1 Press the 4 REPEAT button during play to repeatedly play the chapter track or title disc being currently played Each press changes the repeat play as follows DVD Chapter Repeat Off repeat play normal play Video CD CD Track Disc repeat play repeat play Note The track disc repeat modes cannot be used on video CDs with playback control PBC Press MENU to turn the PBC function off For more details ...

Страница 48: ...Notes You cannot use the repeat play mode during M I X play The M I X play mode cannot be used on video CDs with the playback control PBC Press MENU to turn the PBC function off For more details see the operating instruc tions of your DVD player M I X 1 Playing tracks in random order M I X Video CD CD You can play all the tracks in random order You can use the M I X function only on the connected ...

Страница 49: ...iver cannot watch TV Video unless the vehicle is stopped and the emergency brake is applied If the IVA C800E is not installed correctly the driver will be able to watch the TV Video while driving the vehicle and may be distracted from looking ahead causing an accident The driver or other people could be severely injured Press the SOURCE button The main menu screen appears on the display 1 2 Rotate...

Страница 50: ...een 3 Select a desired Equalizer characteristic curve and press the corresponding Function button 1 FLAT through 6 NEWS You can select your desired equalizer charac teristic curve from 6 preset characteristic curves FLAT MALE FEMALE POPS ROCK and NEWS 4 To be continued Selecting Factory Maker s Equalization Presets If an optional Alpine Equalizer is connected to the IVA C800E the Equalizer can be ...

Страница 51: ...When the FUNC RETURN button is pressed the display returns to the previous screen Tip In the equalizer mode for example you can horizontally scroll each of the mode screens by rotating the rotary encoder to the left or right You can also adjust the volume level by pressing and rotating the rotary encoder DHE Surround BBE listening position time collection mode main screen only 5 RETURN ...

Страница 52: ...otary encoder to execute the selection Make level adjustments by rotating the rotary encoder Press and release the rotary encoder at the desired level Repeat the above steps to adjust other frequencies 5 When the adjustments have been completed press the FUNC RETURN button The display changes to the Equalizer mode screen 6 Creating Personal Equal izer Characteristic Curves You can create your own ...

Страница 53: ...1 Press and hold the FUNC RETURN button for at least 2 seconds The display changes to the surround adjust ment screen 2 Press the rotary encoder to select the surround delay time or surround level that you wish to adjust Each press toggles between the surround delay time and surround level modes 3 4 Turn the rotary encoder clockwise or counter clockwise to adjust the surround sound level or delay ...

Страница 54: ...er to execute the selection The DHE mode screen appears Press one of the Function buttons 2 MODE1 through 6 MODE5 that has your desired DHE mode There are 5 modes as follows When the 1 OFF button is pressed the DHE mode will be deactivated 4 Beat MIX MODE3 Balances the bass sound to make it brighter Beat MAX MODE1 Lyric MIX MODE4 Reproduces voice of female singers clearer Lyric MAX MODE2 Phase MIX...

Страница 55: ...ion Optional When you have selected your desired DHE mode press the FUNC RETURN button The display returns to the Audio Processor List screen Tip When the FUNC RETURN button is pressed the display returns to the previous screen 5 RETURN ...

Страница 56: ...F mode Each press toggles between the Power Fine on and off modes When it is set to the ON mode the DHE effects will be enhanced Effect of the Power On mode More powerful bass sound and crisp clear sound will be produced Effect of the Fine On mode Vocal chorus music will be refined and becomes clearer 3 1 2 3 MODE 1 MODE 2 MODE 3 MODE 4 MODE 5 RETURN Setting DHE Power or Fine Mode The DHE Power an...

Страница 57: ...button The main menu screen appears in the display 1 Press the 4 A PROC button The Audio Processor List screen is displayed 2 Rotate the rotary encoder and select BBE from the list displayed Press the rotary encoder to execute the selection The display changes to the BBE mode screen 3 Select a desired BBE mode and press the corresponding Function button 2 MODE1 through 4 MODE3 The effect is propor...

Страница 58: ...evel Low and High adjustment feature is connected Press and hold the FUNC RETURN button for at least 2 seconds The BBE adjustment mode is activated 2 Press the rotary encoder to select HI LEVEL or LOW LEVEL Each press toggles between HI LEVEL and LOW LEVEL 3 Rotate the rotary encoder and adjust the level to your desired level 4 When adjustment is complete press the FUNC RETURN button The display r...

Страница 59: ...Function buttons 2 ALL through 5 FRONT RIGHT that has your desired listening position Notes The black squares show the listening positions When the 1 OFF button is pressed the L P S mode is deacti vated 4 When selection has been completed press the FUNC RETURN button The display returns to the Audio Processor List screen Tip When the FUNC RETURN button is pressed the display returns to the previou...

Страница 60: ...ges to the L P S adjustment mode 2 3 4 Rotate the rotary encoder to adjust to the desired listening position When the rotary encoder is rotated in the F R mode the cursor moves forward or backward and when it is rotated in the L R mode the cursor moves to the left or right When adjustment is complete press the FUNC RETURN button The display returns to the L P S mode screen 5 2 5 3 4 RETURN Press t...

Страница 61: ... Corr Time Correction then press the rotary encoder The display changes to the Time Correction mode screen 3 4 Press and hold the FUNC RETURN button for at least 2 seconds The display changes to the Time Correction Adjustment mode screen Press the rotary encoder repeatedly to select the position seat you wish to adjust Each press changes the seat positions as follows Fr Left Fr Right Rear Left Rea...

Страница 62: ...e to increase or decrease the Time Correction value respectively to your desired value When adjustment has been completed press the FUNC RETURN button The display returns to the Time Correction mode screen Tip When the FUNC RETURN button is pressed the display returns to the previous screen 7 6 RETURN ...

Страница 63: ...ay 1 Press the 4 A PROC button The display shows the Audio Processor list screen 2 Rotate the rotary encoder and select the Divider when one divider is connected or Divider F and Divider R when two dividers are connected then press the rotary encoder to execute the selection The display changes to the Divider mode screen 3 Press and hold the FUNC RETURN button for at least 2 seconds The mode chang...

Страница 64: ...ress changes the channel as follows When only one 2 way divider is connected Low F High R High When two 2 way dividers are connected Low High Each time the 6 F R button is pressed the mode switches between the Front adjustment and Rear adjust ment modes and the display also changes Low High When only one 3 way divider is connected Low Mid L Mid H High When two 3 way dividers are connected Low Mid ...

Страница 65: ...ed L Low R Low F High L R High R R High L F High R When two 2 way system dividers are connected L Low R Low L High R High Each time the 6 F R button is pressed the mode switches between the Front adjustment and Rear adjustment modes and the display also changes L Low R Low L High R High When only one 3 way divider is connected L Low R Low L Mid R Mid L High R High When two 3 way dividers are conne...

Страница 66: ...ional Rotate the rotary encoder clockwise or counterclockwise to adjust to your desired level upward or downward respectively 4 When adjustments have been completed press the FUNC RETURN button The display returns to the Divider mode 5 RETURN ...

Страница 67: ...e channels as follows When only one 2 way divider is connected L Low R Low F High L R High R R High L F High R When two 2 way dividers are connected L Low R Low L High R High Each time the 6 F R button is pressed the mode switches between the Front adjustment and Rear adjustment modes and the display also changes L Low R Low L High R High When only one 3 way divider is connected L Low R Low L Mid ...

Страница 68: ... Rotate the rotary encoder clockwise or counterclockwise to adjust the time correction value upward or downward respectively 4 When adjustments have been completed press the FUNC RETURN button The display returns to the Divider mode screen 5 RETURN ...

Страница 69: ... screen Press and hold any one of the Function buttons 1 P SET1 through 4 P SET4 for at least 2 seconds The indicators for the 4 buttons blink for 5 seconds 1 While the indicators are still blinking Press the Function button into which you want to memorize preset the divider settings Repeat the above steps to memorize 3 other divider settings 2 1 2 P SET 1 P SET 4 P SET 3 P SET 2 P SET 1 P SET 4 P...

Страница 70: ...ET4 that has your desired divider settings The divider setting stored at the Function button will be recalled Tip You can also recall your desired divider settings memorized by pressing the 4 P DN or 5 P UP button in the Divider mode 1 Recalling Memorized Divider Settings Using Function Buttons P SET 1 P SET 4 P SET 3 P SET 2 1 ...

Страница 71: ... menu is displayed on the display 1 Press the 4 A PROC button The Audio Processor List screen is displayed 2 Rotate the rotary encoder and select Adaptive EQ The Function Guide screen is displayed 3 Press one of the Function buttons 1 P SET1 through 6 P SET6 that has your desired setting memorized using the optional divider 4 Press the FUNC RETURN button The display returns to the main menu screen...

Страница 72: ...acter istic curve 2 Memorizing Characteris tic Curves Equalization characteristic curves created by yourself or factory preset can be stored in memory While the Function Guide indicators are blinking press the Function button 1 P SET1 through 6 P SET6 into which you wish to memorize the characteristic curve Now the characteristic curve has been memorized Repeat this procedure to memorize other cha...

Страница 73: ...o Processor List screen Rotate the rotary encoder and select the desired mode by moving the cursor The Function Guide for the selected mode is displayed 1 Press the Function buttons 1 through 6 that has your desired characteristic curve The list shows the details of the curve selected 2 Selecting Characteristic Curves from Displayed Audio Processor List You can select your desired characteristic c...

Страница 74: ...thout a spectrum analyzer function this feature does not function Each time you press the SPE ANA button the spectrum analyzer modes change There are three modes select your desired mode to match the music being played Mode 1 This mode can be used for any genre of music Mode 2 This mode is suitable to vocal song music Mode 3 This mode emphasizes the rhythmical bass sound and gives an image of vivi...

Страница 75: ... becomes flat Press the SOURCE button The main menu screen appears on the display 1 3 1 2 4 Press the 4 A PROC button The display shows the Audio Processor List screen 2 A PROC 3 Rotate the rotary encoder and select Defeat The Function Guide is displayed Press the 2 ON button to turn on the defeat mode The sound signals pass the BBE and surround circuits To turn off the defeat mode press the 1 OFF...

Страница 76: ...coder and select the desired character for the first position To change between upper case lower case numeral and symbol press the 3 A 1 button Each press changes the bottom menu To be continued 3 4 2 6 Titling Radio Stations CDs You can title radio stations and CDs This manual describes how to title radio stations Immediately after inputting titles or changing the settings of Initialize Mode or D...

Страница 77: ... new station the oldest title will be erased to make room for the new one To delete a title select the title you want to delete then select SPC space and press 6 WRITE button When the 1 BACK or 2 NEXT button is pressed the cursor moves to the left or right on the input titles If an incorrect character has been entered select SPC space and input a new character or press the 4 DELETE button to delet...

Страница 78: ...ings may not be changed Note The Parking Brake must be engaged to access the Initialization mode screen Trying to access this screen while driving will display the warning CAN T OPER ATE WHILE DRIVING 2 7 1 4 5 3 6 Press the SOURCE button The main menu appears on the display 1 Press the 6 INTLZ button The Initialization mode screen is displayed 2 INTLZ 3 Rotate the rotary encoder and select Sub wf...

Страница 79: ...connect a subwoofer you need an amplifier with built in low pass filter The low pass filter passes only the frequencies below the selected cut off frequency Any high frequency content of the audio signal above the cut off will be removed With the Initialization screen displayed pressing and rotating the rotary encoder can adjust the volume level 7 RETURN 6 Press the rotary encoder repeatedly to se...

Страница 80: ...ction press the 1 OFF button 4 0 180 When setting has been completed press the FUNC RETURN button The display returns to the main menu screen 5 RETURN Switching Phase Use the phase switching function after connect ing your audio processor amplifier and subwoofer to the IVA C800E Immediately after inputting titles or changing the settings of Initialize Mode or Display Mode while the system is input...

Страница 81: ...refer to the manual for NVE K200 Immediately after inputting titles or changing the settings of Initialize Mode or Display Mode while the system is inputting the titles or data automatically do not turn the ignition key engine key to OFF Otherwise the title may not be written or the settings may not be changed Press the SOURCE button The main menu screen appears on the display 1 3 1 2 4 5 2 Press ...

Страница 82: ...nnected must have an Interrupt wire with a positive trigger for this function to operate automatically Otherwise a separate switch needs to be added to switch manually 5 RETURN Press the 1 OFF button to turn off the mute mode In the mute OFF mode The volume level can be adjusted in the interrupt mode Note When the Mute On mode is selected sound will not be produced 4 OFF ...

Страница 83: ... automatically do not turn the ignition key engine key to OFF Otherwise the title may not be written or the settings may not be changed Press the SOURCE button The main menu appears on the display 1 3 1 2 4 Press the 6 INTLZ button The Initialization mode screen appears 2 INTLZ Rotate the rotary encoder and select IN INT The Function Guide is displayed 3 Press 1 TEL button When the external device...

Страница 84: ...frequency you wish to control 4 60Hz 70Hz 80Hz 100Hz Press the FUNC RETURN button The display returns to the main menu screen 5 RETURN Setting Bass Frequency Immediately after inputting titles or changing the settings of Initialize Mode or Display Mode while the system is inputting the titles or data automatically do not turn the ignition key engine key to OFF Otherwise the title may not be writte...

Страница 85: ... the V SEL button on the IVA C800E Immediately after inputting titles or changing the settings of Initialize Mode or Display Mode while the system is inputting the titles or data automatically do not turn the ignition key engine key to OFF Otherwise the title may not be written or the settings may not be changed Press the V SEL button to preset the desired item Each press changes the visual modes ...

Страница 86: ...mmediately after inputting titles or changing the settings of Initialize Mode or Display Mode while the system is inputting the titles or data automatically do not turn the ignition key engine key to OFF Otherwise the title may not be written or the settings may not be changed 3 1 2 4 Press the 6 INTLZ button The Initialization mode screen appears 2 INTLZ Rotate the rotary encoder and select AUX O...

Страница 87: ...and sound Notes If the DVD player DVA 5205E is connected to the AUX1 terminal and the V OUT button on the remote control supplied with the DVD player DVA 5205E is pressed and held for more than 2 seconds after having performed steps 1 to 4 on page 176 178 the picture and voice will be produced To deactivate the mode preTo deactivate the mode press the same button ss the same button If no particula...

Страница 88: ...omatically do not turn the ignition key engine key to OFF Otherwise the title may not be written or the settings may not be changed 3 1 2 5 4 Press the 6 INTLZ button The Initialization mode screen appears 2 INTLZ Rotate the rotary encoder and select CLOCK DISP The Function Guide appears 3 4 Press the 1 OFF or 2 ON button to turn off or on the clock display respectively OFF ON 5 Press the FUNC RET...

Страница 89: ...itten or the settings may not be changed Press the SOURCE button The main menu appears on the display 3 1 2 6 4 5 Press the 6 INTLZ button The Initialization mode screen appears 2 INTLZ Rotate the rotary encoder and select CLOCK ADJ to activate the clock adjustment mode The Function Guide appears 3 4 Press the 1 DN or 2 UP button to delay or advance the hours respectively DN HOUR UP 5 To be contin...

Страница 90: ... To quickly set the time to the nearest hour press the 5 TIME RESET button If the displayed time is before the half hour pressing the 5 TIME RESET button sets the clock back to the previous hour If the displayed time is after the half hour pressing the 5 TIME RESET button sets the clock forward to the beginning of the next hour 6 RETURN ...

Страница 91: ...e ignition key engine key to OFF Otherwise the title may not be written or the settings may not be changed 3 1 2 5 4 Press the 6 INTLZ button The Initialization screen is displayed 2 INTLZ Rotate the rotary encoder and select Summer Time The Function Guide is displayed 3 4 Press the 2 ON button to place the Summer Time mode ON The time advances by one hour To return to the ordinary time press the ...

Страница 92: ...a automatically do not turn the ignition key engine key to OFF Otherwise the title may not be written or the settings may not be changed 1 3 1 2 5 4 Press the 6 INTLZ button The Initialization mode screen appears 2 Rotate the rotary encoder and select BEEP The Function Guide is displayed 3 INTLZ Press the 2 ON button to activate the Sound Guide mode The display shows BEEP ON Press the 1 OFF button...

Страница 93: ... OFF Otherwise the title may not be written or the settings may not be changed 3 1 2 4 Press the 6 INTLZ button The Initialization mode screen appears 2 INTLZ Rotate the rotary encoder and select DEMO to activate the Demonstration mode The display shows the Function Guide screen 3 Press the 2 ON button to activate the Demonstration mode When the Demonstration mode is activated the unit automatical...

Страница 94: ...e system is inputting the titles or data automatically do not turn the ignition key engine key to OFF Otherwise the title may not be written or the settings may not be changed 3 1 2 5 4 Press the 6 INTLZ button The Initialization mode screen appears 2 INTLZ Rotate the rotary encoder and select AUTO OPEN The display shows the Function Guide 3 Press the 2 ON button to set the Auto Opening mode ON To...

Страница 95: ...lay 2 Press the 5 DISPLAY button The Display mode screen appears DISPLAY 3 Rotate the rotary encoder and select BRIGHT to activate the Brightness Adjustment mode The display shows the Function Guide 4 Press the 1 DARK to make the picture darker or press the 3 LIGHT to make the picture brighter You can adjust the brightness between MIN 15 and MAX 15 When it reaches the minimum or maximum point the ...

Страница 96: ...anging the settings of Initialize Mode or Display Mode while the system is inputting the titles or data automatically do not turn the ignition key engine key to OFF Otherwise the title may not be written or the settings may not be changed 2 1 3 Press the 1 GRN button to adjust green and press the 3 RED button to adjust red To quickly set to the center position press the 2 0 button 2 GRN 0 RED When...

Страница 97: ...titles or data automatically do not turn the ignition key engine key to OFF Otherwise the title may not be written or the settings may not be changed 2 1 3 Press the 1 THIN or 3 THICK button to make the color of the picture brighter or darker respectively to get your desired colour You can adjust the colour between MIN 15 and MAX 15 When it reaches the minimum or maximum point the display shows MI...

Страница 98: ...the system is inputting the titles or data automatically do not turn the ignition key engine key to OFF Otherwise the title may not be written or the settings may not be changed 3 1 2 5 4 Press the 5 DISPLAY button The Display mode screen is displayed 2 DISPLAY Rotate the rotary encoder and select DIMMER The Function Guide is displayed 3 Press the 3 AUTO button to activate the Auto Dimmer mode In ...

Страница 99: ...nitialize Mode or Display Mode while the system is inputting the titles or data automatically do not turn the ignition key engine key to OFF Otherwise the title may not be written or the settings may not be changed 2 3 1 Press the Function buttons 1 through 6 that has your desired texture The Function buttons have textures colours as follows 2 B GND TEXTURE B GND COLOR MARBLE C1 SKY C2 WOOD C3 GRA...

Страница 100: ... ignition key engine key to OFF Otherwise the title may not be written or the settings may not be changed 3 1 2 4 1 Press the SOURCE button The main menu appears on the display Press the 5 DISPLAY button to activate the Display mode The Display mode screen appears 2 DISPLAY Rotate the rotary encoder and select AUTO B GND The Function Guide is displayed 3 Press the 2 ON button to turn on the Auto B...

Страница 101: ...the monitor displays a normal picture wider to fit in the wide screen monitor by unevenly stretching out The center portion of the picture is stretched out only slightly in order to make the important center portion of the picture look natural In the Mode 3 Cinema the monitor displays a normal picture by stretching out the picture horizontally and vertically This mode is good for displaying a cine...

Страница 102: ... Note Operative only when the video source is DVD AUX1 or AUX 2 To change only the video portion while listening to the current audio source Press the 3 V SEL button to select the video portion Example If a DVD player is connected you can receive the DVD picture sound With the DVD player DVA 5205E connected pressing and holding the V OUT button on the remote control supplied with the DVD player DV...

Страница 103: ...English 210 Other Useful Features Rotate the rotary encoder and select your desired audio source or video source and press the rotary encoder to execute the selection 3 ...

Страница 104: ...l within 2 meters from the IVA C800E 1 Opening the battery cover Slide out the battery cover while firmly pressing outward Replacing the battery Put the batteries in the case as illustrated observing battery polarities 2 Closing the cover Push the cover as illustrated until a click is heard 3 d d e e Remote Control RUE 4185 supplied with IVA C800E Remote Sensor Capteur de télécommande ...

Страница 105: ...er operation 5Band Programme Button Radio Mode BAND Button Press the button and the band will change as shown below Cassette Player Mode Programme Button Press the button to change between the A and B sides of the tape Changer Mode Band Button Switches changers when a Multi Changer Switching device is connected 6Volume Adjustment Buttons To increase the volume level Press the L button To decrease ...

Страница 106: ...e Press the button to advance to the beginning of the next track Cassette Player Mode Press to fast forward the tape Audio Processor Mode Press this button to select the desired Maker Personal settings memolized after pressing the Audio Processor button when an audio processor is Ai NET connected 9 Button Radio Mode Pressing the button will select in descending order stations programmed in the rad...

Страница 107: ...splayed picture is abnormal Le mouvement de l image affichée n est pas normal Temperature in the vehicle is too high Allow the vehicle s interior temperature to cool Unclear or noisy display Affichage pas clair ou bruité Fluorescent plate is worn out Replace the fluorescent plate Unclear picture display Affichage pas clair de l image Fluorescent tube is exhausted Replace the fluorescent tube The f...

Страница 108: ...rea you are in is a primary signal area the antenna may not be grounded and connected properly Check your antenna connections make sure the antenna is properly grounded at its mounting location The antenna may not be the proper length Make sure the antenna is fully extended if broken replace the antenna with a new one Broadcast is noisy Réception parasitée The antenna is not the proper length Exte...

Страница 109: ...is being inserted following instructions in the CD Player Operation section Unable to fast forward or backward the CD Avance rapide ou inversion impossibles a The CD has been damaged Eject the CD and discard it using a damaged CD in your unit can cause damage to the mechanism CD playback sound skips due to vibration Pertes de son dues à des vibrations a Improper mounting of the unit Securely re mo...

Страница 110: ...ult your Alpine dealer Press the magazine eject button and pull out the magazine Check the indication and insert the magazine again If the magazine cannot be pulled out consult your Alpine dealer Magazine ejection not possible Press the magazine eject button If the magazine does not eject see the Owner s Manual for the CD Changer A disc is left inside the CD Changer Press the EJECT button to activ...

Страница 111: ...ifiez l indication et insérez à nouveau le chargeur Si vous ne pouvez pas le sortir consultez votre revendeur Alpine L éjection du chargeur est impossible Appuyez sur la touche d éjection du chargeur Si le chargeur ne peut pas être éjecté reportez vous au mode d emploi du changeur CD Un disque est resté dans le changeur CD Appuyez sur la touche EJECT pour activer la fonction d éjection Quand l éje...

Страница 112: ...5 108 0 MHz Mono Usable Sensitivity Sensibilité utilisable mono KKKKKKKKKKKKKKKKKKKKKKKKKKKKKKKKKKKKKKKKKKKKKKKKKKK 9 3 dBf 0 8 µV 75 ohms 50 dB Quieting Sensitivity Sensibilité à 50 dB RM Ç_ KKKKKKKKKKKKKKKKKKKKKKKKKKKKKKKKKKKKKKKKKKKKKKKKKKKKKKKKKKKKKKKKKKKKKKKKKKKKKKKKKKKKKKKKKKKKK13 5 dBf 1 3 µV 75 ohms Alternate Channel Selectivity Sélectivité de canal altematif KKKKKKKKKKKKKKKKKKKKKKKKKKKKKK...

Страница 113: ...mm 9 16 Depth Profondeur KKKKKKKKKKKKKKKKKKKKKKKKKKKKKKKKKKKKKKKKKKKKKKKKKKKKKKKKKKKKKKKKKKKKKKKKKKKKKKKKKKKKKKKKKKKKKKKKKKKKKKKK 105 mm 4 1 8 Weight Poids KKKKKKKKKKKKKKKKKKKKKKKKKKKKKKKKKKKKKKKKKKKKKKKKKKKKKKKKKKKKKKKKKKKKKKKKKKKKKKKKKKKKKKKKKKKKKKKKKKKKKKKKKKKKKKKKKKK 50 g 1 8 oz GENERAL Power Requirement Alimentation KKKKKKKKKKKKKKKKKKKKKKKKKKKKKKKKKKKKKKKKKKKKKKK 14 4 V DC 11 15 V allowable O...

Страница 114: ...KKKKKKKKKKKKKKKKKKKKKKKKKKKKKKKKKKKKKKKKKKKKKKKKKKKKKKKKKKKKKKKKKKKKKKKKKKKKKKKKK 259 mm 9 13 16 Height Hauteur KKKKKKKKKKKKKKKKKKKKKKKKKKKKKKKKKKKKKKKKKKKKKKKKKKKKKKKKKKKKKKKKKKKKKKKKKKKKKKKKKKKKKKKKKKKKKKKKKKKKKKKKKKKKK 37 mm 1 7 16 Depth Profondeur KKKKKKKKKKKKKKKKKKKKKKKKKKKKKKKKKKKKKKKKKKKKKKKKKKKKKKKKKKKKKKKKKKKKKKKKKKKKKKKKKKKKKKKKKKKKKKKKK 177 5 mm 6 15 16 Notes Due to continuous product i...

Страница 115: ...rezzano Sul Naviglio MI Italy Tel 02 48 47 81 ALPINE ELECTRONICS FRANCE S A R L RCS PONTOISE B 338 101 280 98 Rue De La Belle Etoile Z I Paris Nord Il B P 50016 F 95945 Roissy Charles De Gaulle Cedex France Tel 01 48 63 89 89 ALPINE ELECTRONICS OF U K LTD 13 Tanners Drive Blakelands Milton Keynes MK14 5BU U K Tel 01908 61 15 56 ALPINE ELECTRONICS DE ESPAÑA S A Portal De Gamarra 36 Pabellón 32 0101...

Отзывы: