


33
-EN
10 typical equalizer settings are preset at the factory for a variety of
musical source material.
Setting item:
EQ Presets
Setting contents:
FLAT (Initial setting) / POP / ROCK / NEWS / JAZZ / ELECTRONIC /
HIP HOP / EASY LISTENING / COUNTRY / CLASSICAL
• Only one type can be set to ON.
• When Equalizer Presets is set, the linked Dual HD EQ settings are also
changed. We recommend storing Dual HD EQ settings in a Preset in
advance.
• The Equalizer Presets setting can be configured when Defeat is “Off.”
Parametric Equalizer (Dual HD EQ) can adjust the center frequency/Q
Factor (bandwidth)/level for the front and rear speakers independently.
You can adjust only to the approximate frequency zone, but can then
compensate by performing advanced correction of the sound.
Setting item:
Dual HD EQ
• When the Defeat setting is “On,” you cannot perform the set up.
• When “BASS ENGINE SQ” is selected in the Shortcut Setup, this setting
is disabled.
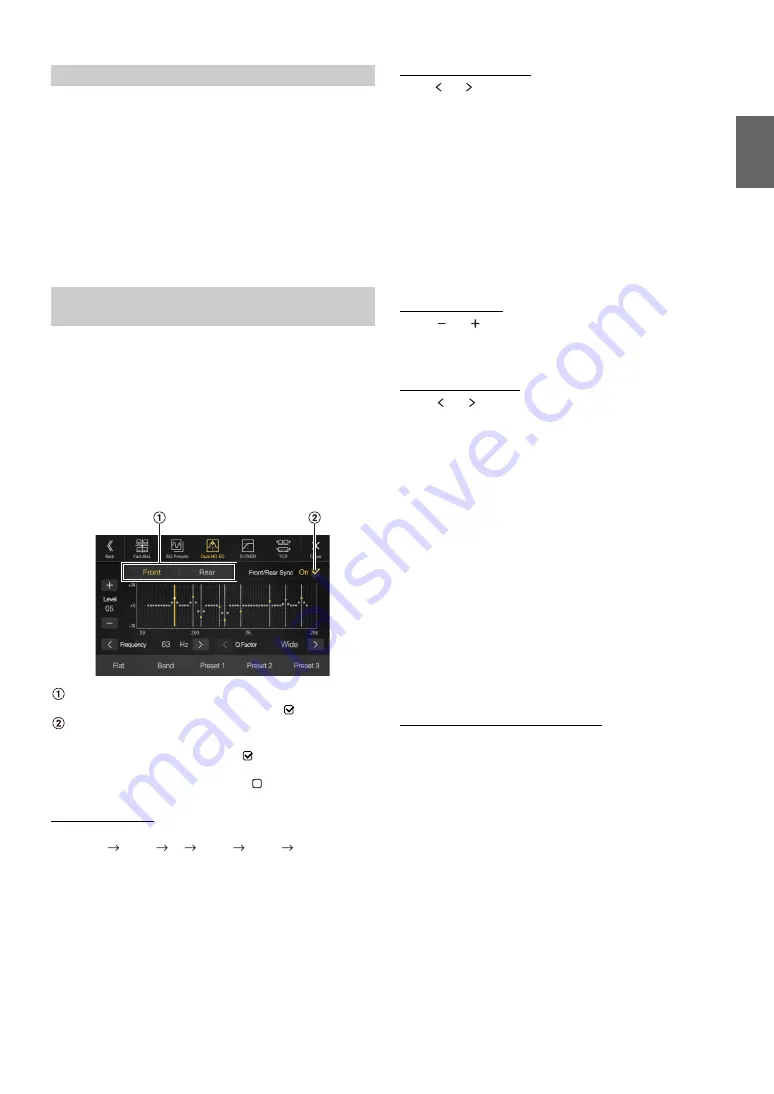
1
Adjust the Dual HD EQ to your preference.
Front/Rear speaker switching button
Not displayed when Front/Rear Sync is ”On” (
).
Front/Rear speaker interlock button
Adjusting the Band
Touch
[Band]
to select the band to be adjusted.
Band1
Band2
•••
Band8
Band9
Band1
• You can select a band directly by touching the screen.
Adjusting the Frequency
Touch
[ ]
or
[ ]
of “Frequency” to adjust the frequency of the
selected band.
Adjustable frequency bands:
20 Hz to 20 kHz (in 1/3 octave steps)
Adjusting the Level
Touch
[
]
or
[
]
of “Level” to adjust the level of selected band.
Setting contents:
-14 to +14 (Initial setting: 0)
Setting the Bandwidth
Touch
[ ]
or
[ ]
of “Q Factor” to select the bandwidth.
Setting contents:
Wide (Initial setting) / Medium / Narrow
2
To adjust another band, repeat step 1, and adjust all
bands.
3
To store the adjusted setting value, touch and hold
[Preset 1]
,
[Preset 2]
, or
[Preset 3]
for at least 2 seconds.
• Band2 and Band8 are the same as the Bass and Treble controls.
• For details on setting Bass and Treble, see “Adjusting Bass Level/Treble
• Settings exceeding the frequency of adjacent bands are not available.
• While adjusting the Dual HD EQ, you should consider the frequency
response of the connected speakers.
• When the Dual HD EQ is adjusted, the Equalizer Presets are
overridden.
• When Equalizer Presets is set, the linked Dual HD EQ settings are also
changed. We recommend storing Dual HD EQ settings in a Preset in
advance.
• Touch
[Flat]
to initialize all values.
Calling the Dual HD EQ adjusted value
Calling the pre-set Dual HD EQ adjusted value.
Touch
[Preset 1]
,
[Preset 2]
, or
[Preset 3]
on the Dual HD EQ
screen.
The setting stored in the Preset will be recalled.
Equalizer Presets
Adjusting the Parametric Equalizer Curve
(Dual HD EQ)
On:
When you want the Front and Rear speakers to have the
same setting, set to ”On” (
).
Off:
When you want to set the Front and Rear speakers
independently, set to ”Off” (
).
Band1:
20 Hz~100 Hz (63 Hz)
Band2:
63 Hz~315 Hz (125 Hz)
Band3:
125 Hz~500 Hz (250 Hz)
Band4:
250 Hz~1 kHz (500 Hz)
Band5:
500 Hz~2 kHz (1 kHz)
Band6:
1 kHz~4 kHz (2 kHz)
Band7:
2 kHz~7.2 kHz (4 kHz)
Band8:
5.8 kHz~12 kHz (8 kHz)
Band9:
9 kHz~20 kHz (16 kHz)
Содержание INE-W987HD
Страница 163: ...User Manual Alpine Navigation System Navigation software for the Alpine Navigation System English January 2019 Ver 3 0...
Страница 174: ...12...
Страница 238: ...76...
Страница 259: ......
Страница 260: ...Ill...


