background image

45

-EN

To prevent noise/interference in the audio system.

Locate the unit and route the leads at least 10 cm away from the car harness.

Keep the battery power leads as far away from other leads as possible.

Connect the ground lead securely to a bare metal spot (remove any paint, dirt or grease if necessary) of the car chassis.

If you add an optional noise suppressor, connect it as far away from the unit as possible. Your Alpine dealer carries various noise
suppressors, contact them for further information.

Your Alpine dealer knows best about noise prevention measures so consult your dealer for further information.

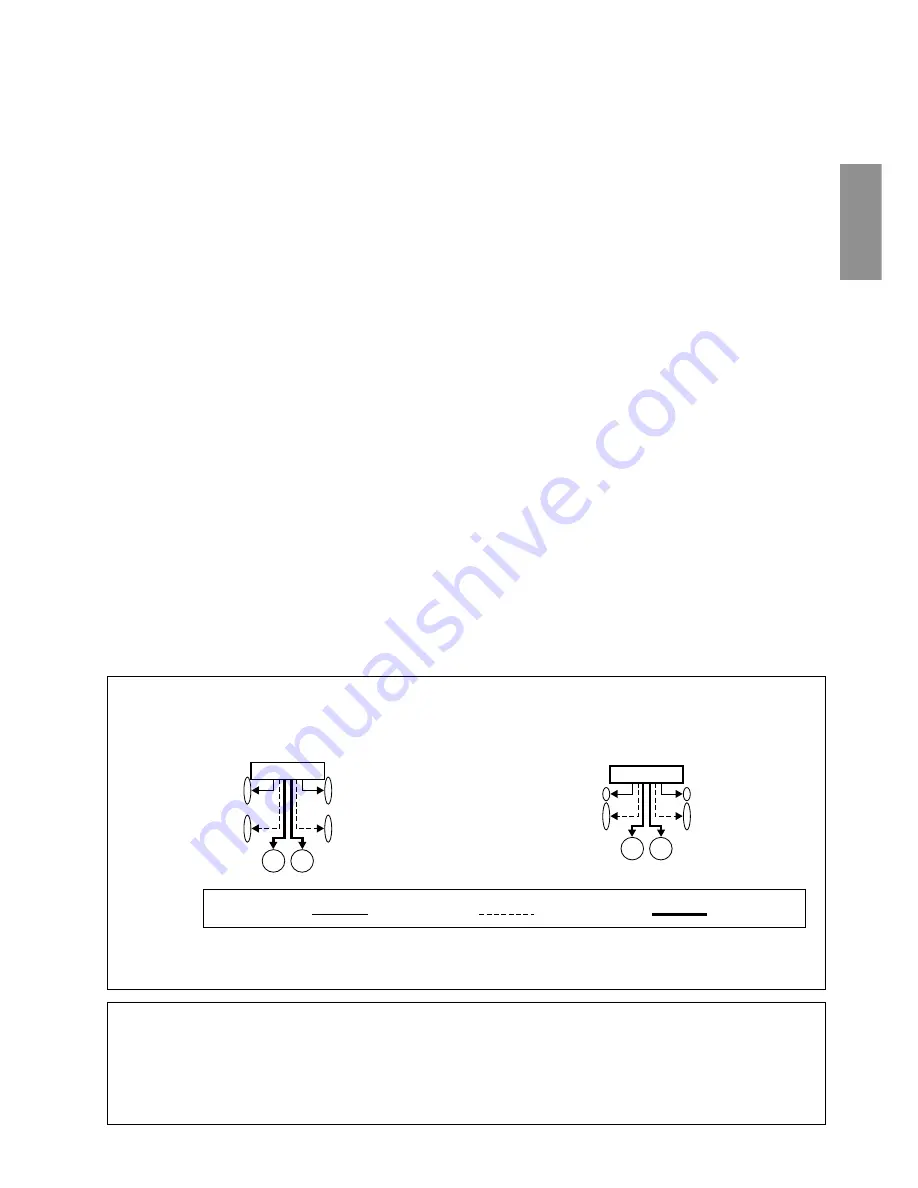
The X-Over Switch position for a two-way system
(frequency range is divided between highs for front/rear and
lows for the Subwoofer).

The X-Over Switch position for a three-way system whose
frequency range is divided among the highs (Front), mids
(Rear), and lows (Subwoofer).

Use the SUB-W output cord to connect the unit to the low range speaker.

You can use the built-in amplifier to output the front output/rear output.

You cannot adjust the fader when set to 3WAY.

The position of the X-Over switch : F/R/Sub-W

The position of the X-Over switch: 3WAY

Output of this unit :

 Front output

 Rear output

 SUB-W output

High range
speaker (L)

Mid range
speaker (L)

High range
speaker (R)

Mid range
speaker (R)

Low range
speaker (L)

Low range
speaker (R)

Front high range
speaker (L)

Rear high range
speaker (L)

Front high range
speaker (R)

Rear high range
speaker (R)

Low range
speaker (L)

Low range
speaker (R)

1

Antenna Receptacle

Connect to the supplied ISO antenna convertor plug.

2

Audio Interrupt In Lead (Pink/Black)

Connect this lead to the Audio Interface output of a cellular
phone which provides ground shorting when a call is
received.

3

Remote Turn-On Lead (Blue/White)

Connect this lead to the remote turn-on lead of your
amplifier or signal processor.

4

Dimmer Lead (Orange)

This lead may be connected to the vehicle’s instrument
cluster illumination lead. This will enable the vehicle’s
dimmer control to dim the backlighting of the unit.

5

Switched Power Lead (Ignition) (Red)

Connect this lead to an open terminal on the vehicle’s fuse
box or another unused power source which provides (+) 12V
only when the ignition is turned on or in the accessory
position.

6

Power Antenna Lead (Blue)

Connect this lead to the +B terminal of your power antenna,
if applicable.

This lead should be used only for controlling the vehicle's power
antenna. Do not use this lead to turn on an amplifier or a signal
processor, etc.

7

Choke Coil with Fuse Holder (20A)

8

Battery Lead (Yellow)

Connect this lead to the positive (+) post of the vehicle's
battery.

9

ISO Power Supply Connector

!

Ground Lead (Black)

Connect this lead to a good chassis ground on the vehicle.
Make sure the connection is made to bare metal and is
securely fastened using the sheet metal screw provided.

"

Ai-NET Connector

Connect this to the output or input connector of other
product (CD changer, Equalizer, etc.) equipped with Ai-
NET.

#

System Switch

When connecting a processor using Ai-NET, place this
switch in the EQ/DIV position. When no device is
connected, leave the switch in the NORM position.

• Be sure to turn the power off to the unit before changing the switch

position.

$

Setting the 3WAY/2WAY switch

Set the 3way/2way Switch according to your audio system.

%

Power Supply Connector

&

ISO Connector (Speaker Output)

(

Left Rear (+) Speaker Output Lead (Green)

)

Left Rear (–) Speaker Output Lead (Green/Black)

~

Left Front (+) Speaker Output Lead (White)

+

Left Front (–) Speaker Output Lead (White/Black)

,

Right Front (–) Speaker Output Lead (Grey/Black)

-

Right Front (+) Speaker Output Lead (Grey)

.

Right Rear (–) Speaker Output Lead (Violet/Black)

/

Right Rear (+) Speaker Output Lead (Violet)

:

Remote Control Interface Connector

To remote control interface box.

;

Ai-NET Cable (Included with CD Changer)

<

Front Output RCA Connectors

RED is right and WHITE is left.

=

Rear Output RCA Connectors

RED is right and WHITE is left.

>

Subwoofer Output RCA Connectors

RED is right and WHITE is left.

?

RCA Extension Cable (Sold Separately)

Содержание CDA-9811R

Страница 1: ...ICA INC 19145 Gramercy Place Torrance California 90501 U S A Phone 1 800 ALPINE 1 1 800 257 4631 ALPINE ELECTRONICS OF CANADA INC 7300 Warden Ave Suite 203 Markham Ontario L3R 9Z6 Canada Phone 1 800 A...

Страница 2: ...e tama o reducido con un CD R RW PLAY BACK I caricatori CD Alpine danno di pi Pi scelta pi versatilit pi comodit Il modello CHA S634 un caricatore a 6 dischi ad elevate prestazioni dotato di un nuovo...

Страница 3: ...h concerning MP3 WMA 15 Quick Search 15 About MP3 WMA 15 Sound Setting Adjusting Balance Between Left and Right Fader Between Front and Rear Defeat 17 Setting the Bass Control CDA 9812RX CDA 9811R onl...

Страница 4: ...ervice 29 Changing the Service Component 29 Memorizing the Service 30 Receiving the Memorized Service 30 Memorizing the Ensemble Automatically 30 PTY Programme Type Tuning 30 Turning ON OFF Traffic Ne...

Страница 5: ...OT PLACE HANDS FINGERS OR FOREIGN OBJECTS IN INSERTION SLOTS OR GAPS Doing so may result in personal injury or damage to the product CAUTION This symbol means important instructions Failure to heed th...

Страница 6: ...e than one disc Make sure the label side is facing up when you insert the disc Your player will automatically eject any disc that is inserted incorrectly If the player continues to eject a correctly i...

Страница 7: ...CD RWs CD ReWritable for audio use on this unit You can also play CD Rs CD RWs containing MP3 WMA formatted audio files Some of the following CDs may not play on this unit Flawed CDs CDs with fingerpr...

Страница 8: ...r object away from the display while it is opening or closing to avoid damage or injury The back of the movable display will get very warm under normal operating conditions This is not a malfunction D...

Страница 9: ...ully holding the sides of the front panel to avoid pushing buttons by mistake Changing the Audio Level Display Pattern CDA 9815RB CDA 9813R CDA 9812RX only You can select the Audio Level display from...

Страница 10: ...tations are stored the tuner will return to the original station you were listening to before the auto memory procedure began Tuning to Preset Stations 1 Press BAND TEL repeatedly until the desired ba...

Страница 11: ...s RDS Setting RDS Reception Mode and Receiving RDS Stations The RDS Radio Data System is a radio information system using the 57 kHz subcarrier of regular FM broadcast The RDS allows you to receive a...

Страница 12: ...ss and hold F SETUP for at least 3 seconds 2 Press g or f to select PI SEEK CDA 9811R PISK 3 Press BAND TEL to toggle the mode between PI SEEK ON CDA 9811R PISK ON and PI SEEK OFF CDA 9811R PISK OFF 4...

Страница 13: ...rmation While Playing CD or Radio 1 Press T INFO so that the underlined portion of the T INFO indicator lights up Only the upper lined portion of the T INFO indicator for CDA 9813R CDA 9812RX 2 Press...

Страница 14: ...ry perform the step 3 To disable the PRIORITY PTY function press and hold 2 P PTY for at least 2 seconds In the PRIORITY PTY function unlike in the T INFO function the volume does not increase during...

Страница 15: ...EARCH 6 8 9 4 5 SOURCE POWER 3 Press g or f to select the desired track file Returning to the beginning of the current track file Press g Fast backward Press and hold g Advancing to the beginning of t...

Страница 16: ...UNC indicator only underlined portions of the FUNC indicator are illuminated for CDA 9811R and go to the step above within 5 seconds A disc that contains more than 40 tracks may not be correctly playe...

Страница 17: ...r free or for a fee without permission of the copyright holder is strictly prohibited by the Copyright Act and by international treaty What is MP3 MP3 whose official name is MPEG Audio Layer 3 is a co...

Страница 18: ...plays the files in the order that the writing software writes them Therefore the playing order may not be the same as the order you input The playback order of the folders and files is as follows How...

Страница 19: ...BASS 2 1 2 Setting the bass centre frequency Press g or f to select the desired bass centre frequency 60Hz 70Hz 80Hz 90Hz 100Hz 130Hz 150Hz 200Hz 60Hz The displayed bass frequency is emphasized 2 2 2...

Страница 20: ...page 7 Setting the Treble Control CDA 9812RX CDA 9811R only You can change the Treble Frequency emphasis to create your own tonal preference 1 Press CENTER f to select the Treble treble centre freque...

Страница 21: ...page 7 Recalling the Stored Equalizer Curve CDA 9815RB CDA 9813R only 1 Press EQ to select EQ mode 2 Press and hold EQ for at least 2 seconds 3 Press any one of the preset buttons 1 through 6 to activ...

Страница 22: ...ot be set for the HIGH slope 5 Turn the Rotary encoder to select the desired output level Adjustable output level 12 to 0 dB HPF high pass filter Cuts the lower frequencies and allows the higher frequ...

Страница 23: ...store the adjusted contents 1 Press and hold any one of the preset buttons 1 through 6 for at least 2 seconds into which you wish to store the adjusted contents 6 For setting another channel repeat t...

Страница 24: ...ct the Bass Focus mode Bass Focus mode Time correction mode normal mode Bass Focus mode 2 Press BAND TEL to select the speakers to be adjusted see below 3 Turn the Rotary encoder to adjust the delay s...

Страница 25: ...you want to apply MX Media Xpander 3 Press and hold MX for at least 2 seconds to activate the level setting mode 4 Turn the Rotary encoder to select your preferred level or OFF FM MX level 1 to 3 The...

Страница 26: ...n the CD contains no Text data 3 ID3 tag WMA tag If an MP3 WMA file contains ID3 tag WMA tag information all the ID3 tag WMA tag information is displayed e g track name artist name and album name All...

Страница 27: ...for 5 seconds to show the operation before returning to Blackout mode To cancel Blackout mode press and hold DISP B OUT CDA 9815RB CDA 9813R CDA 9812RX or MUTE B OUT CDA 9811R for at least 3 seconds A...

Страница 28: ...cally disappear if no operation is performed for 5 seconds 4 Turn the Rotary encoder to select DOWNLOAD and then press the Rotary encoder to start Data downloading starts The file currently shown in t...

Страница 29: ...nd you change to Normal mode Subwoofer On and Off SUB W ON Initial setting SUB W OFF When the subwoofer is on perform the steps below to adjust the subwoofer output phase and level 1 Press the Rotary...

Страница 30: ...rast for better visibility You can adjust in a range of 6 and 6 The initial setting at the factory is 0 Demonstration DEMO ON DEMO OFF Initial setting This unit has a Demonstration feature which simul...

Страница 31: ...n the display is changed to the Dynamic Label after receiving the broadcasting station Frequency Display the frequency of received stations are displayed To switch the frequency display on the CDA 981...

Страница 32: ...emble Automatically 1 Press BAND TEL to select the band that you want to receive 2 Press and hold TUNE A ME for at least 2 seconds The ensemble is searched for and six ensembles are automatically rece...

Страница 33: ...B mode to receive the Alarm Announcement If you adjust the volume level at this time that volume level is memorized and that volume level is applied the next time you receive an urgent broadcast If th...

Страница 34: ...omatically change to the RDS station a station that can be received within the same broadcasting station until good reception is achieved You can switch this for voice only except Service label Dynami...

Страница 35: ...table telephone will be turned on Even if the ACC power of the vehicle is turned off even if the engine is stopped during a hands free call the call is not disconnected and an ordinary call by the por...

Страница 36: ...etrieving an addressee by Alphabetic Sort List 3 When displaying the Alphabetic Sort List turn the Rotary encoder or press g or f to select the addressee 4 Press J or Rotary encoder to place a call 5...

Страница 37: ...to 12 respectively SOURCE POWER BAND TEL Select buttons 1 through 6 Playing MP3 Files with the CD Changer Optional If you connect a changer compatible with MP3 you can play CD ROMs CD Rs and CD RWs c...

Страница 38: ...g this button will select in descending order stations programmed into the radio s presets as shown below 6 5 1 6 CD Changer mode DISC Select DN button Press this button to select a disc in descending...

Страница 39: ...structions the unit will not operate with the vehicle s ignition off Improper power lead connections Check power lead connections Blown fuse Check the fuse on the battery lead of the unit replace with...

Страница 40: ...rted NO DISC is displayed and the unit does not start to play or eject the disc Remove the disc by following these steps 1 Press the c button The movable display will open 2 Press the c button again f...

Страница 41: ...dB Channel Separation 85 dB at 1 kHz PICKUP Wave length 795 nm Laser power CLASS I REMOTE CONTROL CDA 9815RB CDA 9813R CDA 9812RX only Battery Type AAA sized dry battery Battery Quantity 2 Dimensions...

Страница 42: ...parts may damage this unit internally or may not securely install the unit in place This may cause parts to become loose resulting in hazards or product failure ARRANGE THE WIRING SO IT IS NOT CRIMPE...

Страница 43: ...ds of the CDA 9815RB CDA 9813R CDA 9812RX CDA 9811R according to details described in the CONNECTION section For the screw provide a proper screw to the chassis installing location 3 Slide the CDA 981...

Страница 44: ...ht CD Changer Sold Separately Rear Right Rear Left Front Right Front Left Speakers Speakers Front Right 1 The label is attached on the bottom of the unit Pink Black AUDIO INTERRUPT IN Blue White REMOT...

Страница 45: ...nal of your power antenna if applicable This lead should be used only for controlling the vehicle s power antenna Do not use this lead to turn on an amplifier or a signal processor etc 7 Choke Coil wi...

Страница 46: ...ower antenna Battery CD Changer Sold Separately Rear Right Rear Left Front Right Front Left Speakers 1 The label is attached on the bottom of the unit Pink Black AUDIO INTERRUPT IN Blue White REMOTE T...

Страница 47: ...o the vehicle s instrument cluster illumination lead This will enable the vehicle s dimmer control to dim the backlighting of the unit 5 Switched Power Lead Ignition Red Connect this lead to an open t...

Страница 48: ......

Отзывы: