-The appliance requires suitable ventilation in
order to work properly. Leave a space of 30cm
between walls or other obstacles and 10cm
from the floor.
-Do not cover or obstruct any of the openings of
the appliance.
-The plug must be easily accessible so it can be
disconnected in an emergency.
-
To achieve the highest efficiency from the
appliance it should be situated in a place where
the atmospheric temperature is between 12
and 32ºC.
-
To achieve the highest efficiency from the
appliance and so as to be able to install the
appliance on a cold wall (an exterior wall)
and below a window. But never obstructing or
covering a ventilation area.
-The appliance should work well with its wall
support attached or with its wheels attached.
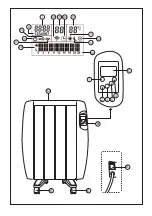
-The appliance has a wall bracket (F) which
must be fixed to the wall.
-Ensure that the appliance is properly and safe-
ly fixed in his working position with screws. To
avoid damaging the appliance, on recommend
to use only the holes specifically made by the
manufacturer.
ASSEMBLING THE WALL BRACKET:
-The appliance has a wall bracket (F) on which
it can be supported.
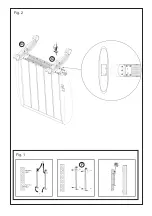
-Taking into account the separation distances
mentioned above, place the wall support in the
required position and mark the drilling points
on the wall (Fig.1).
-Drill into the wall where you marked and insert
the rawlplugs.
-Place the support by matching the holes with
the rawlplugs and screw them in firmly.
-
Make sure that the bracket is firmly fixed; it
should be able to support twice the weight of
the appliance.
-Fit the appliance into the wall support.
FITTING THE BASE WHEELS:
-To assemble the base wheels, place the appli-
ance face down.
-Position the wheels’ support on the base of the
body using the screws provided (G)(Fig.2)
-Stand the appliance up again so as to check
that the wheels work properly.
INSTRUCTIONS FOR USE
BEFORE USE:
-Make sure that all products’ packaging has
been removed.
-Some parts of the appliance have been lightly
greased. Consequently, the first time the ap
-
pliance is used a light smoke may be detected.
After a short time, this smoke will disappear.
-
To eliminate the smell given off by the applian
-
ce when used for the first time, it is recommen
-
ded to have it on at full power for 2 hours in a
well-ventilated room.
-Prepare the appliance according to the function
you wish to use.
WIFI CONNECTION & DOWNOADING THE
APP:
-To be able to use the thermal transmitter
Malbork Connect from anywhere, the Taurus
Connect App has to be downoalded.
SET UP:
-Download the Taurus Connect App form the
App Store or Google Play.
-Sign up using your email address and pass-
word.
-
Confirm the registration using the verification
code that will be sent to your email account.
-Create your home, name it, establish the geo-
graphical location and select the room where
you are going to place this smart appliance.
-Add Malbork Connect by following the steps
described in THE QUICK GUIDE.
IMPORTANT
-The device only supports 2.4GHz Wi-Fi net-
work.
-If the connection fails again, check the follo-
wing possible causes
-Malbork Connect is too far away from the
router.
-The Wi-Fi password is incorrect.
-The Wi-Fi network is not 2.4GHz
USE:
-Extend the cable completely before plugging
it in.
-Connect the appliance to the mains.
-Power the appliance on, by using the power
switch (A).
Содержание taurus MALBORK CONNECT 1200
Страница 2: ...A B C D E E 1 2 3 5 4 I XI III XII IV V VII VI XIV II IX VIII X XIII ...
Страница 3: ...Fig 1 F G G Fig 2 ...
Страница 70: ......
Страница 71: ......
Страница 72: ...Avda Barcelona s n 25790 Oliana Spain 26 10 2021 ...


